

Wondering what Connections are? Let's discover what this concept is together right here.
See at a glance all your connections
In the PIM, you can easily see all its connections to third-parties, such as ERPs, DAMs, ecommerce platforms, syndication tools,...
To do so, click on the System menu and then, on the Connections submenu.
The following screen should be displayed.
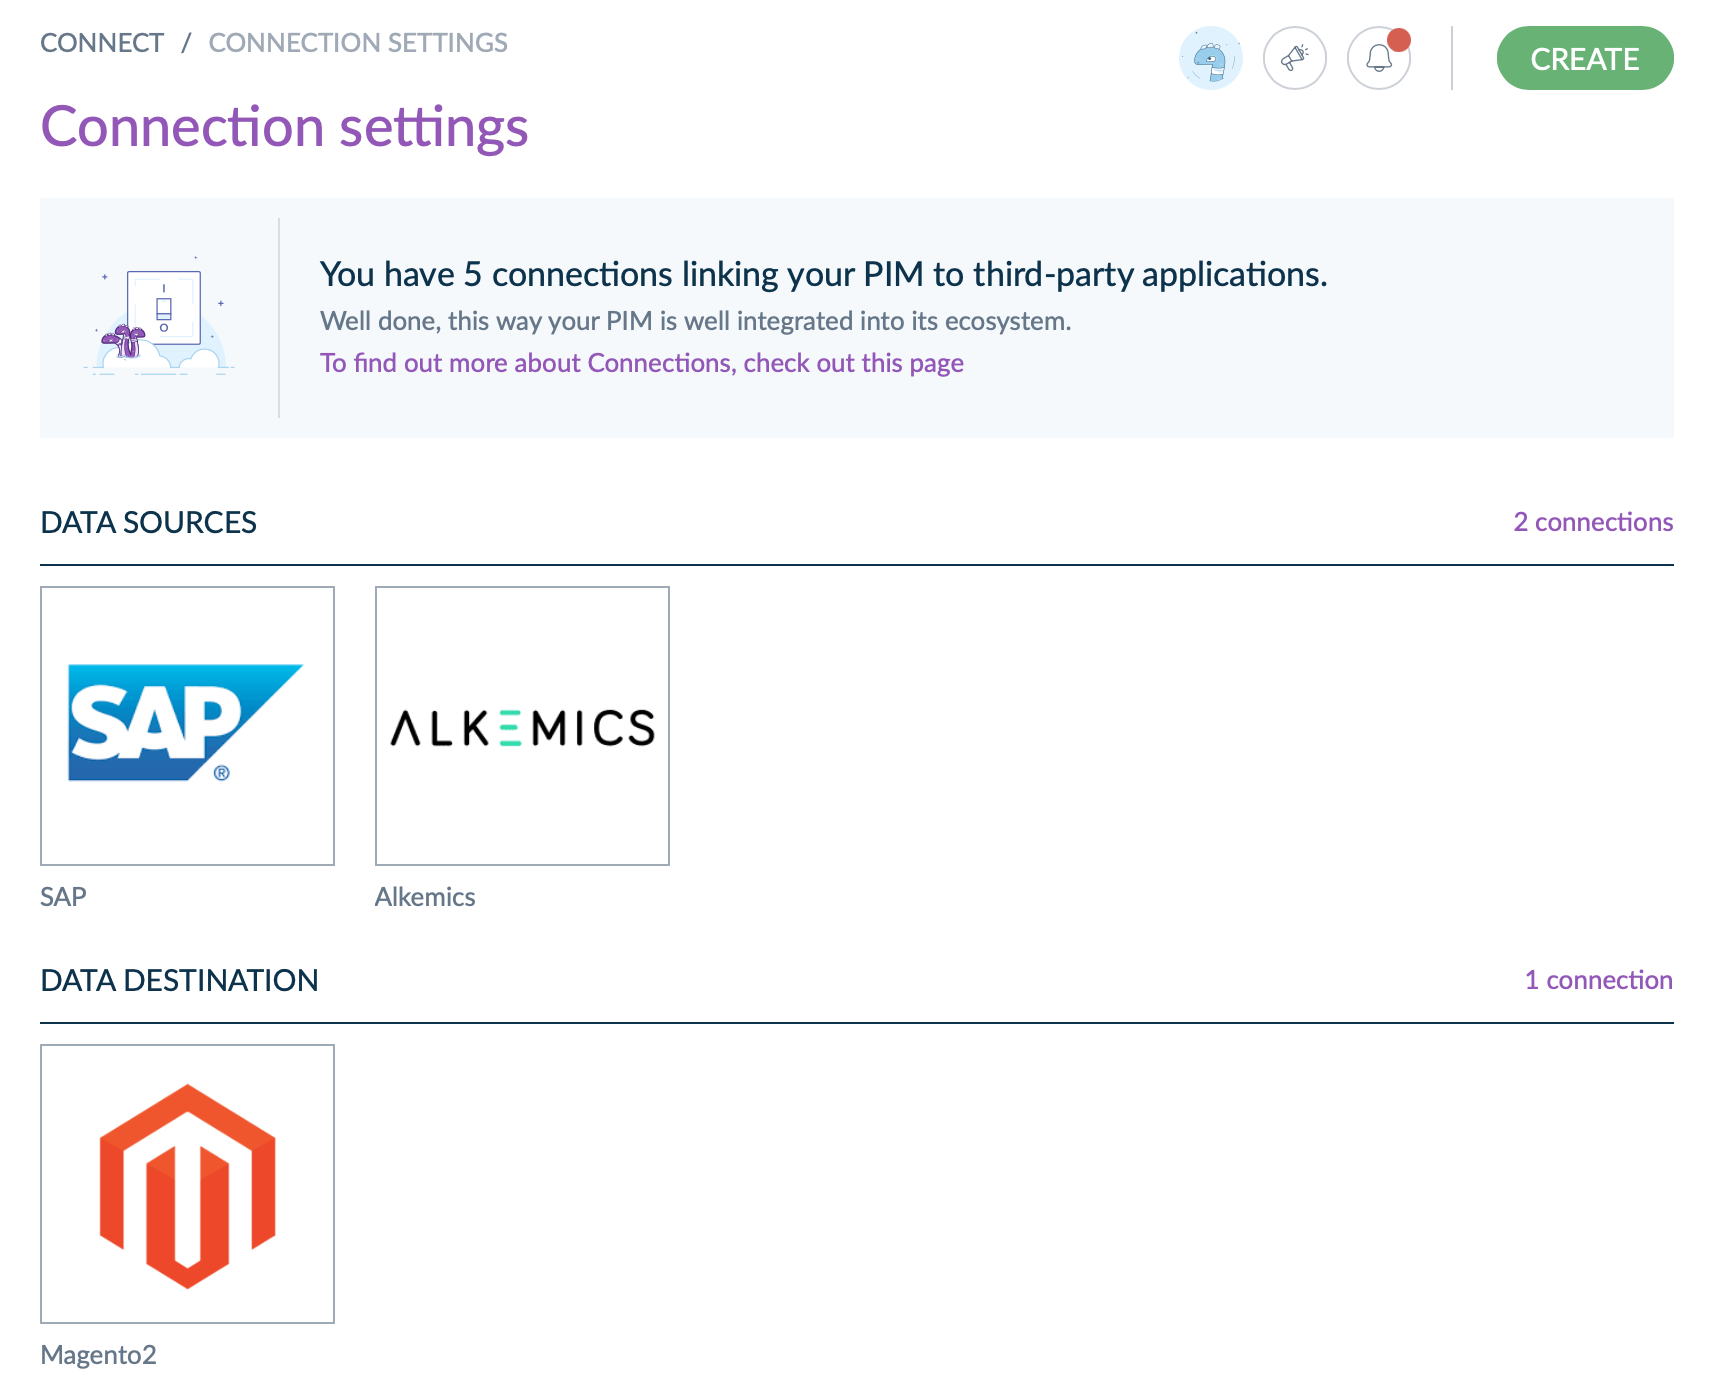
As an example, here, we have 3 connections around this PIM:
- 2 source connections: an ERP and a retail collaboration platform,
- one destination connection: an e-commerce platform.
Those 3 third-parties are either sending or receving information to/from the PIM.
There is no connection declared here yet? Discover what a connection is here and then don't hesitate to create a new one! 😉
Create a connection
To connect your PIM to a third-party solution, you will need to create a connection.
You can connect up to 50 third-parties through connections and connected Apps. 🚀
Here are the simple steps to create a connection:
- Click on Connect.
- Then on Connection settings.
- Click on Create.
- In the Label field, enter the name of your connector. For example, if you wish to connect your PIM to Magento, write Magento or Magento connector.
Sidenote: the code of the connection is automatically generated based on the label. You can keep it as is or change it, it's up to you! - Choose the flow type of your connection. To choose wisely, see the section below.
You're done! 🎉
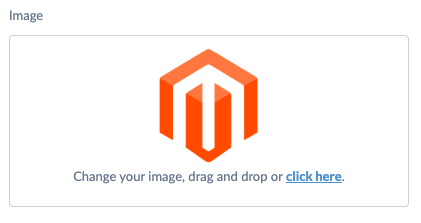
Once your connection is created, you'll be able to assign it a visual in order to easily see which connection it refers to. For example, if your connection represents your connection to Magento, you may want to put a picture of the Magento logo, exactly like in the screenshot below.
After creating the connection, you'll also be given a set of credentials to authenticate your connector. See this section, to know more.
Choose your flow type
When you create or update a connection, you have to define a "flow type". But what does it mean?
The flow type is a central concept in the connection notion. It allows you to characterize the data flows that will interact with your PIM. More precisely it allows indicating the direction of a given flow.
It will determine the way your connection flows are monitored in the connection dashboard feature.
This flow type has three available options you'll have to choose from. The next sections describe each of them. It will help make your decision.
The Source connection flow type
Choose this option for your connection whenever it represents a data flow entering the PIM. For example, your data flow mainly creates or updates PIM data, such as products, product models, assets, reference entities,...
With this flow type, you can connect your ERP, DAM, MDM, etc.
If you choose this option, the Data flows dashboard will focus on the data that is pushed inside the PIM via this connection.
The Destination connection flow type
Choose this option for your connection whenever it represents a data flow that mainly extracts product information from your PIM.
With this flow type, you can connect e-commerce platforms, publishing and syndication tools...
If you choose this option, the Data flows dashboard will focus on the data that is pushed outside the PIM via this connection.
The Other flow type
Choose this option whenever you can't opt for none of the options above.
Try avoiding choosing this option. Indeed, you won't have any connection monitoring for your Others connections, as we can't know what is the direction of your flows in this connection.
You may be tempted to declare the connections connecting to translation tools as Others. Indeed, in this case, product information in one language is being retrieved from the PIM to be translated. Then, once the translation is done, the translated product information is pushed back in the PIM. So, it is both a Source and a Destination connection.
That being said, even in this case, we advise you to choose between the two options, instead of choosing Others. The question you should ask yourself here is "Do I wish to have a monitoring of the flows that are going out or the flows that are going in?".
Enable the tracking
For each connection, you can choose whether you want to track it in the connection dashboard.
To do so, select the Track in the connection dashboard checkbox, in the connection setting screen of the connection you want to track.

Others connections can't be tracked. Indeed, we wouldn't know what to track about them.
If you want to track the data entering your PIM, change your connection flow type to Source.
If you want to track the data that is pulled out of the PIM by your connector, change your connection flow type to Destination.
You can deactivate the tracking whenever you want.
We will stop tracking the connection immediately and you won't be able to select it in the filters of the connection dashboard. However, note that all the data collected up to that point for this connection will still appear in some KPIs.
Grab your credentials
Whenever you create a connection, the PIM automatically generates a set of credentials for you. These credentials are necessary if you want to make any API calls to the PIM. Don't hesitate to learn more about the authentication over the API in our dedicated API website.
These credentials consist of 4 different strings:
- the
client id, - the
secret, - the connection
username, - the connection
password.
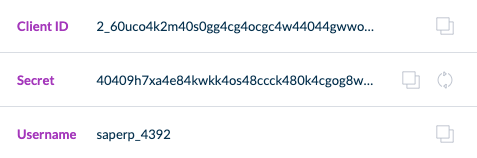
To access the client id, the secret and the username, go to System / Connections, click on the connection for which you want to see the credentials. They are displayed on the right side of the screen in the Credentials column.
You can easily copy/paste the credentials by clicking on the button next to them.
The password is only showed once to you, just after the connection creation. So, make sure you save it somewhere.
When the password is visible, there is a copy icon next to it for easy copy-paste. 😉
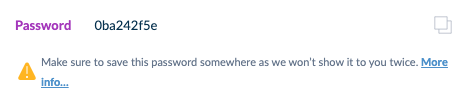
You forgot your password? Don't worry, you can regenerate a new one. Take a look at the Regenerate your connection password section.
Use these credentials to authenticate the API calls in the connector that matches your connection. For this step, take a look at this guide.
Why should you use the connection username?
You may have noticed that nothing prevents you from using another username than the one generated for you when your connection is created. It's totally possible but it's, in fact, not recommended at all!
Instead, we highly recommend using the connection username to authenticate all the API calls coming from the connector linked to your connection.
Here are the 2 main reasons why:
- First, all the permissions set on your connection are based on the connection username. So if you don't use it, your permission connection won't be enforced.
- The connection monitoring in the dashboard is also based on the connection username. So if you want to benefit from this feature, use this username to authenticate your API calls.
Revoke/regenerate your connection secret
In some cases, your connection secret may have leaked and fallen into the wrong hands. So you want to revoke this secret, to avoid enabling these "wrong hands" to access your PIM via the API.
Along with the secret revocation, the PIM will automatically regenerate a new secret for you.
Here are the simple steps to go through to revoke your secret:
- Click on the
Systemmenu. - Click on the
Connectionssubmenu. - Click on the connection for which you want to revoke the secret.
- In the
Credentialssection, on the right side of theSecretline, click on the regenerate icon button.
- A popin asks you for confirmation. Click on the
Regeneratebutton.
The current secret will be revoked. It means that no one will be able to use it anymore to authenticate their API calls.
Also, a new secret has been generated. Be sure to use this new one in your connector, in order to be able to make API calls again.
As you may have understood, revoking a secret can have an impact on the connector linked to your connection. Indeed, when you revoke a secret that is used by one of your connectors, all its API calls will automatically stop working and send 401 errors instead. You won't be authenticated anymore.
To be authenticated again, launch a new authentication request using the new generated secret.
Don't really know how the authentication via API works? Don't worry, there is documentation to help you! It's right here!
Regenerate your connection password
The PIM shows you the connection password only once, at the connection creation. In case you may have forgotten it, you can regenerate a new one.
Here's how:
- Click on the
Systemmenu. - Click on the
Connectionssubmenu. - Click on the connection for which you want to revoke the password.
- In the
Credentialssection, on the right side of thePasswordline, click on the regenerate icon button.
- A popin asks you for confirmation. Click on the
Regeneratebutton.
The current password will be deleted and a new one is generated. It means that no one will be able to use it anymore to authenticate their API calls.
Be sure to use the new password in your connector, in order to be able to make API calls again.
As you may have understood, regenerating a password can have an impact on the connector linked to your connection. Indeed, when you regenerate a password that is used by one of your connectors, all its API calls will automatically stop working and send 401 errors instead. You won't be authenticated anymore.
To be authenticated again, launch a new authentication request using the new generated password.
Don't really know how the authentication via API works? Don't worry, there is documentation to help you! It's right here!
Set the permissions
For each connection, you can define a set of permissions that can restrict the access to:
- some API endpoints. In this case, those permissions are defined thanks to your connection user role.
- some parts of your product catalog. In this case, those permissions are enforced thanks to the connection user group. Note that they are only available in the Enterprise Edition.
Configure the connection user role
For each connection, you can define a user role. This user role should be first created in the User role screens.
By default, your connection is created with the User user role. You may want to change that as this user role is quite generic and may not assign the desired permissions to your connection.
We strongly recommend you to create one dedicated user role for your connections, different from the user roles that you use for your UI users. It's even better if you create one user role for every connection you will need, as it will allow you to fine tune what each connection will be able to access. 😉
Also, we don't recommend giving UI permissions to your connection user roles.
To create a user role and link it to your connection:
- Click on the
Systemmenu. - Click on the
Rolessubmenu. - Click on the
Create rolebutton. - In the form that appears, give a name to your user role,
My Magento user rolefor example. - Click on the
Web API permissionstab and selectOverall Web API access. - You can also select other accesses in the list below depending on what you want your connection to be able to achieve.
- Save your configuration by clicking on the
Savebutton. - Click on the
Connectionssubmenu. - Click on the connection for which you want to set the permissions.
- On the right side of the screen, there is a
Permissionssection. Select the user role you've just created in theRoledropdown.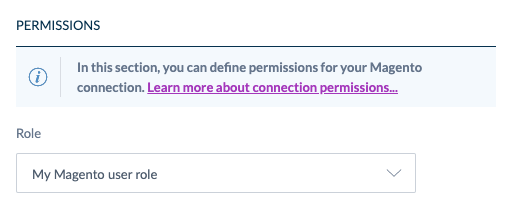
- Don't forget to save by clicking on the
Savebutton.
Configure the connection user group
For each connection, you can define a user group. This user group should be first created in the User group screens.
By default, your connection is created with the All user group. You may want to change that as this user group is quite generic and may not assign the desired permissions to your connection.
We strongly recommend you to create one dedicated user group for your connections, different from the user groups that you use for your UI users. It's even better if you create one user group for every connection you will need, as it will allow you to fine tune what each connection will be able to access. 😉
To create a user group and link it to your connection:
- Click on the
Systemmenu. - Click on the
User groupssubmenu. - Click on the
Create groupbutton. - In the form that appears, give a name to your user group,
My Magento user groupfor example. - Save by clicking on the
Savebutton. - Click on the
Connectionssubmenu. - Click on the connection for which you want to set the permissions.
- On the right side of the screen, there is a
Permissionssection. Select the user group you've just created in theGroupdropdown.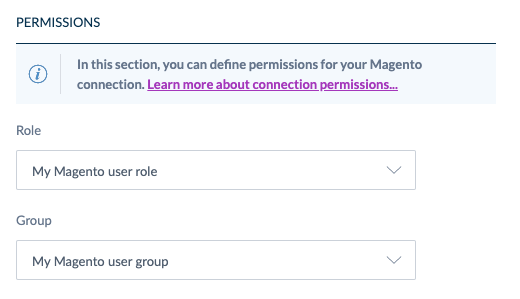
- Don't forget to save by clicking on the
Savebutton.
By default, the user group you've just created does not give any rights to the catalog. So it's perfectly normal if you receive no products when you ask for products via the API using the connection credentials.
To be able to view the catalog, you will need to give permissions to your connection user group. Here is the documentation to help you in this task.
Delete a connection
If you created a connection you don't want to use anymore, you can delete it.
- Click on the
Systemmenu. - Click on the
Connectionssubmenu. - Click on the connection you want to delete.
- Click on the
...in the top right corner of your screen. - Click on the
Deleteoption.
- A popin asks you for confirmation. Click on the
Deletebutton.
As a result, your connection will be deleted. It means that:
- you won't be able anymore to follow its data flows inside the connection dashboard,
- the credentials that were generated with the connection will be revoked. The API authentication made with these credentials will be revoked as well. It means that all the API calls using a token that was generated based on these credentials will now send 401 errors. If this does not ring a bell for you, you might want to learn more about authentication in the API right here. 😉