


If you are not familiar with the concept of attributes, you can read the What is an attribute? article.
How to create an attribute?
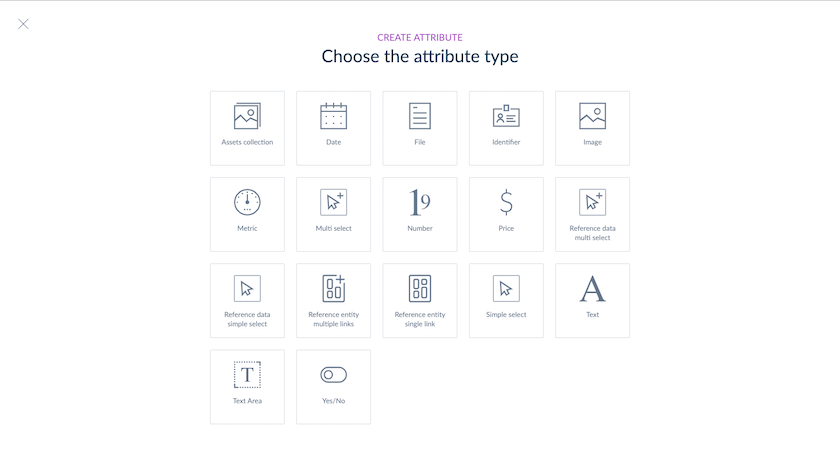
Akeneo proposes several types of attributes. Discover all attributes available in the Introduction to Akeneo attribute types article. Make sure you pick the most appropriate attribute type that perfectly matches your needs.
For example, if you want to make sure that your PIM users will select one option from a list of predefined options, select a simple select attribute type instead of a free text field. Create a Measurement attribute to add a weight/size/length... for your products.
To create an attribute in Akeneo PIM:
- Go to Settings/Attributes
- Click on the Create attribute button:

- Select the attribute type you want:
- The attribute edit form is displayed, fill in the following properties:
Under General Parameters:- A code (required) to identify the attribute.
- A type based on the attribute type selected in the previous screen.
- An attribute group (required) to which the new attribute will be added.
- In addition to these required attributes, you can select the following properties:
- Unique value (Yes/No): enable this property if the value of this attribute must be unique. By default, it is set to yes for Identifier attribute type.
- Value per channel (Yes/No): enable this property if you plan to have different product values per channel.
- Value per locale (Yes/No): enable this property if you plan to have different product values per locale.
- Read only (Yes/No) (Enterprise Edition only): to prevent this attribute from being edited through the UI, it will only be updated through imports, API or rules
- Usable in grid (Yes/No): if you want to filter on this attribute in the product grid or use it as a column.
-
Locale specific: this attribute will only be available for some locales.
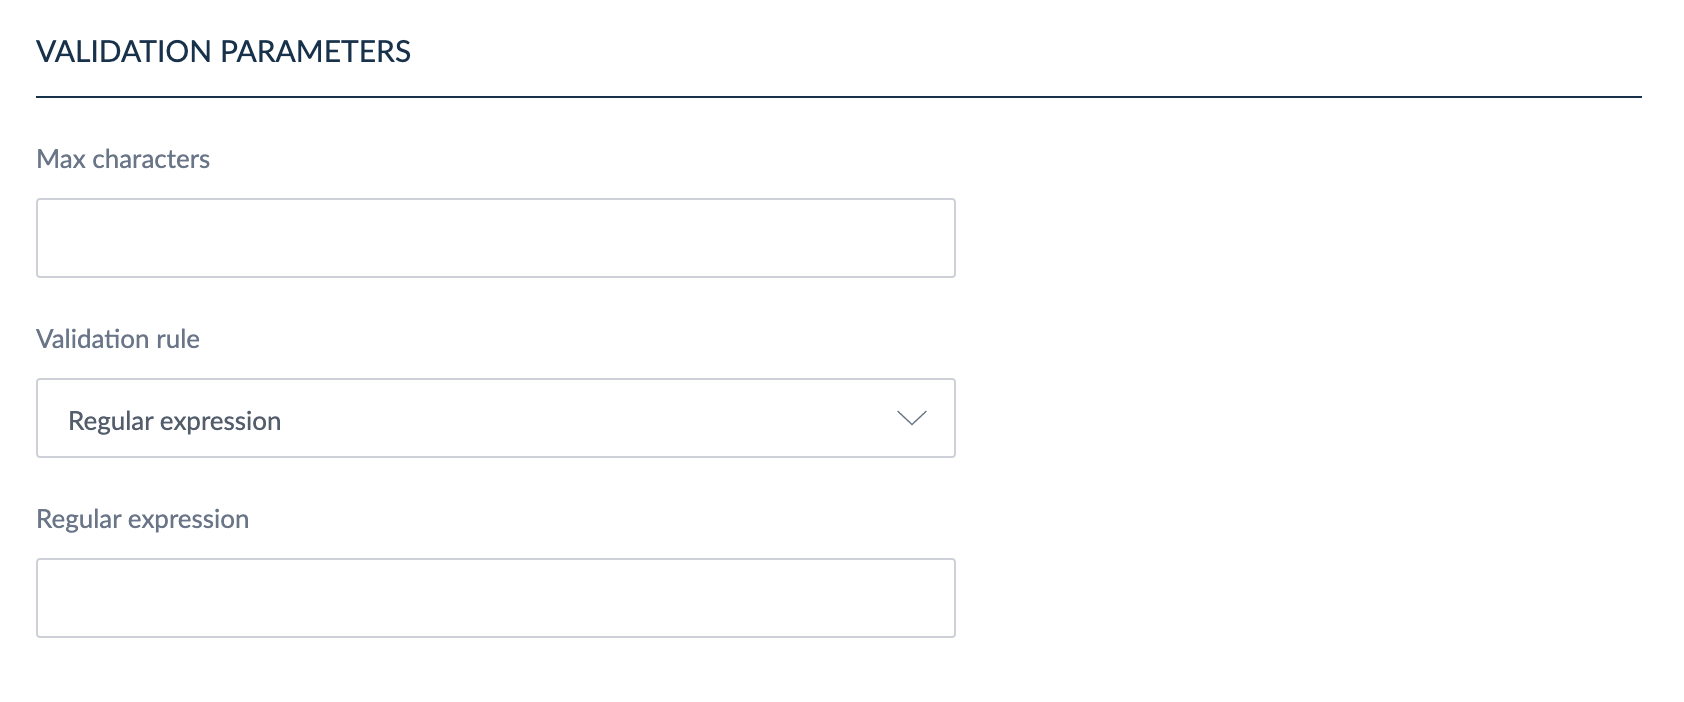
Under Validation Parameters, add validations to control your data: - Validation parameters: each attribute comes with validation parameters (see Add attributes validation parameters).
- Click on Save to create your attribute.
Add attributes validation parameters
Each attribute has specific properties to add more control on attribute's values:
-
Date attribute:
- Min date: the earliest date that can be accepted
- Max date: the latest date that can be accepted
-
Text attribute:
- Maximum number of characters: maximum number of characters that an attribute value can have
- Validation rule: how the value should be validated: such as an URL, as an Email, or using a regular expression
-
Text area attribute:
- Maximum number of characters: maximum number of characters that an attribute value can have
- Enable WYSIWYG: activates the WYSIWYG feature
-
File attribute and image attribute:
- Maximum size allowed in MB
- Allowed extensions files
-
Measurement attribute:
- Allow negative values for the attribute
- Allow decimal values for this attribute
- Minimum value: the smallest value allowed
- Maximum value: the largest value allowed
- Measurement family: the measurement family used for the attribute (weight, length, area, etc. )
- The default measurement unit: the unit selected by default to enter a value for the measurement attribute
-
Price attribute:
- Allow decimals for the attribute values
- minimum value: the smallest allowed value
- maximum value: the largest allowed value
-
Number attribute:
- Allow negative values for the attribute
- Allow decimals
- Minimum value: the smallest allowed value
- Maximum value: the largest allowed value
-
Reference entity single link attribute & reference entity multiple links attribute (Enterprise Edition only):
- Related reference entity: the reference entity linked to this attribute
-
Reference data simple select attribute & reference data multi select:
- Reference data type: choose an existing reference data value to link to your attribute
-
Asset collection attribute (Enterprise Edition only):
- Related asset family: the asset family linked to this attribute
-
Table attribute (Enterprise and Growth Editions only):depending on your column types, there can be several validation parameters:
- text column type: Maximum number of characters (it must be less than 100 characters)
-
number column type:
- Allow decimals
- Minimum value: the smallest allowed value
- Maximum value: the largest allowed value
For the text attribute type, you can add a regular expression to validate the content of the input. For instance, to control the right format of a EAN13 code, add a validation rule based on the following regular expression: /^[0-9]{13}$/
Translate your attribute labels
Once your attribute is created, translate it! You can add a translation for each enabled locales under the Label translations tab. If you need to edit some other attribute's property, please refer to the section Edit attribute properties.
Edit attribute properties
To edit an attribute:
- Go to Settings/Attributes
- Select the attribute to edit in the grid and click on the line or on the edition shortcut
- Change the properties and click on Save

You can change the following properties of an attribute:
- Attribute group: the attribute group the attribute belongs to
- Labels: these are labels that appear when they are displayed in the PIM
- Locale specific: if it must apply to specific locales not all of them
- Usable in grid: whether or not the attribute can be displayed as a column or used as a filter in the product grid (Community and Enterprise Edition) or in the proposal grid (Enterprise Edition only)
- Read only: when enabled it prevents this attribute from being edited in the UI, it can only be updated through imports or rules (Enterprise Edition only)
- Validation parameters (see Add attributes validation parameters)
- Options (for simple or multi select attribute types only): these are predefined values that the user can select
Find your attributes
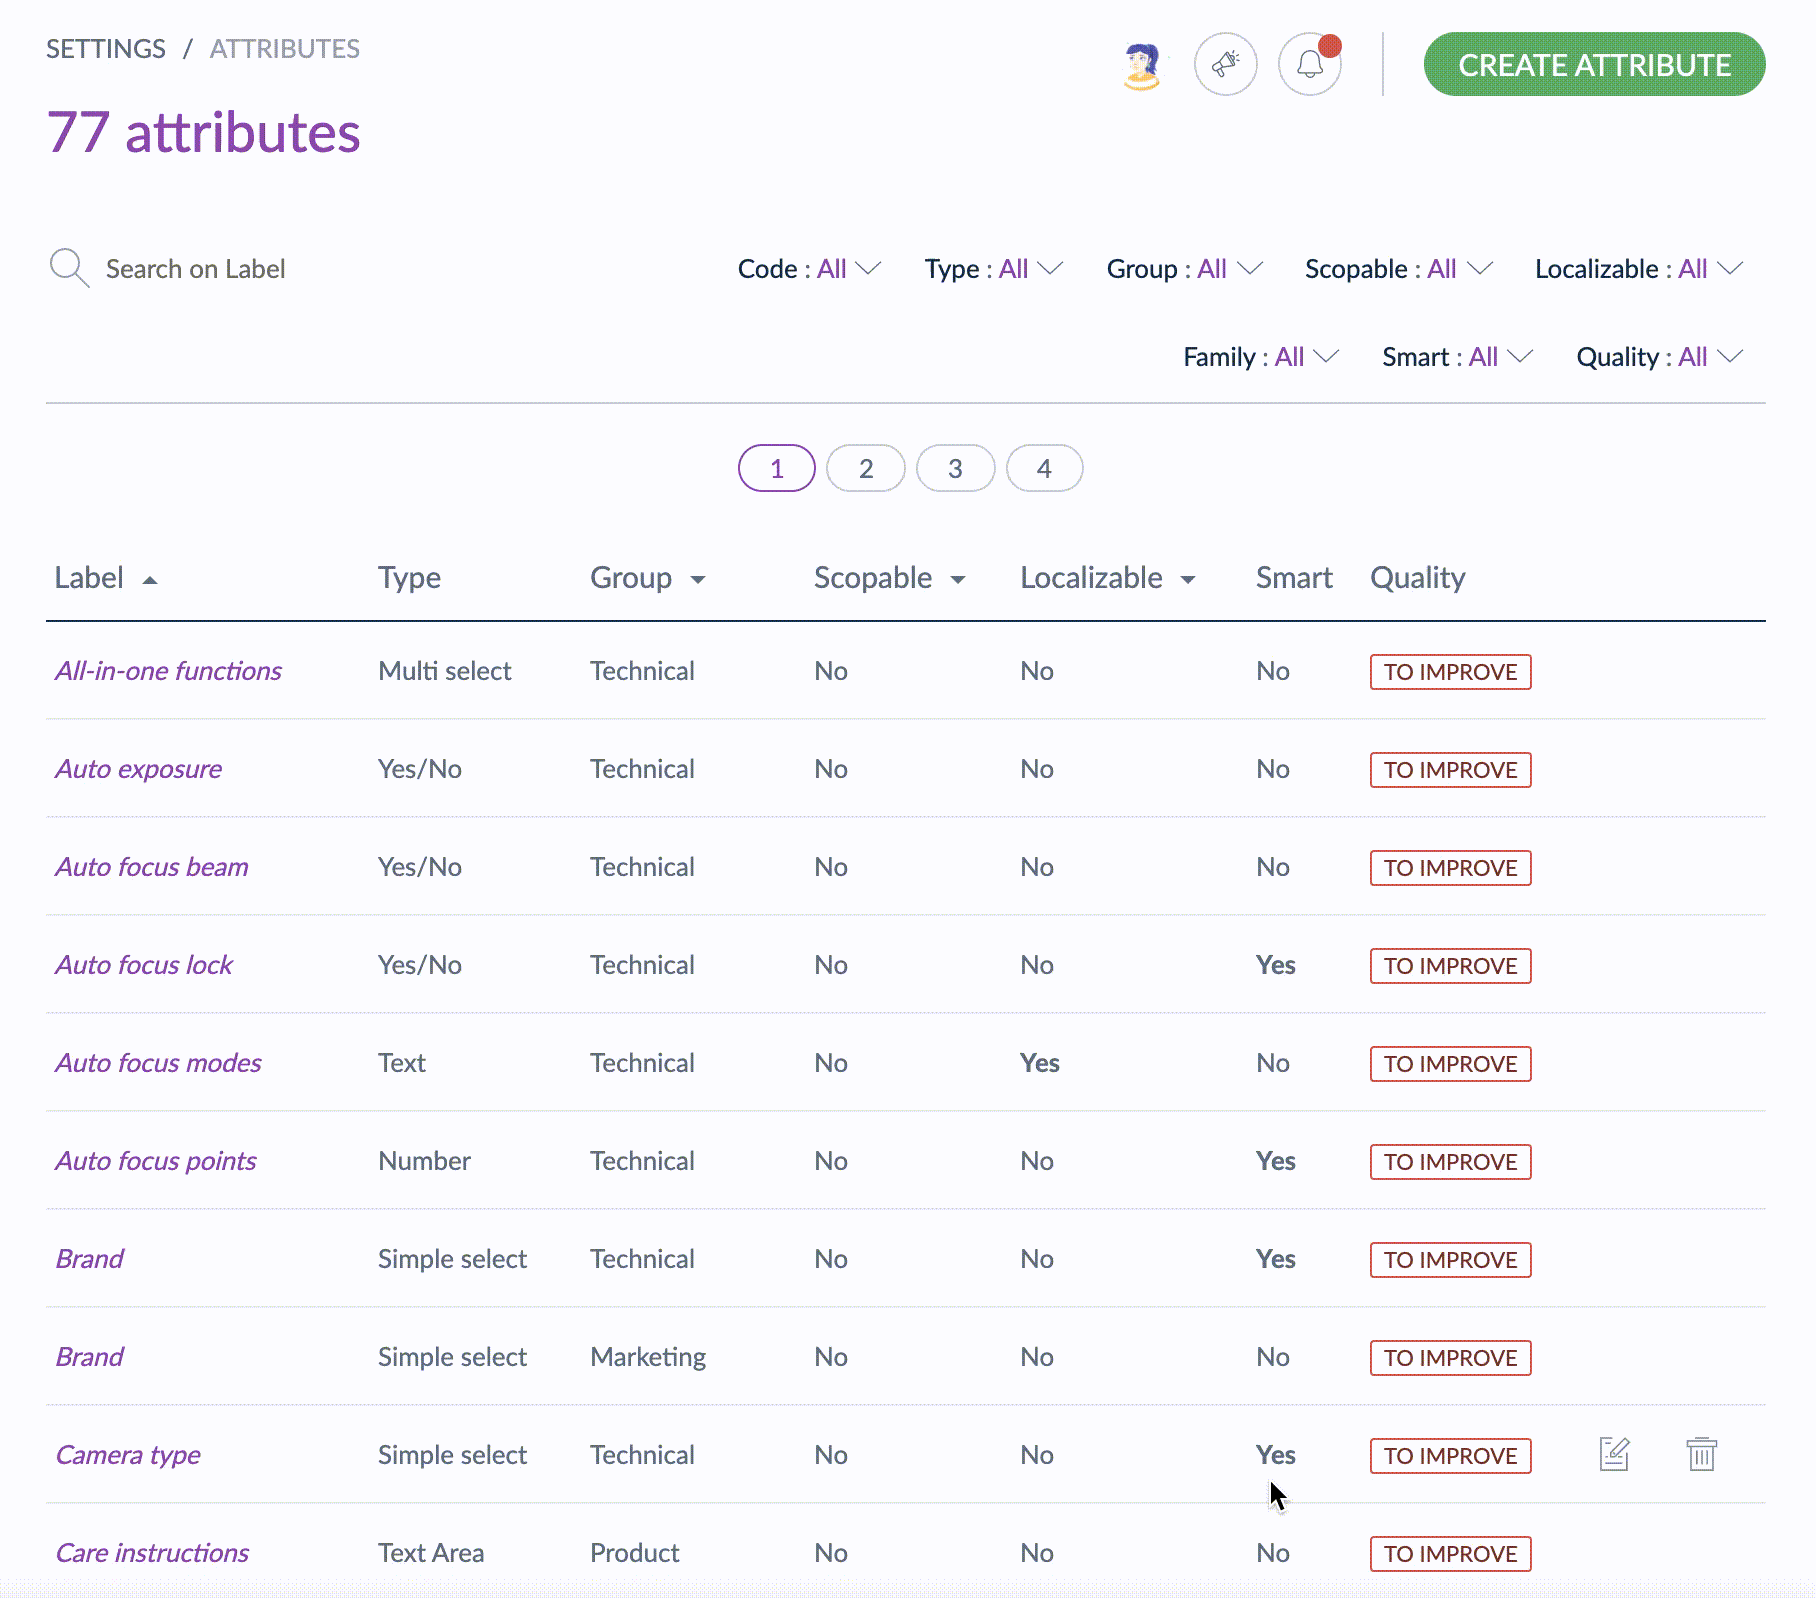
Go to Settings/Attributes, to see all the existing attributes or create a new one.
The attribute grid displays 25 attributes per page. To browse attributes pages, click on the page number you want to reach or use the filters.

You can sort out attributes by clicking on the column header on the grid.
Search on the grid
ON ITS LABEL
To quickly find an attribute, use the search bar available above the grid. Use your attributes label to find what you are looking for.
USE FILTERS
Other filters are available on the right side of the screen, you can search attributes based on their code, type...

- Enter your filter criteria
- The grid is automatically updated when a new filter is set
You can filter on the following attribute information:
- The attribute code
- The attribute type
- The attribute group it belongs to
- The family it belongs to
- The scopable property (one value per channel)
- The localizable property (one value per locale)
- The smart property (Yes/No) if there is a rule impacting this attribute (Enterprise Edition only)
- The quality status (Good/To improve) if there are spelling typos to correct (Enterprise Edition only)
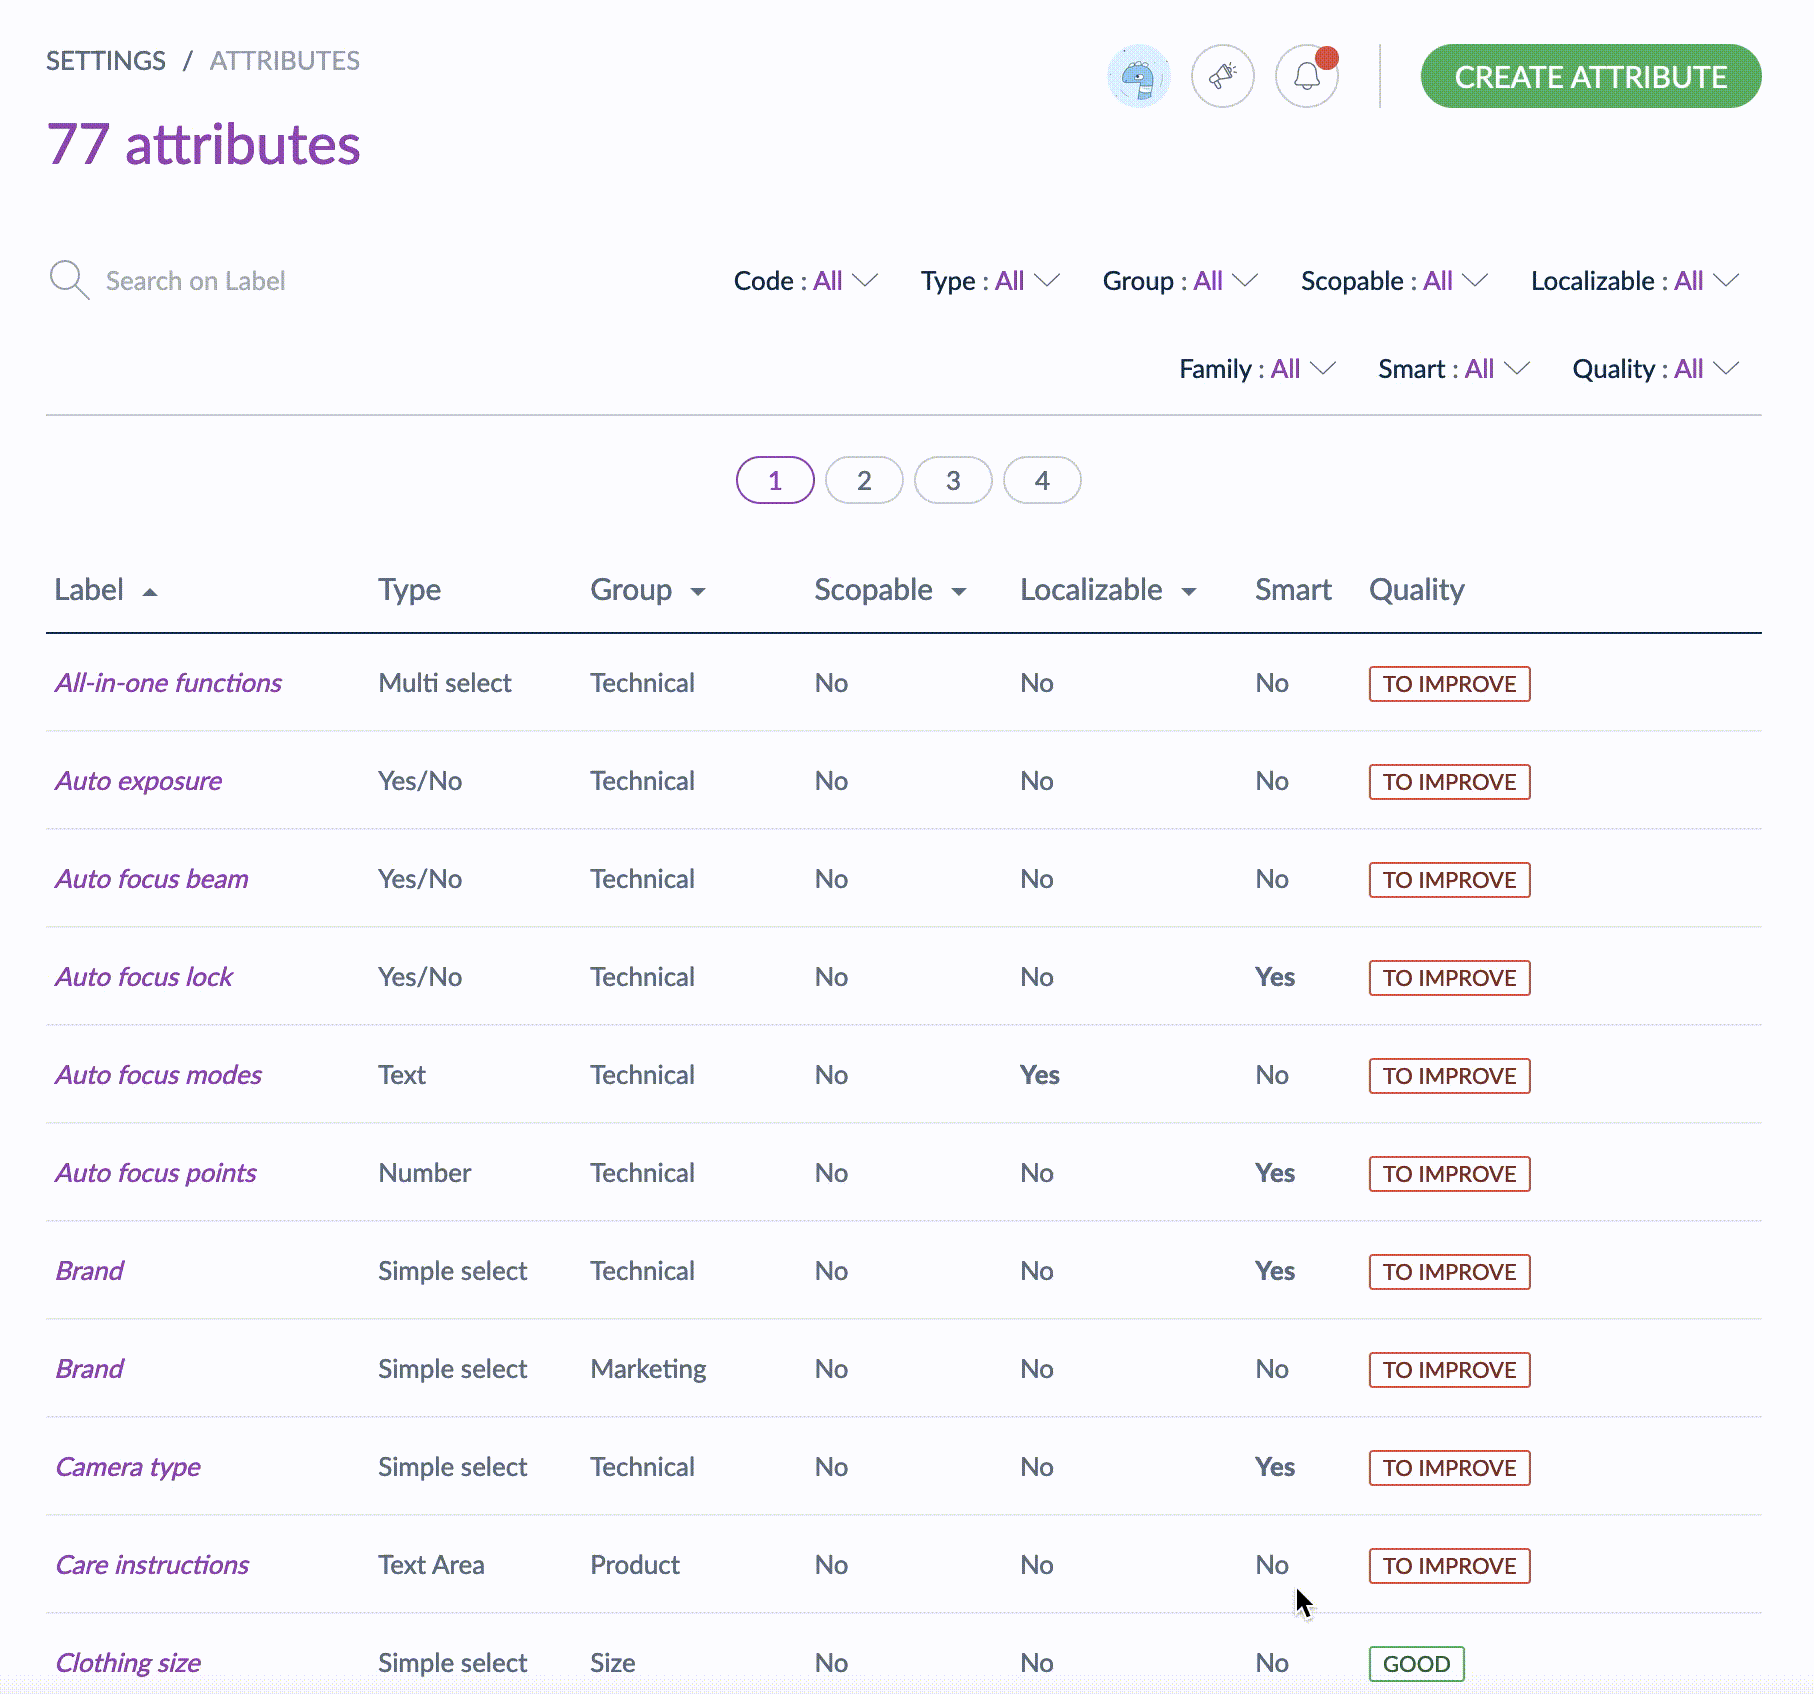
Shortcut actions on each attribute
There is a set of actions available for each attribute. You can find on the right side of the grid. Buttons are visible when you hover your mouse over the line.

Manage simple and multi selects attribute options
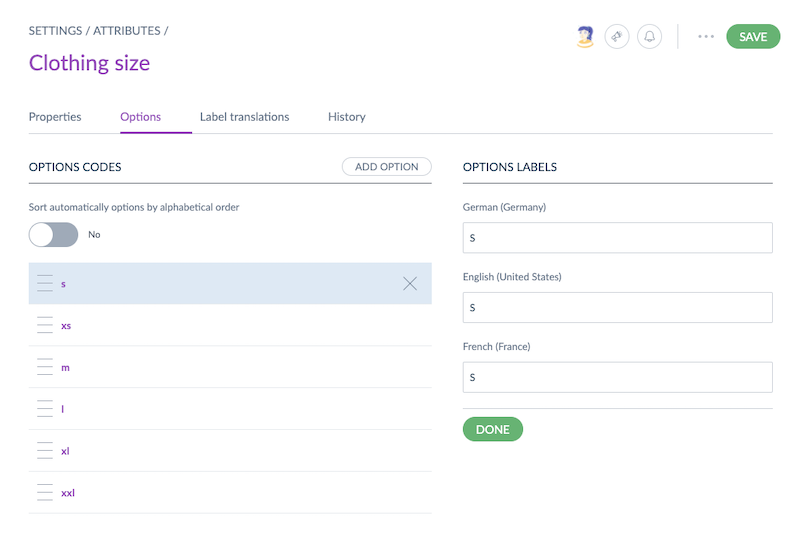
You can define option values for simple and multi select attribute types. Options can be added, edited, sorted or deleted.
Find the attribute options
To manage your simple and multi selects attribute options, remove an option or add a new one:
- Go to Settings/Attributes
- Select the attribute to edit, then click on the relevant row in the attribute datagrid
- Click on the Options tab
Add a new option
- Click on Add an option button
- Give a unique code to the new option
- Click on the Done button
The option is instantly created.
Edit option labels
- Click on the option name in the left column of the screen
- Edit the labels you wish to update
- Click on the Done button
Delete an option
- Roll-over the option name in the left column of the screen
- Click on the cross at the end of the blue line
Sort options
Options can be automatically sorted by alphabetical order using the toggle button Sort automatically options by alphabetical order on the top of the attribute's options page.
If you want to define your own sort, you can drag and drop option rows to reorder options manually.
Manage rules on attributes (EE only)
If you are not familiar with the concept of rules, you can read our What is a rule? article.
If a rule applies to your attribute, this rule will be visible under the Rules tab.
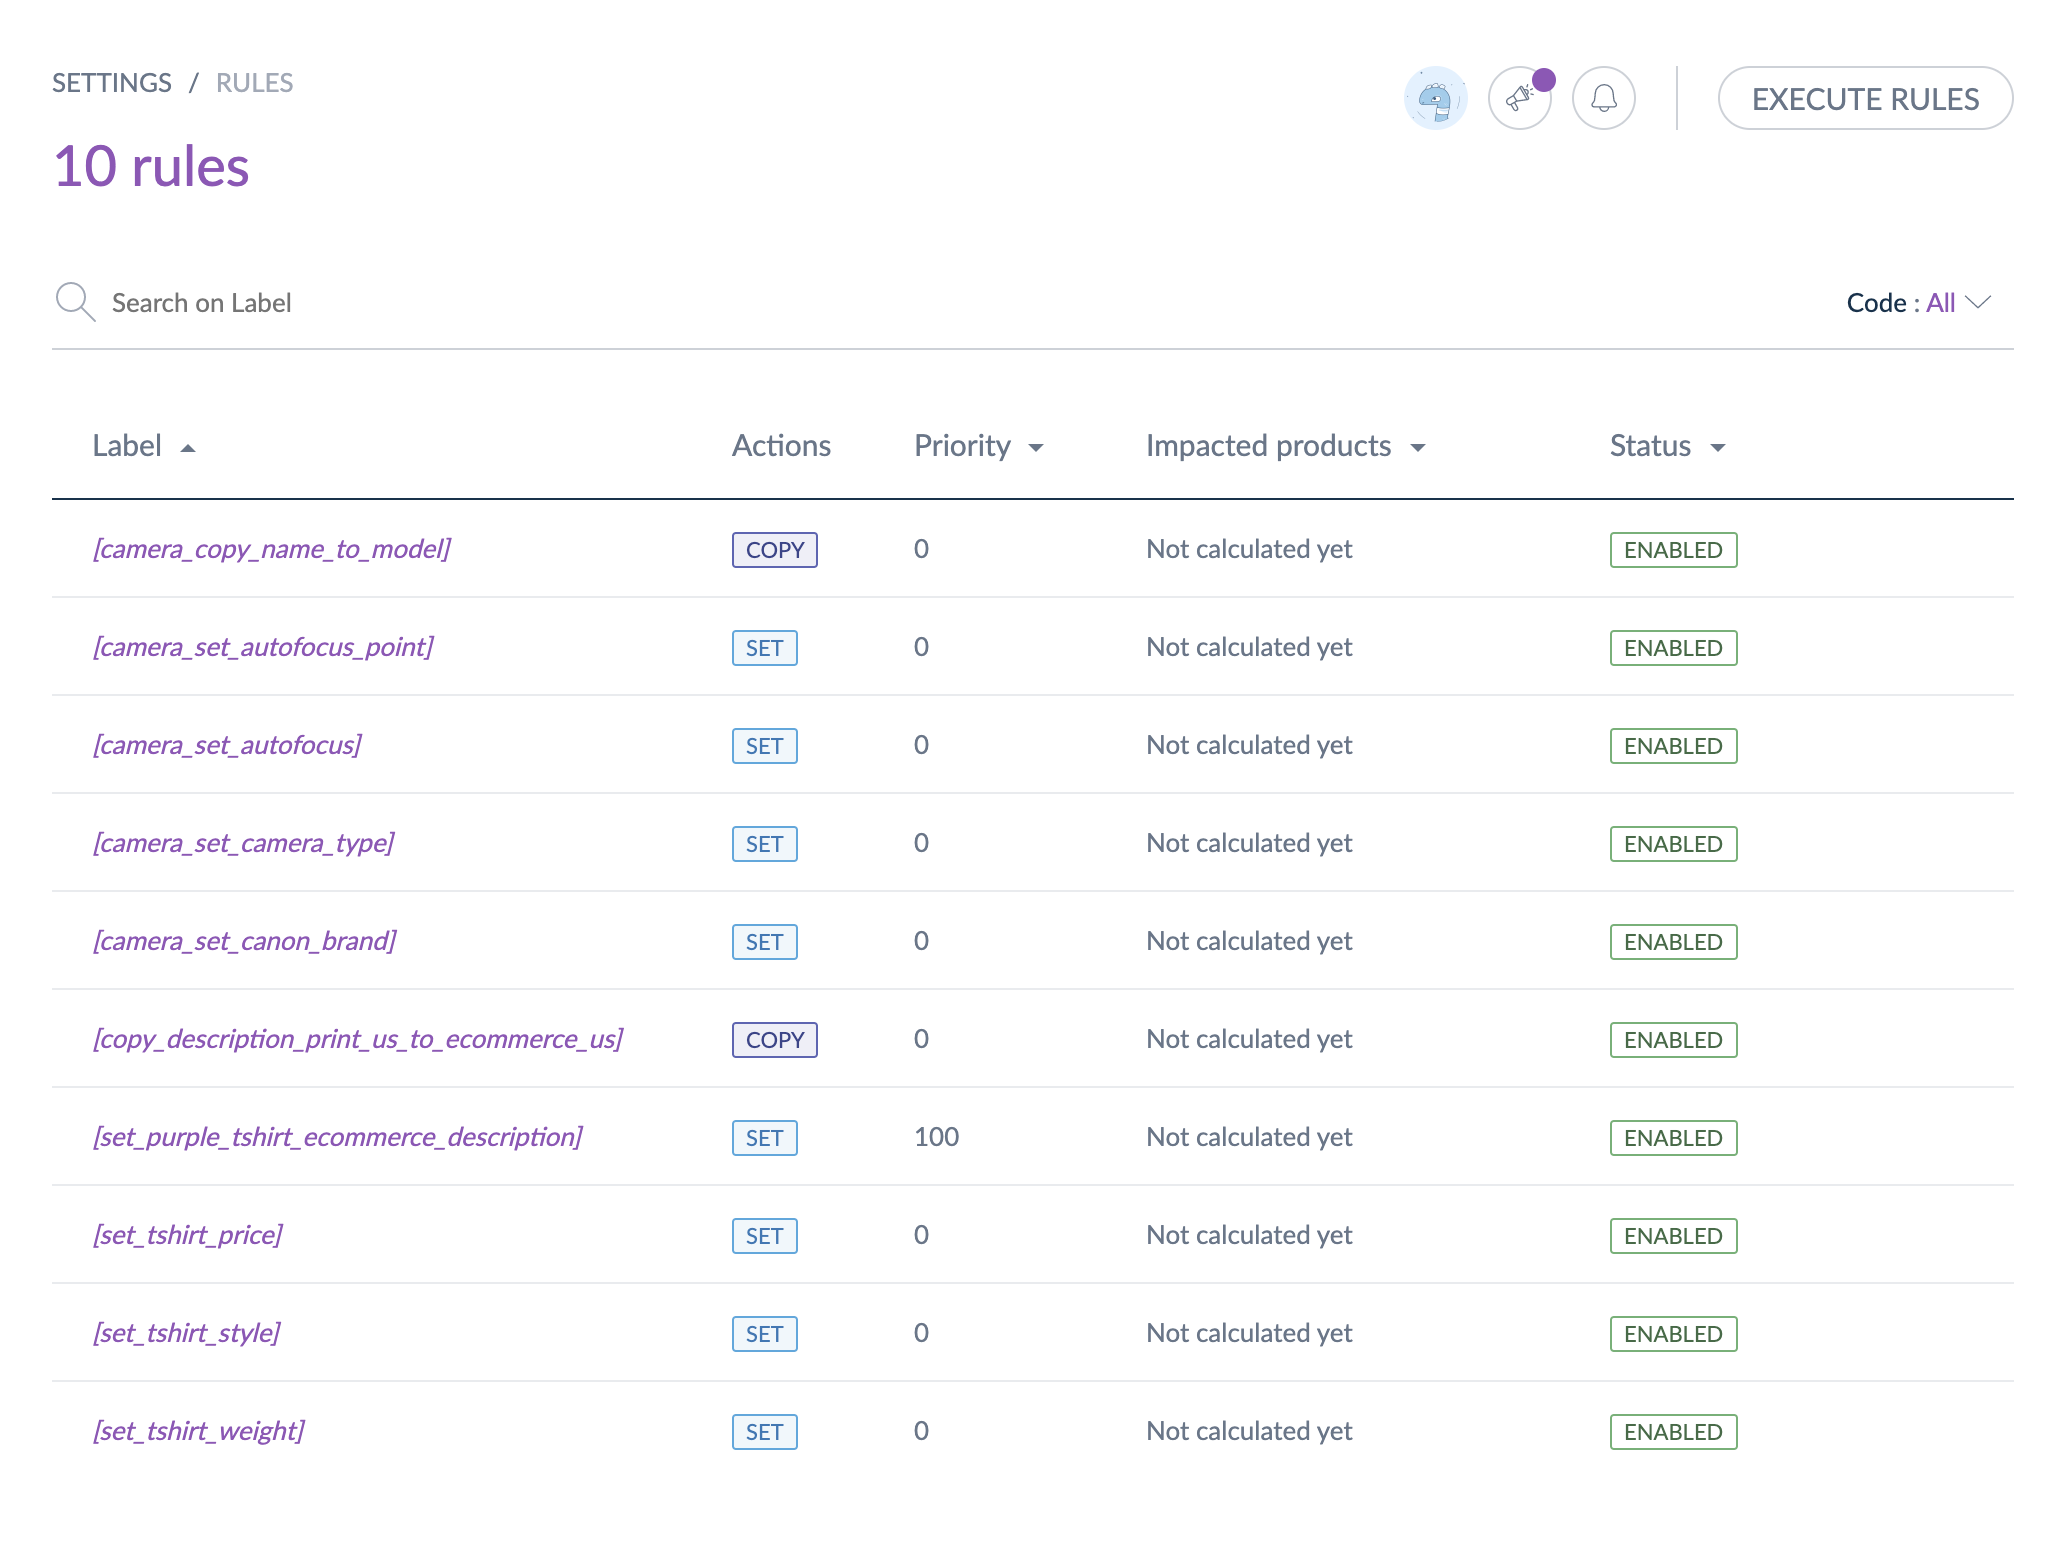
The Rules screen is composed of several information:
- Rule's code: the name of the rule imported
- Rule's condition(s): the conditions to apply the rule, starting with “If”
- Rule’s action(s): the actions to do if the product matches the condition(s), starting with “Then”
- Number of affected products (if calculated): the number of products that are impacted by the rule (this calculation can be run from the Settings/Rules page, see the dedicated section Calculate the number of affected products for rules.
The rules have to be read from left to right: conditions and then actions.
Like on the Settings/Rules page, you can execute or delete rules from the Rules tab.
Check the attribute history
All changes made on attributes are saved and visible under the attribute’s history, for example: a label change, a property change, etc.
For each change, an attribute version is created. The following information is tracked down for each version:
- The person or system that made the changes
- The date and time (up to seconds) of the changes
- The old value and the new value of each modified field
To view the attribute versions:
- Open and edit the attribute page
- Click on the History tab and the list of version will be displayed
Delete an attribute
There are two ways to remove an attribute:
- Through the attribute edit form
- Through the delete shortcut in the grid
When you remove an attribute, all the product values set for this attribute will be cleared. If you want to keep them, please read the dedicated section.
Delete an attribute without keeping the related data
THROUGH THE ATTRIBUTE EDIT FORM
- Go to Settings / Attributes
- Select the attribute you want to delete
- Click on ... for other actions and then Delete on the top right corner
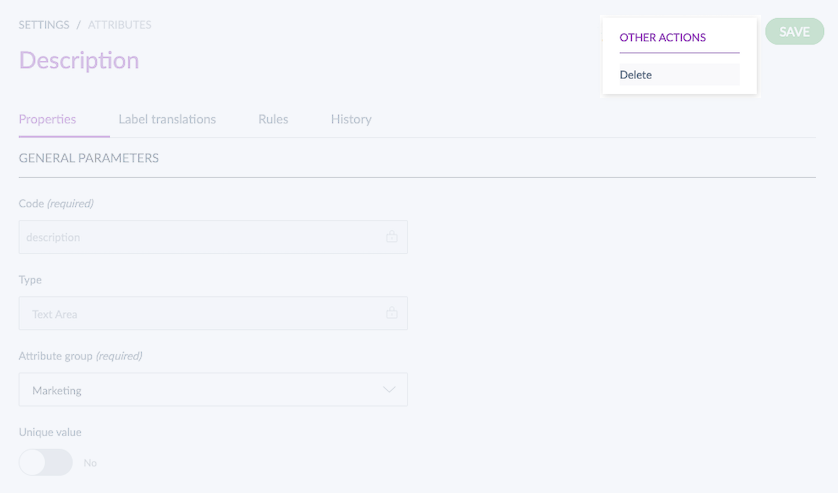
- Confirm the action in the popin
THROUGH THE DELETE SHORTCUT IN THE GRID
- Go to Settings / Attributes
- Select the attribute you want to remove from the attribute grid
- Place your mouse over the line of the attribute in the grid, a trash can icon appears

- Click on it
- Confirm the action in the popin
Delete an attribute and keep the related data
If you need to change an attribute property (to make it scopable and/or localizable), or if you want to change the attribute type (from a simple text to a text area for instance), you need to delete the attribute.
Before doing so, if you plan to create another attribute using the same code, and if you want to keep the data already input for this attribute, you will need to:
- Export the product information
- Export the families and/or family variants
- Delete the attribute
- Create a new attribute
- Import back the families and/or family variants
- Import the product information back
This walkthrough will help you go through the different steps.
FIRST STEP: EXPORT THE PRODUCT INFORMATION
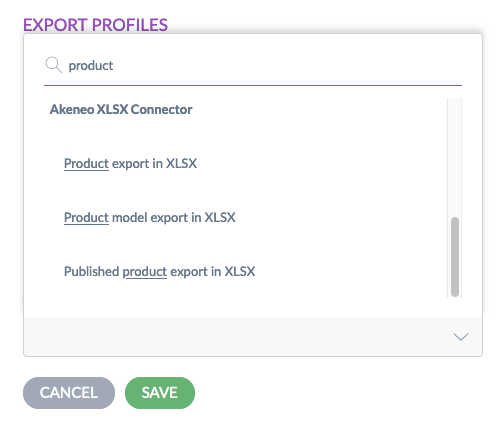
- Go to Exports and click on Create export profile
- Define a code and a label
- Select the job in the job field, whether you want to export products or product models (if you need to export both, you will need to create an export profile for each)
- In Content, filter the products by clicking on Add attribute and select the attribute you want to delete
- Set the value to Is not empty
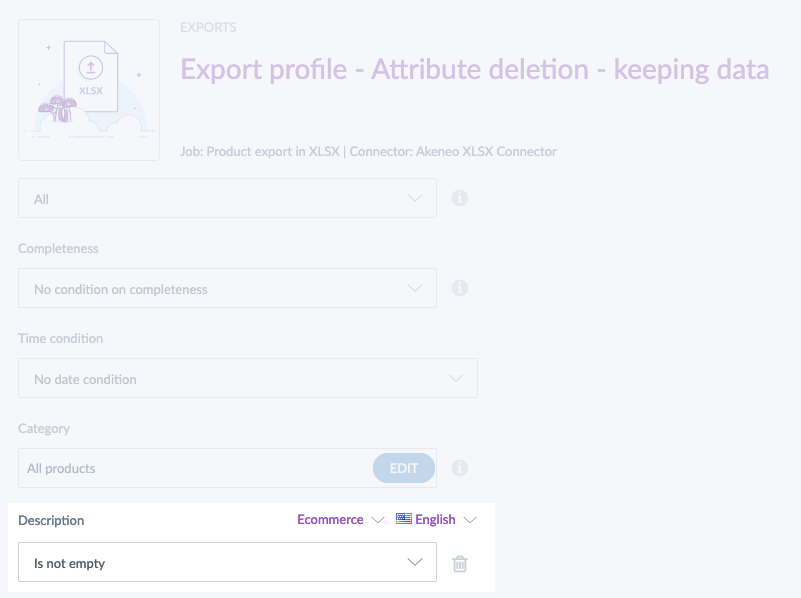
- In Global settings, make sure the option Export with labels is not activated
- Check the different other options (channel, locales, format...) to refine your export and click on Save
- Click on Export now
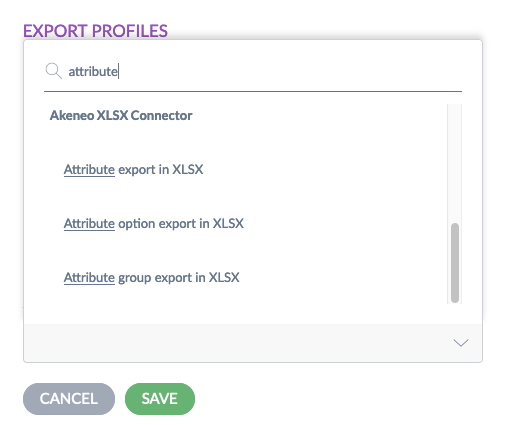
SECOND STEP: EXPORT THE FAMILIES AND/OR FAMILY VARIANTS
- Go to Exports and click on Create export profile
- Define a code and a label
- Select the job in the job field, whether you want to export the families or the family variants
- Click on Save and on Export now
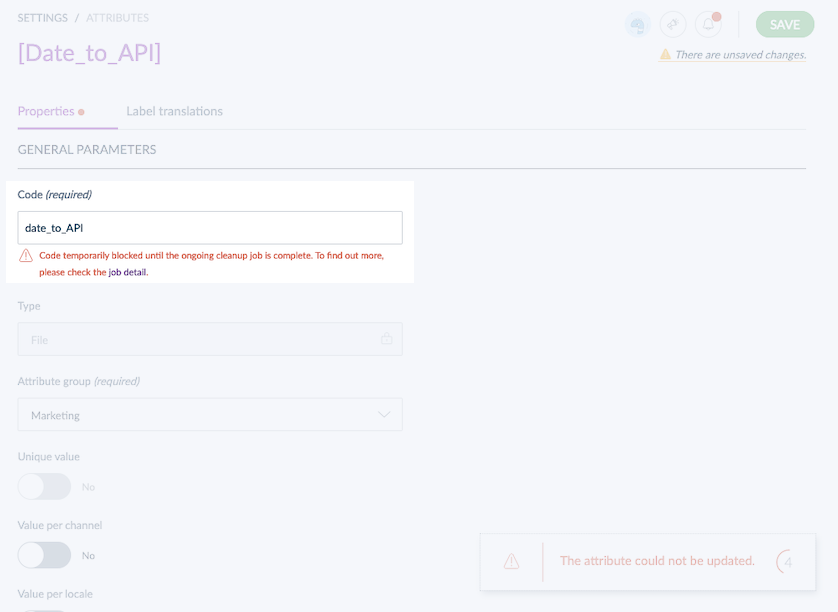
THIRD STEP: DELETE THE ATTRIBUTE
To delete the attribute, you have two options:
- From the attribute edit form
- From the delete shortcut in the grid
FOURTH STEP: CREATE THE NEW ATTRIBUTE
To complete this step, please read how to create an attribute. Here you can create the new attribute using the same code that was used for the attribute you just deleted.
FIFTH STEP: IMPORT BACK THE FAMILIES AND/OR FAMILY VARIANTS
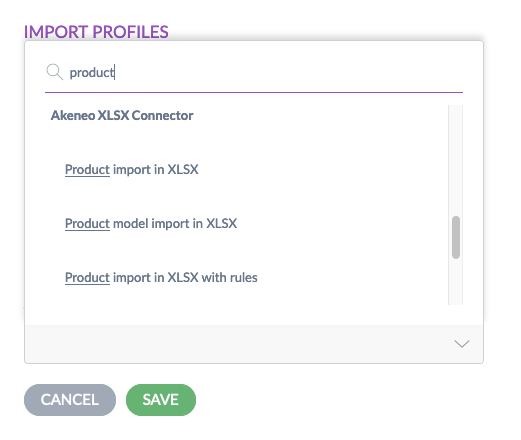
- Go to Imports and click on Create import profile
- Define a code and a label
- Select the job in the job field, whether you want to import the families or the family variants
- Drop your file and click on Upload and import now
SIXTH STEP: IMPORT THE PRODUCT INFORMATION BACK
- Go to Imports and click on Create import profile
- Define a code and a label
- Select the job in the job field, whether you want to import products, product models and/or attribute options (if you need to export all of them, you will need to create an import profile for each)
- Check the different options (format, enable product...) to refine your import and click on Save
- Drop your file and click on Upload and import now