


Overview
Importing data is convenient when you want to update your catalog with information from external sources such as vendors or an ERP system.
When importing data, Akeneo PIM extracts data from the file and converts it to save in the PIM.
- Imports accept two file formats: CSV and XLSX.
- Imports are limited to 5 GB per file.
- For XLSX files, only the first sheet is processed. The PIM does not use the active sheet or any sheet beyond the first.
You can import product data as well as catalog entities such as families, categories, and attributes.
Akeneo PIM is not case-sensitive. For example, if you import two products with the identifiers "A238B" and "A238b", the PIM treats them as the same product: the first will be created, then immediately updated with the second identifier.
Steps of an import
The import process is straightforward:
- Create an import profile (see below for more information)
- Build the file manually or via a third-party application
- Upload the file in the PIM, or enable the PIM to fetch it from a given path (the file path option is not available in the Serenity offer)
- Launch the CSV or XLSX file import
What is an import profile?
An import profile defines how an import will be performed. Each profile is based on:
- A code to uniquely identify the profile
- A job that defines what will be imported and in which format (e.g., a product import in XLSX, a category import in CSV)
- A set of configuration fields available as a form in the PIM. Each profile can have its own configuration.
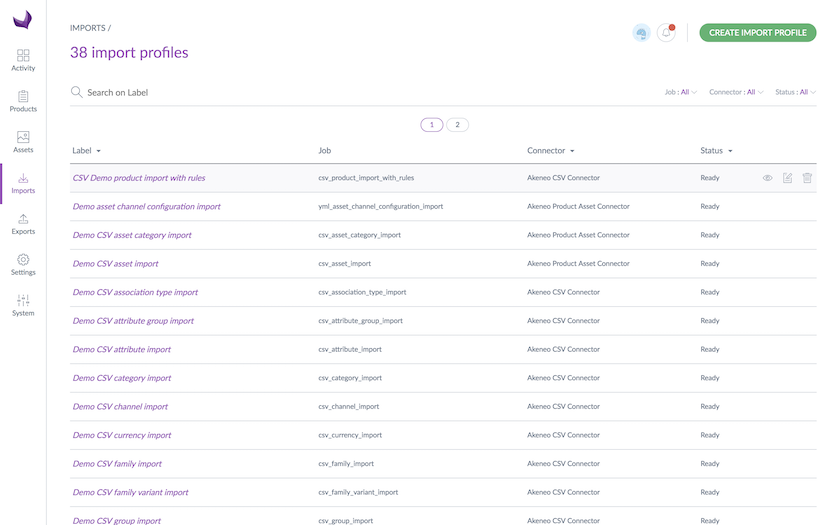
Browse import profiles
To view the available import profiles:
- Log in with a user account with the permission to View the list of profiles for imports
- Go to the Imports menu
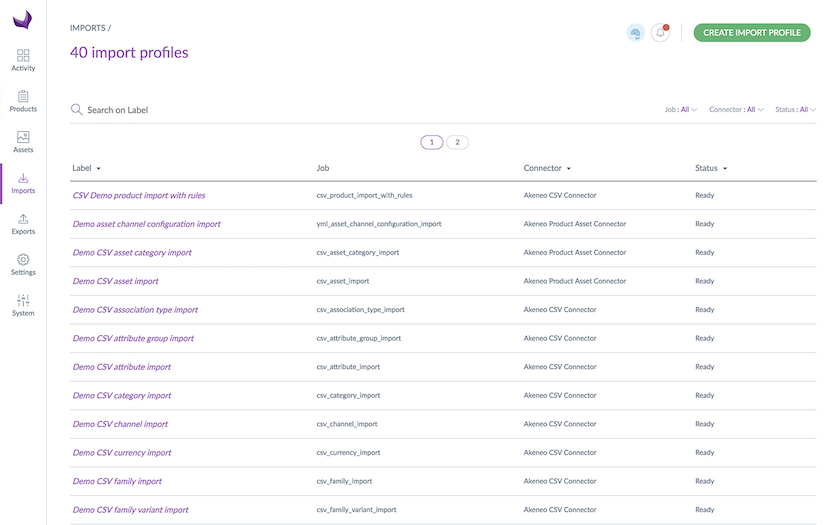
- To narrow down the list, use the available filters above the grid or the search bar (searches on the label)
To see the details of a given import profile, click on its row in the grid.
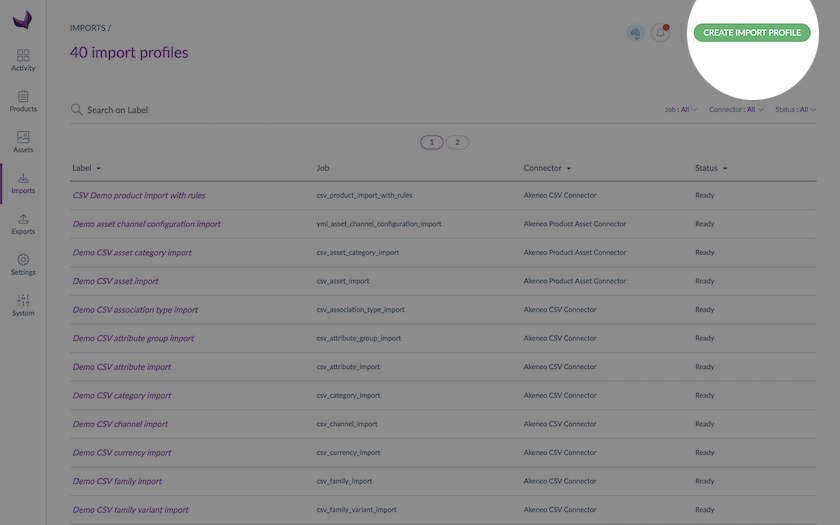
Create a new import profile
To create a new import profile:
- Log in with a user account with Create an import profile permission
- Go to the Imports menu
- Click Create import profile
- Fill in all required fields in the pop-up window:
- A unique code
- A label to identify the profile more easily
- A job according to what you wish to import
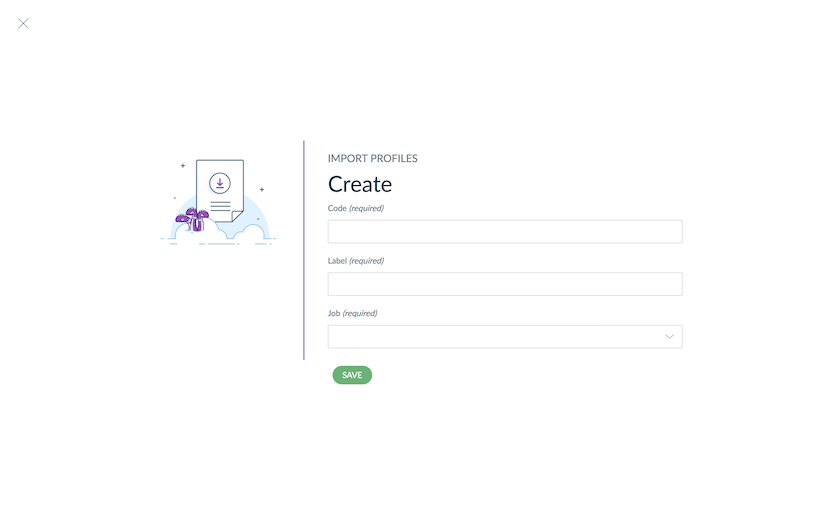
- Click Save to finalize the profile creation. The profile page is then displayed and you can configure it.
Update an import profile
To update an import profile:
- Log in with a user account with the relevant permissions
- Go to the Imports menu
- Click on the import profile to modify
- Click the Edit button
- Make your changes
- Click Save to update the profile
In the Properties tab, you can edit the label of your profile.
In the Global settings tab, available properties depend on the import job. For example, for the CSV product import, you will find the following properties:
| Property | Details |
| File path | Defines the path of the file to import in case you want the PIM to automatically fetch it (not available in Serenity offer) |
| Allow file upload | Allows file upload from the specified file path in case you want the PIM to automatically fetch the file (not available in Serenity offer) |
| Delimiter | Defines the character used to delimit fields in the file (semicolon, comma…) |
| Enclosure | Defines the character used for field enclosure in the file (") |
| Decimal separator | Defines the character used as decimal separator in the imported file (dot, comma…) |
| Date format | Defines the format used for dates in the imported file (e.g., yyyy-mm-dd, mm/dd/yyyy…) For XLSX files with formatted dates, always configure the import with the yyyy-dd-mm date format, regardless of the display format in your file. |
| Enable the product | Sets the default activation status for newly created products: enabled if Yes, disabled if No |
| Categories column | Defines the column name for categories in the imported file |
| Family column | Defines the column name for family in the imported file |
| Groups column | Defines the column name for groups in the imported file |
| Compare values | When enabled, compares imported values against existing values. Can speed up imports when most values are unchanged. |
| Real time history update | When enabled, updates the product history in real time. Can be disabled to improve import performance. |
| Enable options creation | Automatically creates missing attribute options during product or product model creation and update. Only works for simple select and multi-select attributes that have the Enable option creation during import property enabled. |
If a user has no role permission to modify an import profile, any Enterprise Edition user group rights they may have will also be ignored. For example, a user without the Edit profiles of imports permission cannot edit a specific import profile even if their user group grants it.
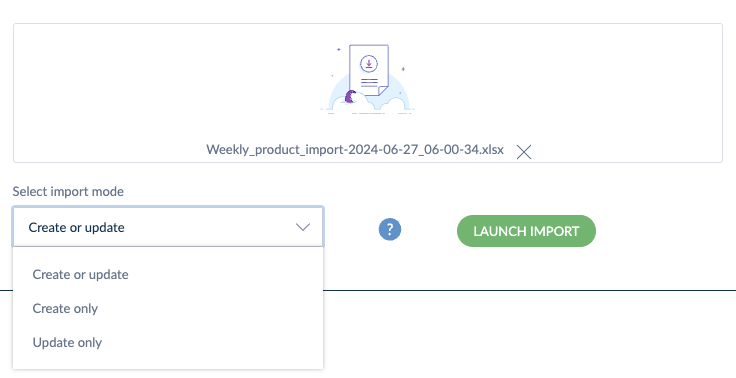
Select your import mode
For greater control over product data imports, you can select from three import modes:
- Create or update: updates existing products and creates new ones
- Create only: creates new products and skips any existing ones
- Update only: updates existing products and ignores rows that would create new ones
The import mode selection is available for the following jobs:
- Product import in XLSX
- Product model import in XLSX
- Product import in CSV
- Product model import in CSV
- Product & product model import in XLSX
- Product & product model import in CSV
- Product import with rules in XLSX
- Product import with rules in CSV
- Product model import with rules in XLSX
- Product model import with rules in CSV
- Tailored import in XLSX
- Tailored import in CSV
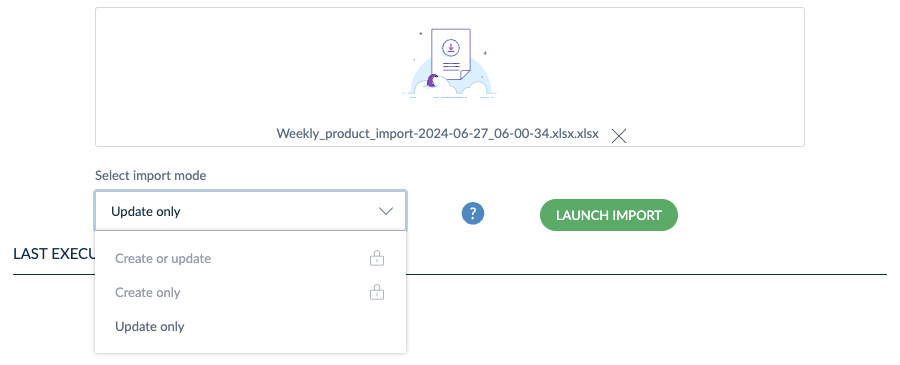
The available modes depend on your role permissions. For instance, if you do not have permission to create new products, the Create only option will not appear in the import mode selection.
Even if a user does not have the role permission to Edit attributes of a product or Edit attributes of a product model, they can still make changes through an import file — including adding products to groups, creating associations, and changing product status. Attribute values remain protected, but other product data can still be modified.
Import images & files
If you have Image and/or File attribute types in your families, you can import their content directly via the product import profile. To do this:
- First, export the relevant products or product models via an archive.
- Then, configure the archive to modify the product/product model file by adding your images and/or files.
- Finally, import the new archive back into the PIM.
Export the relevant products or product models
- From the left menu, click Exports
- From the top right corner, click Create, type a label and a code, and select the job Product export in XLSX or Product model export in XLSX
- Under Global settings, switch Export files and images to Yes
- Under Content, select the relevant Image or File attributes
- Save and click Export
- Once the job is finished, click Download generated files to get the archive
Configure the archive
- Open the archive you downloaded
- Open the Files folder
- Each subfolder under Files corresponds to a product or product model — folder names match the SKUs or codes of your products or product models
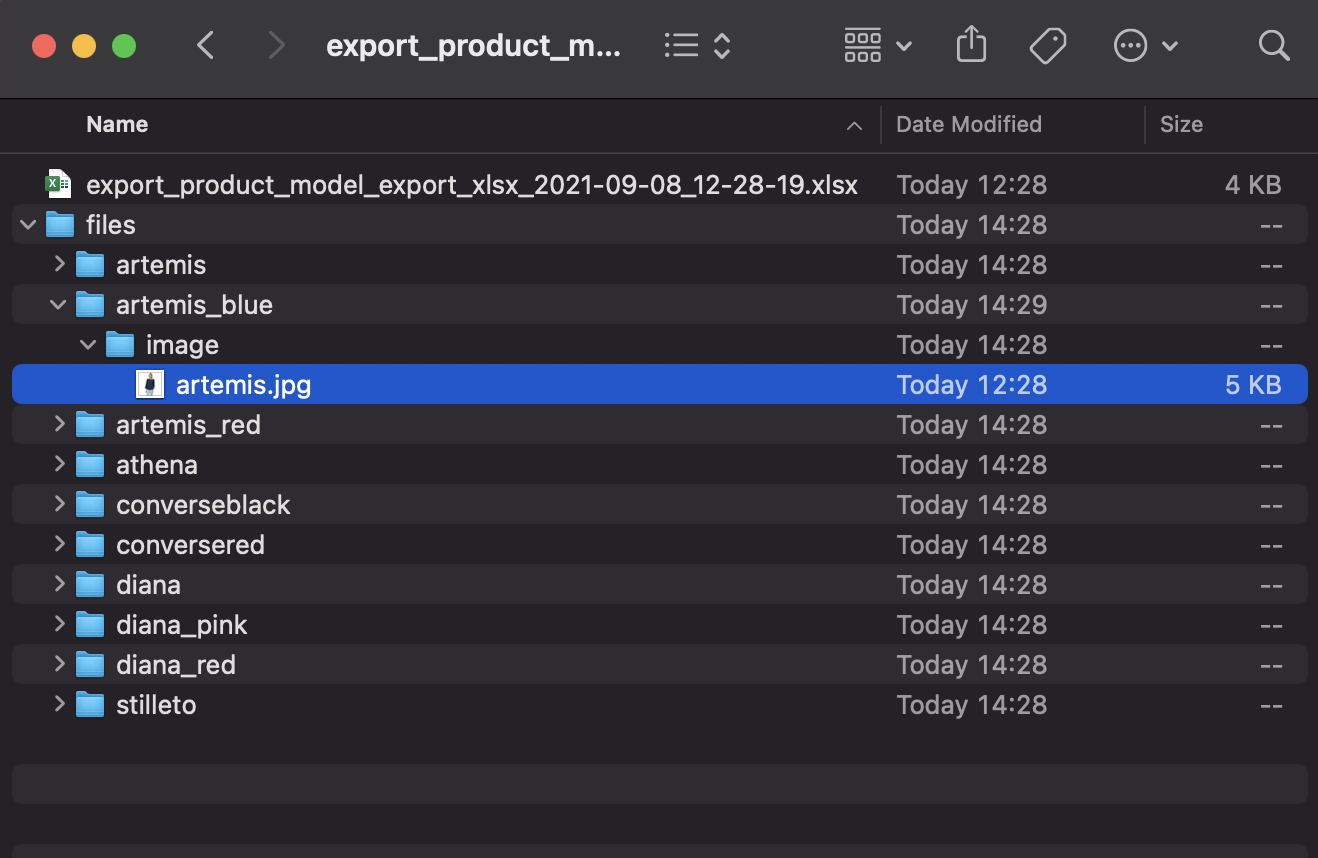
- To add new images or files, open the relevant folders and add your files
- Open the CSV or XLSX file corresponding to your products or product models
- Go to the columns corresponding to your image or file attributes
- Update the filenames to match the names of the files you just added
- Save your spreadsheet
- Select the spreadsheet(s) and the Files folder simultaneously and create an archive
Product identifiers containing spaces or special characters may cause issues during file import, as the file paths generated with those identifiers won't be re-imported correctly. Remove any spaces or special characters from identifiers to ensure full compatibility.
Import back the new archive
- From the left menu, click Imports
- Select the import profile named XLSX product import
- Upload your archive and click Import
You cannot import back the archive exactly as downloaded from the PIM. You must first configure it before importing it.
Duplicate an import profile
To create a new profile based on an existing one:
- Select the import profile to duplicate
- Click Edit
- In the top right corner, click the three dots ... and select Duplicate
- Enter a label and a code, then click Save
Download and upload an import profile
To copy an import profile from one instance to another (e.g., from staging to production), you can download its configuration and import it into a new profile on the target instance.
Download an import profile configuration:
- Select the import profile to copy
- Click Edit
- In the top right corner, click the three dots ... and select Download Profile Configuration
Upload the configuration to another instance:
- Create a new profile on the target instance
- Click Edit
- In the top right corner, click the three dots ... and select Import Profile Configuration
- Upload the configuration file you downloaded
This functionality is only available for Tailored import profiles. Permissions and properties are not included in the downloaded configuration.
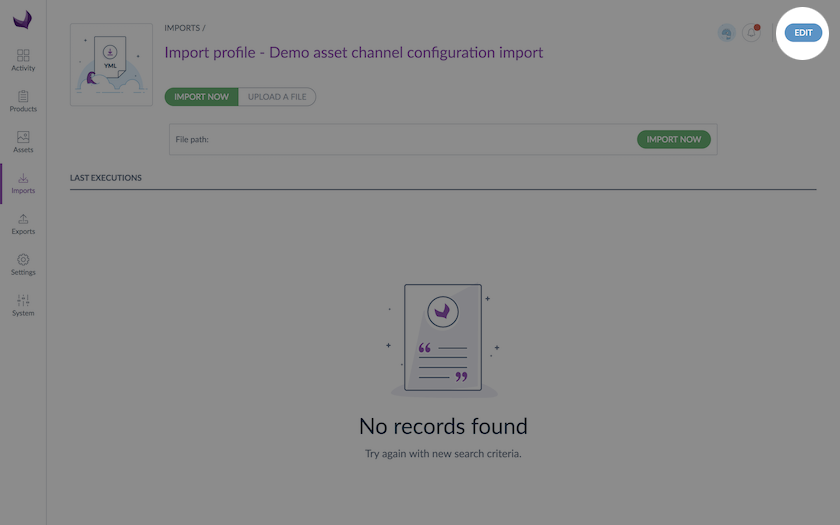
Run an import
How to start an import
- Go to the Imports menu
- Click on the import profile to execute
- Click Import now to have the PIM fetch the file from the configured path, or click Upload a file to upload a file manually
- The execution page displays and refreshes automatically so you can monitor progress
When the import ends, a notification appears in the top right corner of the PIM.
An email notification can also be sent depending on your user configuration. For further details, please refer to the Manage your account article.
With the user groups rights (EE only)
Rights on the product information
For product imports, the PIM applies your permissions based on the user groups you belong to:
- If you own the products in the Clothes category, the import will directly update those products
- If you only have edit rights on products in the Audio video category, the import will automatically create a draft for you instead of directly updating the products
- If you only have view rights on products in the Goodies category, the import will fail for those products with an error indicating you cannot modify them
To learn more, see the Access rights on products article.
Rights on import execution
Execution permissions can be configured per import profile. If you cannot launch an import, check that you have the right to run it in the Permissions tab of the import profile in edit mode. See the Access rights on imports/exports article for more details.
If a user's role does not include permission to modify product families, they will be restricted from editing families directly in the UI. However, the same user can still modify product families through an import file. We recommend reviewing role permissions and import configurations to ensure proper access control.
Main identifier and UUID
Akeneo PIM supports up to 10 identifier attributes. By default, the main identifier is the SKU. You can set any other identifier attribute as the main identifier for your catalog — the SKU will then act as an additional identifier.
The main identifier and the UUID are both valid references for imports. You can use both in your import file, or each independently.
You cannot change the main identifier for your whole catalog through an import file. To transition from SKUs to EANs for example, go to your PIM, create a new identifier attribute, and set it as the main identifier on its settings page.
New import processes with the UUID
The following use cases are supported when running imports:
- No main identifier and no UUID: a new product will be created with a randomly assigned UUID
- Main identifier only, no UUID: a new product will be created with that identifier and a randomly assigned UUID
- UUID only: the product will be updated even if the main identifier is unavailable
- Main identifier only: the product will be updated even if the UUID is unavailable
- UUID to update the identifier: the product will be updated with the new main identifier
- Custom UUID: you can provide your own v4 UUID during product creation
The UUID column is hidden by default. To include it in your export file, update your export profile and activate With Product UUID before running the export.
All use cases depending on what you fill in the UUID and main identifier columns:
| uuid | main identifier | family | use case | result |
| EAN-ex01 | tshirt | Existing product | Update product having EAN = EAN-ex01 | |
| EAN-new01 | tshirt | New product | Create product with generated uuid and main identifier = EAN-new01 | |
| tshirt | New product | Create product with generated uuid and no main identifier | ||
| uuid-0001 | EAN-ex02 | tshirt | Existing product | Update product having uuid = uuid-0001 |
| uuid-0002 | EAN-new02 | tshirt | New product | Create product with uuid = uuid-0002 and main identifier = EAN-new02 |
| uuid-0003 | tshirt | Existing product | Update product having uuid = uuid-0003 and no main identifier | |
| uuid-0004 | tshirt | New product | Create product with uuid = uuid-0004 and no main identifier |
The UUID cannot be modified once a product is created.
Combined product and product model import
The combined product and product model import is available for Advanced and Premium customers only. It is available as a dedicated import profile job and is not supported in Tailored Import.
The combined import allows you to import both products and product models from a single CSV or XLSX file. The PIM reads the entity_type column in each row to determine whether to process it as a product or a product_model.
This is particularly useful when you need to:
- Update a complete product hierarchy (product models and their variant products) in one operation
- Re-import a file previously exported with the combined export profile
- Reduce the number of import jobs required to enrich a catalog with family variants
Create a combined import profile
To create a combined product and product model import profile, select the relevant job:
- Product and product model import in CSV
- Product and product model import in XLSX

Configure a combined import profile
Once the profile is created, click Edit to configure it. The profile contains the following tabs: Properties, Permissions, Global settings, and History.
In the Properties tab, you can edit the label of your profile, configure a storage source, and enable scheduling for automated imports.
In the Global settings tab, configure the following properties to match the format of your import file. The CSV profile includes Delimiter and Enclosure fields; the XLSX profile does not.

| Property | Details |
| Delimiter (CSV only) | Defines the character used to delimit fields in the file |
| Enclosure (CSV only) | Defines the character used for field enclosure in the file |
| Decimal separator | Defines the character used as decimal separator in the imported file |
| Date format | Defines the date format used in the file (e.g., yyyy-mm-dd). For XLSX files with formatted dates, always use yyyy-dd-mm regardless of the display format in the file. |
| Enable the product | Sets the default activation status for newly created products: enabled if Yes, disabled if No |
| Categories column | Defines the column name for categories in the imported file |
| Family column | Defines the column name for family in the imported file |
| Groups column | Defines the column name for groups in the imported file |
| Compare values | When enabled, compares imported values against existing values. Can speed up imports when most values are unchanged. |
| Real time history update | When enabled, updates the product history in real time. Can be disabled to improve import performance. |
| Convert variant products to simple products | When enabled, variant products present in the import file are converted to simple products during the import. Disabled by default. |
| Create attribute options during import | Automatically creates missing attribute options during import. Only works for simple select and multi-select attributes that have the Enable option creation during import property enabled. Disabled by default. |
Prepare your combined import file
The most reliable way to prepare a valid combined import file is to first export using a combined export profile. This guarantees the correct file structure, column order, and entity_type values.
Your file must respect the following rules:
- The
entity_typecolumn must be present and contain eitherproductorproduct_modelfor every row - Product model rows must include a value in the
codecolumn, unless an Identifier Generator is active -
Rows must be ordered so that parent records always appear before their children. If a child product or sub model is listed before its parent, it will not be created. The correct order follows the same depth-first hierarchy as the combined export:
- Product model A
- Sub model A1 (child of A)
- Variant products belonging to A1
- Sub model A2 (child of A)
- Variant products belonging to A2
- Sub model A1 (child of A)
- Product model B…
- Product model A
The import reads the entity_type column in each row of your import file to determine whether to process it as a product or a product_model. This column is mandatory. If it is missing or contains an invalid value, the row will be skipped with an error.
Using draft codes for product models with generated codes
When product model codes are generated automatically by the Identifier Generator rather than defined manually, the code does not exist yet at the time you prepare your import file. In this situation, you cannot fill in the parent column of child rows because the parent's code is unknown.
The draft_code column solves this problem. It lets you assign a temporary placeholder code to a product model row. You then reference that same placeholder in the parent column of its children. When the import runs, the PIM resolves the placeholder automatically once the real code has been generated by the Identifier Generator.
The draft_code column only applies to product model rows whose code will be generated automatically. If you already know the product model code, simply use it directly in the code and parent columns as normal, no draft code is needed.
How to use draft codes
- Add a
draft_codecolumn to your import file. - On the product model row whose code will be generated, leave the
codecolumn empty and fill in a unique placeholder value indraft_code(e.g.draft_jacket_001). - On any child rows (sub product models or variant products) that belong to that parent, enter the same placeholder value in the
parentcolumn. - The PIM will replace the placeholder with the real generated code during the import.
Draft codes are scoped to a single product model hierarchy. The mapping between a draft code and its resolved real code resets when a new root product model is encountered in the file. Make sure each draft code is unique within its hierarchy.
Example
The following example shows a file with one root product model whose code will be generated, one sub product model, and two variant products. The draft_code value draft_jacket_001 is used as a temporary reference throughout the hierarchy.
| entity_type | draft_code | code | parent | family | family_variant | categories |
product_model |
draft_jacket_001 |
jackets |
jackets_by_size_color |
outerwear |
||
product_model |
draft_jacket_001_M |
draft_jacket_001 |
jackets |
jackets_by_size_color |
||
product |
draft_jacket_001_M |
jackets |
||||
product |
draft_jacket_001_M |
jackets |
During the import, the PIM generates the real codes for the two product model rows and automatically replaces all references to draft_jacket_001 and draft_jacket_001_M in the parent column with the actual generated codes.