


Overview
The rules engine can radically boost your productivity in the PIM by automating actions. As explained in this article, a rule enables you to automatically apply one or several actions to a specific list of products and product models. To set the targeted products, you have to define conditions (that are composed of fields and operators).
The rules are defined in a YML file that you can import in the PIM using a dedicated job profile or via the interface.
To guide you in the rules engine usage, read below and find out what you can use it for and how it works.
Create a Rule
In the PIM UI
To create or edit rules, you need the appropriate permissions. Go to System/Roles, select a role, click Permissions/Rules, and enable Create rulesand/or Edit rules.
To create a rule in the UI, navigate to Settings/Rules and click Create. A pop-up will appear; enter a code and a label for your rule, then confirm. Your rule is now created, and you can define its product selection and actions.
By Import
To create rules using a YML file, first create it, then import it into the PIM using the Rule import in YML import job.
For more details on executing an import, refer to Import your data.
You can also export rules using the Rule export in YML export job. For more details, see Export your data.
Each rule must have a unique code. It can also have a label per enabled PIM locale. This label will appear under Settings/Rules and be visible in your product form under your smart attributes. You can add the labels' settings anywhere in your rule. In the example below, it is placed at the end of the rule, and it adds labels for your American English and French locales. Here is the expected format:
camera_copy_name_to_model:
    priority: 0
    conditions:
        -   operator: AND
            value:
                -   field: family
                    operator: IN
                    value:
                        - camcorders
                -   field: camera_model_name
                    operator: EMPTY
    actions:
        -   type: copy
            from_field: name
            to_field: camera_model_name
    labels:
        en_US: 'Copy name to model'
        fr_FR: 'Copie nom vers modèle'
If you do not want to add labels to your rule, leave the labels settings with { }.
labels: {}
The rule code will appear between brackets [ ] in the interface if no label is set.
You can also search on your rule labels under Settings/Rules.
Define a Status for a Rule
You can set a rule's Status to control its automatic execution. This is useful if you want to save a rule but not run it immediately.
In the UI
To change a rule's status, go to its Properties tab and select either Enabled or Disabled.
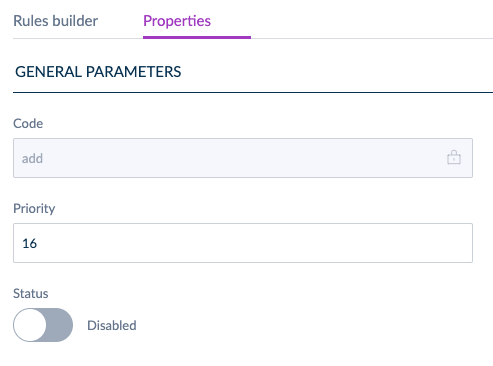
The rules grid displays the status of each rule at a glance.
By default, new UI-created rules are disabled.
By import
A status can be defined with the enabled key. The rule cannot be executed from cronjob or manually when the value is false.
In the rule import, this key is not mandatory. If it's not specified, the rule is enabled and set to true, by default.
To define the rule status, please follow this format:
camera_copy_name_to_model:
    priority: 0
    enabled: true
    conditions:
        -   operator: AND
            value:
                -   field: family
                    operator: IN
                    value:
                        - camcorders
                -   field: camera_model_name
                    operator: EMPTY
    actions:
        -   type: copy
            from_field: name
            to_field: camera_model_name
    labels:
        en_US: 'Copy name to model'
        fr_FR: 'Copie nom vers modèle'
The Rule Builder Tab
This tab is crucial for managing your rule's conditions and actions. First, filter the products you wish to update using the available filters under the Add Condition or Add Grouped Condition button.
Product Selection
In the Product selection section, define 'Conditions' using attributes or system fields to filter products/product models. These conditions together form your 'Product selection'.
For a complete list of attributes and system fields, please see our article.
If no conditions are set, the rule will apply to your entire product catalog.
System fields are listed first, followed by attributes grouped by type. Use the search bar to find specific attributes. Once a condition is added, its color changes to purple, and a new line appears in the product selection.
Each condition line includes the chosen system field or attribute (in purple) and an operator, which varies based on the filter. Additional fields, such as value, channel, and locale, may appear depending on the filter's requirements. To remove a condition, click the 'X' at the end of its line.
A counter next to the Add Condition button displays the number of products/product models that match your current conditions; this count updates automatically as you adjust conditions.
Condition operators
When building your rules, you can use condition operators to define how multiple conditions should interact. By default, conditions are combined with AND, meaning all of them must be met. With the OR operator, you can create more flexible rules by allowing products to match if at least one of the conditions is true. This makes it easier to cover broader scenarios without multiplying the number of rules.
At the first level of conditions, you can only use one type of operator (either all AND or all OR), so it’s not possible to mix them at the same level.

In this example, We want to select products with status enabled or in the “Paint” Family.
Grouped Conditions
You can create groups of conditions directly from the Product Selection tab, using the dedicated Add Grouped Condition button. Groups let you organize your logic more clearly, and you can nest conditions up to two levels deep. However, it’s not possible to create a group inside another group. It’s also possible to create multiple groups within the same product selection, giving you even more flexibility to design and maintain complex rules while keeping them easy to read and manage.
You can only use one type of operator (either all AND or all OR) in a group.

In this example, We want to select products with status enabled and created before 5 days , or products with status enabled and updated before 5 days.
Available Conditions
You can use all system fields and attribute types in the PIM as conditions to select products/product models, including:
Categories
The possible operators for the categories field are:
- IN
- NOT IN
- UNCLASSIFIED
- IN OR UNCLASSIFIED
- IN CHILDREN
- NOT IN CHILDREN
Import example :
field: categories
        operator: IN
        value:
         - C0056
         - F677
Family
The possible operators for the family field are:
- IN
- NOT IN
- EMPTY
- NOT EMPTY
The value element will be ignored if the operator is EMPTY or NOT EMPTY.
Import example :
field: family
        operator: IN
        value:
         - camcorders
         - digital_cameras
Family variant
The possible operators for the family_variant field are:
- IN
- NOT IN
- EMPTY
- NOT EMPTY
The value element will be ignored if the operator is EMPTY or NOT EMPTY.
Import example :
field: family_variant
        operator: IN
        value:
         - shoes_by_size
         - clothing_by_color
Groups
The possible operators for the groups' field are:
- IN
- NOT IN
- EMPTY
- NOT EMPTY
The value element will be ignored if the operator is EMPTY or NOT EMPTY.
Import example :
field: groups
        operator: IN
        value:
         - oro_tshirts
         - akeneo_tshirts
Enabled (Status)
- =
- ≠
Import example :
field: enabled
        operator: =
        value: false
If you want to select the activated products, set the value to "true". If you want to select the deactivated ones, set it to "false".
Entity type (product or product model)
The only accepted operator for the entity_type field is:
- =
Import example :
field: entity_type
        operator: =
        value: Akeneo\Pim\Enrichment\Component\Product\Model\ProductModelInterface
The value field expects either Akeneo\Pim\Enrichment\Component\Product\Model\ProductInterface for products or Akeneo\Pim\Enrichment\Component\Product\Model\ProductModelInterface for product models.
Identifier
The possible operators for the identifier field are:
- STARTS WITH
- CONTAINS
- DOES NOT CONTAIN
- =
- “!=”
- IN
- NOT IN
Import example :
field: identifier
        operator: IN
        value:
         - model_tshirt_red
         - tshirt_red_xxl
Completeness
The possible operators for the completeness field are:
- =
- ≠
- ‘>’
- <
The locale and scope elements are mandatory.
Import example :
field: completeness
        locale: fr_FR
        scope: print
        operator: =
        value: "100"
Parent
The possible operators for the parent field are:
- IN
- EMPTY
- NOT EMPTY
The value element will be ignored if the operator is EMPTY or NOT EMPTY.
Import example :
field: parent
        operator: IN
        value:
         - model_tshirt_red
         - model_pants_blue
Creation date
The possible operators for the created field are:
- =
- ≠
- ‘>’
- <
- BETWEEN
- NOT BETWEEN
- EMPTY
- NOT EMPTY
Import example :
- field: created
          operator: =
          value: "2015-01-23 00:00:00"
        - field: created
          operator: <
          value: "-10 days"
The format of the date is:
- "yyyy-mm-dd HH:MM:SS" (UTC time)
- “now”
- "<relative date format>" (see below)
The value element will be ignored if the operator is EMPTY or NOT EMPTY.
The "relative date format" only works with the <, >, = and != operators.
Update date
The possible operators for the updated field are:
- =
- ≠
- ‘>’
- <
- BETWEEN
- NOT BETWEEN
- EMPTY
- NOT EMPTY
Import example :
-
          field: updated
          operator: =
          value: "2015-01-23 00:00:00"
        -
          field: updated
          operator: '>'
          value: "-1 year"
The format of the date is:
- "yyyy-mm-dd HH:MM:SS" (UTC time)
- “now”
- "<relative date format>" (see below)
The value element will be ignored if the operator is EMPTY or NOT EMPTY.
The "relative date format" only works with the <, >, = and != operators.
Please note that the hour format is in the UTC timezone.
Asset collection attribute
The possible operators for the Asset Collection attribute type are:
- IN
- NOT IN
- EMPTY
- NOT EMPTY
Import example :
field: packshot
        operator: IN
        value: [my_product_packshot]
In this example, we select all the products with the "my_product_packshot" asset in their "packshot" asset collection.
The value element will be ignored if the operator is EMPTY or NOT EMPTY.
We expect an array of asset codes as value.
Date attribute
The possible operators for the Date attribute type are:
- <
- ‘>’
- =
- ≠
- BETWEEN
- NOT BETWEEN
- EMPTY
- NOT EMPTY
Import example :
-
          field: release_date
          operator: =
          value: "2015-01-23"
        -
          field: creation_date
          operator: '>'
          value: "-1 year"
The format of the date is:
- “yyyy-mm-dd”
- “now”
- "<relative date format>" (see below)
The value element will be ignored if the operator is EMPTY or NOT EMPTY.
The "relative date format" only works with the <, >, = and != operators.
Focus on the “relative date format”
The relative date format allows to specify dates that are relative to the rule execution date, it is formatted as follows:
<+/-><count> <unit>, with:
- "+" means a date in the future, "-" a date in the past
- count is an integer
- unit is one of the following values: day, week, month or year with an optional final s
For instance, +1 month means in one month, and -2 days means 2 days ago
Import example :
field: created_date
        operator: '>'
        value: "2016-05-12"
The "relative date format" is based on the UTC timezone. It means that if you are located in Eastern Australia (UTC +10) and the rules are executed on the 06/22/20 at 8:00am, the "relative date" will be based on the 06/21/20
File attribute
The possible operators for the File attribute type are:
- STARTS WITH
- CONTAINS
- DOES NOT CONTAIN
- =
- ≠
- EMPTY
- NOT EMPTY
Import example :
field: small_file
        operator: CONTAINS
        value: ../../../
         src/PimEnterprise/Bundle/InstallerBundle/Resources/fixtures/icecat_demo/AKNTS_PB.pdf
We expect a text as a value (it should match the filename).
Image attribute
The possible operators for the Picture attribute type are:
- STARTS WITH
- CONTAINS
- DOES NOT CONTAIN
- =
- ≠
- EMPTY
- NOT EMPTY
Import example :
field: small_image
        operator: CONTAINS
        value: ../../../
         src/PimEnterprise/Bundle/InstallerBundle/Resources/fixtures/icecat_demo/images/AKNTS_PB.jpg
We expect a text as a value (it should match the filename).
Measurement attribute
The possible operators for the measurement attribute type are:
- <
- ≤
- =
- ≠
- ‘>’
- ‘>=’
- EMPTY
- NOT EMPTY
Import example :
field: weight
        operator: =
        value:
         amount: 0.5
         unit: KILOGRAM
The value element will be ignored if the operator is EMPTY or NOT EMPTY.
We expect numeric value and measurement unit code in the following format:
- dot “.” is the decimal separator,
- there is no space between thousands.
Simple select attribute
The possible operators for the Simple select list attribute types are:
- IN
- NOT IN
- EMPTY
- NOT EMPTY
Import example :
field: size
        operator: IN
        value:
         - xxl
The value element will be ignored if the operator is EMPTY or NOT EMPTY.
We expect the option code as a value.
Multi-select attribute
The possible operators for the Multiselect list attribute types are:
- IN
- NOT IN
- EMPTY
- NOT EMPTY
Import example :
field: material
        operator: IN
        value:
         - GOLD
         - LEATHER
The value element will be ignored if the operator is EMPTY or NOT EMPTY.
We expect the option code as a value.
Number attribute
The possible operators for the Number attribute type are:
- <
- ≤
- =
- ≠
- ‘>’
- ‘>=’
- EMPTY
- NOT EMPTY
Import example :
field: min_age
        operator: =
        value: 12
The value element will be ignored if the operator is EMPTY or NOT EMPTY.
We expect a number as a value.
Text attribute
The possible operators for the text/textarea attribute types are:
- STARTS WITH
- CONTAINS
- DOES NOT CONTAIN
- =
- ≠
- EMPTY
- NOT EMPTY
Import example :
field: description
        operator: CONTAINS
        value: "Awesome product"
If the operator is EMPTY or NOT EMPTY, the value element will be ignored
text can be written with or without quotation marks.
Boolean attribute
The possible operators for the boolean attribute type are:
- =
- ≠
Import example :
field: shippable_us
        operator: =
        value: false
Text area attribute
The possible operators for the text/textarea attribute types are:
- STARTS WITH
- CONTAINS
- DOES NOT CONTAIN
- =
- ≠
- EMPTY
- NOT EMPTY
Import example :
field: description
        operator: CONTAINS
        value: "Awesome product"
If the operator is EMPTY or NOT EMPTY, the value element will be ignored
text can be written with or without quotation marks.
Reference entity single link attribute
The possible operators for the Reference entity single link attribute types are:
- IN
- NOT IN
- EMPTY
- NOT EMPTY
- WHERE : Allows you to use reference entity attributes as condition in your rule.
Import example :
field: size
        operator: IN
        value:
         - xxl
The value element will be ignored if the operator is EMPTY or NOT EMPTY.
We expect the option code as a value.
Reference entity multiple link attribute
The possible operators for the Reference entity multiple link attribute types are:
- IN
- NOT IN
- EMPTY
- NOT EMPTY
- WHERE : Allows you to use reference entity attributes as condition in your rule.
Import example :
field: material
        operator: IN
        value:
         - GOLD
         - LEATHER
The value element will be ignored if the operator is EMPTY or NOT EMPTY.
We expect the option code as a value.
Price attribute
The possible operators for the Price collection attribute type are:
- <
- ≤
- =
- ≠
- ‘>’
- ‘>=’
- EMPTY
- NOT EMPTY
Import example :
field: basic_price
        operator: <=
        value:
          amount: 12
          currency: EUR

        field: null_price
        operator: NOT EMPTY
        value:
          amount: null
          currency: EUR
The value element will be ignored if the operator is EMPTY or NOT EMPTY.
We expect numeric value and currency code in the following format:
- dot “.” is the decimal separator,
- there is no space between thousands.
- Table attribute
- Product links
Available actions
Add actions
| Add actions | What they do |
| Add categories | Classify products/product models into new categories without removing them from existing ones. |
| Add groups | Add groups to your product selection (product models don't have groups). |
| Add attribute value | Add values to multi-select, price collection, reference entity multiple links, or asset collection attributes, keeping existing values. |
| Add associations | Add associations to products/product models without removing previously associated ones (choose association type and target entity: products, product models, or groups). |
Import precisions
The expected values are:
- field: the attribute code or property
- items: the value codes. It has to be an array of the items you need to add.
- locale: the locale code for which the value is assigned (optional)
- scope: the channel code for which the value is assigned (optional)
Import examples
To add the “t-shirts” category to a set of products, the action will be as follows:
actions:
              - type: add
                  field: categories
                  items:
                    - t-shirts
The following action will associate the product_42 product and the tshirt group to your product (while keeping previously associated products and groups), and won't update the associated product models.
actions:
              - type: add
                field: associations
                items:
                    X_SELL:
                        products:
                          - product_42
                        groups:
                          - tshirts
Calculate action
| Calculate action | What it does |
| Calculate attribute value | Perform simple mathematical operations on numeric attribute values (number and measurement). |
This action only accepts number, measurement or price collection attributes for both the source and the destination. Additionally, a number attribute from a Reference Entity can be used as the source only.
Import precisions
The action is split into 3 required steps, and 1 optional:
destination: the value you want to update. It is composed of:
- field: the attribute code (required)
- locale: locale code if the attribute is localizable (optional)
- scope: channel code if the attribute is scopable (optional)
- currency: currency code if the attribute is a price collection (required if the destination attribute type is a price collection)
- unit: unit code if the attribute is a measurement (optional, the default measurement unit of the attribute will be used if not set)
source: the first operand of the operation. It requires at least either a value or a field and additional items. For instance, you can have:
- value: a constant numeric value - decimal separator: dot, no thousands separator, e.g: 1515.14 (required)
OR:
- field: attribute code of the source value (required)
- locale: locale code if the attribute is localizable (optional)
- scope: channel code if the attribute is scopable (optional)
- currency: currency code if the attribute is a price collection (required if the source attribute type is a price collection)
operation_list: the list of operations to execute (at least one operation is required)
It is exactly the same format as the source property, with an additional required field:
- operator: can be either add, subtract, multiply, or divide (required)
The operations are applied in the order they are provided, regardless of any mathematical priority. For instance, 5 - 3 + 2 x 5 will result in ((5 - 3) + 2) x 5) = 20
If a product value required in an operation is empty or if a division by zero occurs, the product won't be updated.
round_precision (optional): rounds the final result of the operation(s)
If this parameter is not specified or if the value is null, the final result will not be rounded. The round precision can be:
- a positive number: it represents the number of decimals to keep
- 0: rounded with no decimal
- a negative number: the rounding will occur before the decimal point (for example, with a precision of -1: 81 becomes 80, with a precision of -2: 81 becomes 100)
If the destination attribute does not allow decimals, the action can be applied only when the result is an integer. This behavior can be changed by setting up the round_precision to 0: the result will be rounded, and the action will be applied.
Import examples
For instance, to calculate the volume of a cone (volume = (π x R² x h) / 3), given a radius and a height, you can use the following action:
actions:
              - type: calculate
                destination:
                  field: volume
                  unit: CUBE_CENTIMETER
                source:
                  value: 3.14
                operation_list:
                  - operator: multiply
                    field: radius
                  - operator: multiply
                    field: radius
                  - operator: multiply
                    field: height
                  - operator: divide
                    value: 3
The following action will calculate a price in euros, based on the price in dollars and a ratio, and round the result to the nearest integer value:
actions:
              - type: calculate
                round_precision: 0
                destination:
                  field: price
                  scope: ecommerce
                  currency: EUR
                source:
                  field: price
                  scope: ecommerce
                  currency: USD
                operation_list:
                  - operator: multiply
                    field: ratio
When using measurement attributes, their value will be converted to the default measurement unit defined for the attribute. For instance, a Length attribute can have a 'CENTIMETER' default unit and yet its value for the product is 1 INCH. In that case, the value will be converted to 2.54 (1 inch = 2.54 cm).
Also, no consistency check is performed regarding the units. You can perfectly multiply a frequency by a length and put the result in a price attribute, even if it makes no sense 😃
Clear actions
| Clear actions | What they do |
| Clear attribute value | Delete attribute values from your product/product model selection. |
| Clear associations | Delete all associations from your product/product model selection. |
| Clear quantified associations | Delete all quantified associations from your product selection. |
| Clear groups | Delete all groups from your product selection (product models don't have groups). |
| Clear categories | Unclassify products/product models from all categories. |
Import precisions
The expected values are:
- field: the attribute code, "categories", "groups" or "associations".
- locale: the locale code for which the value is assigned (optional).
- scope: the channel code for which the value is assigned (optional).
Import examples
To clear the brand in en_US locale, the action will be as follows:
actions:
            - type: clear
              field: brand
              locale: en_US
To clear all the categories that are linked to products, the action will be as follows:
actions:
            - type: clear
              field: categories
To clear all the product associations, the action will be as follows:
actions:
            - type: clear
              field: associations
Concatenate action
| Concatenate action | What it does |
| Concatenate attribute value | Combine two or more values into a single value, useful for creating descriptions using free text, attribute fields, and line breaks. |
The possible source attribute types are:
- Text
- Text area
- Date
- Identifier
- Measurement
- Number
- Price
- Simple select
- Multi-select (a comma separates values)
- Code from reference entity
- Label from reference entity
- Text attribute from reference entity
- Number attribute from reference entity
- Reference entity multiple links
The possible target attribute types are:
- Text
- Text area
Import precisions
The parameters from and to are required in this format. Depending on the source attribute type, some optional keys can be added.The expected values are:
from
- field: the attribute code.
- locale: the locale code for which the value is assigned (optional)
- scope: the channel code for which the value is assigned (optional)
- format: format of the date following the PHP format specification (optional, only relevant for date attributes). By default, it is Y-m-d (e.g.,i.e. 2020-01-31)
- currency: the currency code for which the price is assigned (optional, only relevant for price_collection attributes). By default, all the prices in the collection are displayed, separated by a comma.
- label_locale: the locale code for the label of the option or record (optional, only relevant for simple select, multi-select, reference entity single link, and reference entity multiple link attributes). By default, the code of the option is used.
- unit_label_locale: the locale code for the unit of the measurement (optional, only relevant for measurement attributes). By default, the code of the unit is used.
We don't manage grammar corrections when using a measurement attribute type in a concatenation (i.e., no plural management).
Here is an example:
actions:
            - type: concatenate
              from:
                  - field: brand
                  - field: color
                    label_locale: en_US
                  - field: name
                    scope: ecommerce
                    locale: en_US
to
- field: the attribute code.
- locale: the locale code for which the value is assigned (optional)
- scope: the channel code for which the value is assigned (optional)
Import example
To concatenate the brand (without a value per locale and without a value per channel) and the model in the en_US locale into the product title value in the en_US locale, the action will be as follows:
actions:
            - type: concatenate
              from:
                  - field: brand
                  - field: model
                    locale: en_US
              to:
                  field: product_title
                  locale: en_US
Convert action
| Convert action | What it does |
| Convert Measurement Attribute Value | Convert a measurement value across attributes, locales, and channels |
This action is designed for Measurement attributes to support country or channel specific requirements, enabling the automatic conversion of values according to your selected locale.
Beyond converting values within the same attribute (e.g., French 'Height' in cm to US 'Height' in inches), you can also handle conversions across different attributes within the same measurement family.
For example, you can automatically convert a value from a 'Length_Metric' (cm) attribute to a separate 'Length_Imperial' (inch) attribute.
For this rule to work, both attributes need to belong to the same measurement family.

Copy action
| Copy action | What it does |
| Copy attribute value | Copy a value from one attribute to another. |
It is possible to copy values from an attribute type to another attribute of the same type (for example: from a text attribute type to another text attribute type). There are some exceptions, mind you!
You can copy the values of a table attribute to the same table attribute only, when you need to copy values from one locale/channel to another.
You can go even further. It is possible to copy attribute values in another attribute value field even if they are two different types of values. There are some exceptions, mind you! Take a look at the list below.
You can copy the given attribute to a selection of attribute types that we defined based on logical criteria:
You can copy the option code of a simple select attribute to:
- a reference entity single link attribute (the record must already exist)
- a text attribute
- a text area attribute
You can copy the option codes of a multi-select attribute to:
- a reference entity multiple links attribute (the records must already exist)
- a text attribute (a comma separates the codes)
- a text area attribute (a comma separates the codes)
You can copy the value of a text attribute to:
- a text area attribute
- a simple select attribute (the option code must already exist)
- a reference entity single link attribute (the record must already exist)
- a number attribute (the value must respect the number attribute validation parameters. Only decimal separators (comma '' or period '') are authorized; no thousand separator (neither period, nor comma, nor space) is permitted.)
You can copy the value of an identifier attribute to:
- a text attribute
- a text area attribute
You can copy the value of a date attribute to:
- a text attribute
- a text area attribute
The date will be copied into the ISO 8601 format (ex: 2019-01-25T12:00:00+01:00).
You can copy the value of a measurement attribute to:
- a text attribute
- a text area attribute
- a number attribute
You can copy the value of a number attribute to:
- a text attribute
- a text area attribute
- a measurement attribute
You can copy the value of a price attribute to:
- a text attribute
- a text area attribute
You can copy the record code of a reference entity single link attribute to
- a text attribute
- a text area attribute
- a simple select attribute (the option code of the simple select attribute must already exist)
You can copy the record label of a reference entity single link attribute to
- a text attribute
- a text area attribute
You can copy the value of a text attribute in a reference entity to:
- a text attribute
- a text area attribute
- a simple select attribute (the option code of the simple select attribute must already exist)
- a reference entity single link attribute (the record must already exist)
You can copy the value of a number attribute in a reference entity to:
- a text attribute
- a text area attribute
- a measurement attribute
You can copy the value of a reference entity multiple links attribute to:
- a text attribute
- a textarea attribute
- a multi-select attribute (the option codes of the multi-select attribute must already exist)
You can copy the value of an asset collection to:
- another asset collection attribute sharing the same asset family
If the destination Asset Collection has a configured capacity limit, the copy operation will respect this constraint. Only the first assets up to the specified limit will be copied from the source.
Specificity regarding simple select/multi-select attributes
In a list, an option is defined by a code and a label (the label is not mandatory). When the rule engine performs a copy action, it uses the option codes.
To copy values from a simple select attribute to another or from a multi-select attribute to another, every option you want to copy must already exist in the target attribute.
For instance, if you have two attributes: Attribute 1 and Attribute 2, both containing sizes.
You want to copy the size filled in Attribute 1 to Attribute 2. Both have an option with code "S", but this option doesn't have the same label: in Attribute 1, the label is Small, whereas, in Attribute 2, it is S.
When you perform a copy action on one or several products to copy this size, the option with code S will be copied from attribute 1 to attribute 2 in your product page, and the result will be:
- Attribute 1: Small
- Attribute 2: S
Import precisions
The expected values are:
- from_field: the code of the attribute to be copied
- to_field: the attribute code where the value will be copied
- from_locale: the locale code of the value to be copied (optional)
- from_scope: the channel code of the value to be copied (optional)
- to_locale: the locale code where the value will be copied (optional)
- to_scope: the channel code where the value will be copied (optional)
Import example
You have a value per channel and value per locale attribute called description. You can copy its content from the en_US locale and the print channel to the en_US locale and the e-commerce channel. The action will be defined as follows:
actions:
              - type: copy
                  from_field: description
                  from_locale: en_US
                  from_scope: print
                  to_field: description
                  to_locale: en_US
                  to_scope: ecommerce
Generate actions
| Generate action | What it does |
| Generate Attribute Value with AI | Use AI to create or enrich a product attribute based on your existing data and assets, for example to extract key details or generate marketing text. |
| Generate Translation with AI | Use AI to translate product content into another locale, while applying your own custom translation rules or instructions. |
| Generate Dynamic Content | Use Twig to dynamically insert product attributes (e.g. name, color) into your templates, and preview the generated content directly within the rule. |
Generate with AI
You can now automate content generation for a range of products using AI-Enhanced Enrichment, thanks to two new actions available in the Rule Engine:
- 'Generate attribute value with AI’
- 'Generate translation with AI'
To use the two new rules, you will need first to enable AI for content generation and/or translation at the attribute level.
On the tab ‘Generative AI’ of your attribute in Settings/Attributes, select ‘Yes’ if you want to enrich this attribute through AI. Then, select the attributes (text or text area attributes) that you would like to consider when generating product content within the attribute you enable with Generative AI.
Then, select a pre-defined template of instructions (’System prompt’) that will be used to prompt OpenAI’s ChatGPT and allow it to be as precise as possible in the content that will be created. You also have the option to generate a custom template of instructions (’System prompt’) if you choose ‘Custom’ in the drop-down list.
Prompt Guidelines
If you would like to build your customizable prompt, we can recommend checking out our ‘Prompt Guidelines’ section in our article dedicated to 'AI-Enhanced Enrichment' for advice on how to create an accurate system prompt for your business. You can then test the accuracy of your prompt by generating descriptions for several products in the Product Edit Form before automating this action with the Rule Engine.
- How to set up these new rules?
You can define the ‘Conditions’ for your Product Selection in the first part. The attributes or system fields will select and filter your products/product models. Altogether, your Conditions will create your 'Product selection'.
Your whole product catalog will be selected by default if you do not add any condition in the product selection of your rule. With these two new rules, existing content on your attributes might be erased and replaced by AI-generated content. We strongly recommend to fine-tune your selection with the relevant conditions for your products.
To generate AI-Enhanced product content in the Rules Engine, select the action ‘Generate attribute value with AI’: you must select the target attribute where product content will be generated, and the channel and locale of your choice.
To generate AI-Enhanced product translation in the Rules Engine, select the action ‘Generate translation with AI’: you must select your source attribute with channel and locale and then your target locale(s). You can select one or several locales as your target.
When creating a rule, if you notice that some fields are locked when selecting an action, it could be that your attribute is not enabled with AI. To do so, navigate through Settings/ Attributes and then select the Attribute (text or text area) that needs to benefit from ‘AI-Enhanced enrichment’, then select ‘This attribute can be enriched through AI’ for Generation and/or translation.
New permissions
If you do not see these two new rules available in the Rules Engine, we can recommend to check the ‘Permissions’ area of your PIM: System / Roles / Permissions / AI. You will have three ACL groups to choose from:
- Enable AI on attributes: this will allow users to set up any text or text area attributes to be enabled with AI, allowing for future AI-Enhanced content to be generated.
- Authorize AI usage on Product Edit Form: this will allow users to benefit from our new ‘Ask AI’ button on every text and text area attribute.
- Authorize Rules Configuration with AI: this will allow users to benefit from our two new rules to automate the generation of AI directly in the Rules Engine.
By default, these three permissions will be disabled.
To learn more about our AI-Enhanced enrichment feature and additional capabilities in the PIM, check out our dedicated article.
Generate Dynamic Content
This feature lets you dynamically insert product information into your dynamic templates, using the “Generate Dynamic Content” rule in the PIM. Imagine you want to create a product description that includes the product's name and color. To do this, you'll use the attribute codes assigned to these properties in your PIM.
Here's a basic example:
Let's say you have a product and want to include its name, stored in an attribute called product_name, and its color, stored in an attribute called product_color, in your description. You would write the following template:
This product is called {{ product.product_name }} and its color is {{ product.product_color }}.
When this template is processed, it will be replaced with the actual values from the product. For instance, if the product's name is "Elegant Lamp" and its color is "Golden", the output would be:
This product is called Elegant Lamp and its color is Golden.
Key Takeaway:
- Replace product_name and product_color in the example with the actual attribute codes from your PIM.
- The general format is {{ product.attributecode }} where attributecode is the code of the attribute you want to retrieve.
- The table below provides more detailed examples for various attribute types and advanced options.
Remember that the feature uses Twig, a powerful templating language. While basic usage is straightforward, you can refer to the provided Twig documentation for more complex operations.
Integrate product values in your dynamic content
Here is a table with most common ways to retrieve values from a product.
If you need more advanced information go the next section of this page. Keep in mind this a just a sum of common expressions but you may need to use most advanced Twig configurations depending on your needs.
Here is a list of attributes types & properties available : Text, Number, Measurement, Price, Simple Select, Reference entity single link, Family, Category
| Attribute type | Capabilities (not exhaustive) | Expression to use in your dynamic template | Example of output |
|---|---|---|---|
| Text Attribute | Display the full text | {{ product.Attributecode }} | My text |
| Display the text of a specific locale (localizable attribute) | {{ product.Attributecode(null, 'fr_FR') }} | Mon Texte | |
| Display the text of a specific channel and locale (localizable & scopable attribute) | {{ product.Attributecode('ecommerce', 'fr_FR') }} | Mon autre texte | |
| Number Attribute | Display the number | {{ product.Attributecode }} | 1 |
| Display the rounded number using round filter | {{ product.AttributeCode | round }} | 1234.1400 | |
| Display the rounded number with 2 decimals using round filter | {{ product.AttributeCode | round(2) }} | 1234.14 | |
| Display the number with 2 decimals, a space for thousands and a dot for decimals using number_format filter | {{ product.Attributecode | number_format(2, '.', ' ') }} | 1 234.14 | |
| Measurement Attribute | Display the number & the unit | {{ product.Attributecode }} | 6000.0000 CENTIMETER |
| Display the number only | {{ product.AttributeCode | amount }} | 6000.0000 | |
| Display the unit only | {{ product.AttributeCode | unit }} | CENTIMETER | |
| Display the rounded number only using round filter | {{ product.AttributeCode | amount | round }} | 6000 | |
| Display the number only with 2 decimals, a space for thousands and a dot for decimals using number_format filter | {{ product.Attributecode | amount | number_format(2, '.', ' ') }} | 6 000.00 | |
| Price Attribute | Display the number & the currency | {{ product.Attributecode }} | 2500.12 EUR, 2400.00 USD |
| Display the number only of a specific currency | {{ product.Attributecode | price('EUR') }} | 2500.12 | |
| Display the number only of a specific currency using round filter | {{ product.Attributecode | price('EUR') | round }} | 2500 | |
| Display the number only with 2 decimals, a space for thousands and a dot for decimals using number_format filter | {{ product.Attributecode | price('EUR') | number_format(2, '.', ' ') }} | 2 500.12 | |
| Apply a country specific currency format using format_currency filter | {{ product.Attributecode | price('EUR') | format_currency('EUR', {}, 'fr') }} | 2 500,12 € | |
| Simple Select Attribute | Display the code of the attribute option | {{ product.Attributecode | optionCode }} | optioncode |
| Display the label of the option in the locale of destination | {{ product.Attributecode | optionLabel(target.locale) }} | Option Label | |
| Display the label of the option in a specific locale | {{ product.Attributecode | optionLabel('fr_FR') }} | Label de l’option | |
| Apply a default value when the label is empty using the default filter | {{ product.Attributecode | optionLabel('en_US') | default('default label') }} | default label | |
| Multi Select Attribute | List all option codes, separated by a comma | {{ product.Attributecode | optionCode }} | optioncode1,optioncode2 |
| List all option codes, separated by a comma | {{ product.Attributecode | optionCode }} | optioncode1,optioncode2 | |
| List all option labels in a specific locale, separated by a comma | {{ product.Attributecode(null, 'en_US') | optionLabel('en_US') }} | option label 1,option label 2 | |
| Reference entity single link Attribute | Display the code of the reference entity record | {{ product.Attributecode }} | record_code |
| Display the label of the reference entity record in the locale of destination | {{ product.Attributecode | recordLabel(target.locale) }} | Record Label | |
| Display the label of the reference entity record in a specific locale | {{ product.Attributecode | recordLabel('en_US') }} | Record Label | |
| Apply a default value when the label is empty using the default filter | {{ product.Attributecode | recordLabel('en_US') | default('default label') }} | default label | |
| Reference entity multiple link Attribute | Display the codes of the reference entity records, separated by a comma | {{ product.Attributecode }} | record_code1, record_code2, record_code3 |
| Display the labels of the reference entity records in the locale of destination, separated by a comma | {{ product.Attributecode | recordLabel(target.locale) }} | Record Label 1, Record Label 2, Record Label 3 | |
| Display the labels of the reference entity records in a specific locale, separated by a comma | {{ product.Attributecode | recordLabel('en_US') }} | Record Label 1, Record Label 2, Record Label 3 | |
| Categories | List all categories of a product with their codes, separated by a comma | {{ product.categories | join(', ') }} | camcorders, cameras_sales |
| List all categories of a product with their label of a specific locale, separated by a comma | {{ product.categories | categoryLabel('en_US') | join(', ') }} | Camcorders, Cameras | |
| List all categories of a product with their label of the locale of destination, separated by a comma | {{ product.categories | categoryLabel(target.locale) | join(', ') }} | Caméscopes numériques, Caméras | |
| Family | Display the family code | {{ product.family }} | camcorders |
| Display the family label in the locale of destination | {{ product.family | familyLabel(target.locale) }} | Caméscopes numériques | |
| Display the family label in a specific locale | {{ product.family | familyLabel('en_US') }} | Camcorders | |
| UUID | Display the product UUID | {{ product.UUID }} | 2a443ff2-f9f6-4cfc-bba8-eb15b10ef8cc |
| Generate a UUID in a specific attribute | {{ uuid() }} | 1a6aad95-7f69-46f8-a7a7-68fe6f7013b7 |
Preview your dynamic content
Before applying your rule to all target products, use the preview feature to verify that your content generates as expected.
Steps:
- Enter your template: In the designated area, type or paste your dynamic content template.
- Select a preview product: Click the "Preview Product" button and choose a specific product or product model from the list.
- Review the results: The preview will display the generated content for up to 3 matching products and/or product models. For accurate results, especially with complex templates, it's recommended to initially shorten your product selection with a single, representative product.
- Refresh the preview: After making changes to your template, click the refresh icon (arrows) in the top right corner to update the preview.
Note: Some dynamic content might be generated (and previewed) as empty in the following contexts:
- The attribute is empty for the product.
- There is a syntax error in the dynamic value (incorrect attribute code, invalid characters, etc.).
Map actions
| Map actions | What they do |
| Map attribute value | Map a source attribute value to a target attribute based on configuration. |
Available mappings :
- Text to simple Select (the mapping will perform a set operation)
- Text to Multi Select (the mapping will perform an add operation)
Import precisions
The expected values are:
- from_field: the source attribute where to take the data
- locale: the locale code for which the value is assigned (optional)
- scope: the channel code for which the value is assigned (optional)
- to_field: the target attribute where to do the mapping
- locale: the locale code for which the value is assigned (optional)
- scope: the channel code for which the value is assigned (optional)
- configuration_code: the code of the configuration used in the action (the configuration needs to be already created)
Import example
In the example below, you can see that the following action will try to map the value of Style_ID with the values of List_of_Styles attribute, using Test configuration.
actions:
            - type: mapping_attribute
              from_field: Style_ID
              to_field: List_of_Styles
              configuration_code: Test
Remove actions
| Remove actions | What they do |
| Remove categories | Unclassify products/product models from selected categories. |
| Remove products from groups | Remove products from groups (product models don't have groups). |
| Remove attribute values | Remove values from multi-select, reference entity multiple links, or asset collection attributes. |
Import precisions
The expected values are:
- field: the attribute code or “categories”
- items: the value codes to remove
- locale: the locale code for which the value is assigned (optional)
- scope: the channel code for which the value is assigned (optional)
- include_children: if true, then it also applies the removal of the children to the given categories. It is only applicable if the field is set to “categories” (It's optional. By default, it is set to false)
Import examples
To remove the “t-shirts” category, the action will be as follows:
actions:
              - type: remove
                  field: categories
                  items:
                    - t-shirts
To remove the “clothing” category and its children, the action will be as follows:
actions:
              - type: remove
                  field: categories
                  items:
                    - clothing
                  include_children: true
To declassify products from the whole “Master catalog” tree, the action will be as follows:
actions:
              - type: remove
                  field: categories
                  items:
                    - master
                  include_children: true
Set actions
| Set actions | What they do |
| Set categories | Classify products/product models into chosen categories, removing them from previous ones. |
| Set family | Replace your products' families. |
| Set attribute value | Set values for any attribute type, replacing old values. |
| Set groups | Assign groups to your product selection (product models don't have groups). |
| Set associations | Assign associations to products/product models (choose association type and target entity: products, product models, or groups). |
| Set quantified associations | Assign quantified associations to products/product models (choose association type, target entity: products, product models, or groups, and quantity). |
| Set status | Set a status for your product selection. |
Import precisions
The expected values are:
- field: the attribute code or property
- value: the attribute value or property value
- locale: the locale code for which the value is assigned (optional)
- scope: the channel code for which the value is assigned (optional)
Import examples
To set the “My very new description for purple T-shirt” value to your description attribute in the en_US locale and for the e-commerce channel, the action will be as follows:
For instance, the following actions will disable the product and set its family to shoes. It will also categorize it in casual and women (while uncategorizing it from its previous categories), and add it to the summer group (while removing it from its previous groups).
actions:
              - type: set
                field: enabled
                value: false
              - type: set
                field: family
                value: shoes
              - type: set
                field: categories
                value:
                   - casual
                   - women
              - type: set
                field: groups
                value:
                  - summer
In the example below, you can see that the following action will replace the associated products for the X_SELL association, but won't replace associated product models or groups.
And for the UPSELL association, it will replace the associated product models and groups but not the associated products.
actions:
              - type: set
                field: associations
                value:
                    X_SELL:
                        products:
                          - product_42
                          - another_product
                    UPSELL:
                        product_models:
                          - amor
                        groups:
                          - tshirts
Actions inside a rule are executed in a specific order depending on their type. The execution order is:
- Parent actions
- Value actions (copy, concatenate, calculate, etc.)
- Status actions
- Family actions
- Category actions
- Group actions
- Association actions
- Quantified association actions
Within each type, actions are executed following the order they were added in the UI.
Important note: each action calculates its result based on the product data as originally loaded, not on values updated by previous actions in the same rule. For example, if you first generate a product description with AI, and then add a translation with AI action on this attribute, the translation will use the old value of the attribute and not the one just generated.
Replace action
| Replace action | What it does |
| Replace attribute value | Apply one or more configured search-and-replace operations on a Text or a Text Area value, including words and special characters (max 20 replacements per configuration). |
You can replace characters with:
- Other characters or words
- A space (enter a single space character in the replacement field)
- Nothing (leave the replacement field empty to remove the character)
Special Character replacement
You can replace special characters through the configuration. To do so, enable the Unicode option and enter the special character using its Unicode representation in the input field, even if the original character appears in a different format.
Example: If you want to remove a group separator from an attribute value, enable the Unicode option and enter U+001D in the input field. This will match all group separator characters in the data, regardless of their encoding (Unicode, UTF-8, UTF-16, etc.).
Import precisions
The expected values are:
- field: the attribute code or property
- locale: the locale code for which the value is assigned (optional)
- scope: the channel code for which the value is assigned (optional)
- configuration_code: the code of the configuration used in the action (the configuration needs to be already created)
Import example
In the example below, you can see that the following action will replace characters in the Name attribute using Test configuration.
actions:
            - type: search_and_replace
              field: Name
              configuration_code: Test
The Execution Tab
To best suit your specific business needs and automation strategies, the Akeneo Rule Engine offers three distinct modes for rule execution: Scheduled, Triggered, and Workflow-based. Choosing the right mode ensures that your rules run precisely when and how they are needed, helping to streamline your product information management processes and guarantee data quality.
Scheduled Mode
The Scheduled mode allows you to build powerful rules based on a comprehensive set of conditions in the Rule Builder. Once enabled, rules in this mode execute automatically every 6 hours, ensuring regular and predictable maintenance of your product data. This mode is also designed for maximum compatibility across all PIM attribute types.

For immediate needs, rules in this mode can also be triggered manually :
- Directly within the user interface (UI) of the Rule Engine.
- Automatically right after a product data update by using the dedicated "Products import with rule" job during an import process.
Triggered mode
What is it ?

The Triggered mode (also previously known as “On Save” mode) is designed for responsive data automation, offering an event-driven mechanism within the PIM. The primary benefit of this mode is its agility: a rule is executed as soon as a product is updated and one of the attributes specified in its conditions is modified. This direct link to product changes ensures that data enrichments and validations are applied instantly, guaranteeing maximum consistency and reducing the delay between a data change and its resulting effect. Unlike the Scheduled mode, execution is therefore not bound to a fixed time, but rather to the PIM's activity.
Rules in this mode apply exclusively to products being updated, which is why they are not compatible with conditions unrelated to product updates, such as date-based conditions (e.g., “execute the rule 60 days after the product is created”) or completeness-based conditions ( e.g., “execute the rule if a product have a completeness of at least 80%”).
System attributes ('created', 'updated', 'enabled', 'identifier', 'completeness', 'entity_type', 'family_variant') cannot be used as triggers in this mode. However, they are whitelisted to ensure reliability; if a rule uses any of these attributes in its conditions, it will trigger during every product update to ensure no changes are missed.
The delay between saving a product and executing the rule may vary based on system performance, and could take several minutes.
The Triggered mode is based on a Fair Usage Policy, and Akeneo reserves the right to disable a rule if it violates this policy by excessively impacting PIM performance.
Manual and Automatic Triggers
To further increase flexibility, you can define additional manual triggers. These triggers are entirely editable and customizable and act purely as execution options: any update to one of these attributes will trigger the rule, regardless of the value entered. This allows you to launch the rule without the need to modify its underlying conditions, thus extending its usability for specific, non-conditional needs.
It is important to note that the attributes used in the rule's conditions and those serving as the source for actions (Copy, Concatenate, etc.) are also counted as automatic triggers. They function similarly but are implicit and cannot be edited independently; they can only be changed by directly modifying the conditions or actions within the Rule Builder.
Having visibility over both these manual and automatic triggers provides the user with a complete overview of all possible execution scenarios for their rule, ensuring full control and predictability over the automated enrichment process.

In this example :
- Status is a manual trigger added by the user
- SKU and EAN are automatic triggers and come from the conditions in the rule builder Tab
- Product Description is an automatic trigger and comes from the source of the "Copy Attribute Value" action in the Rule Builder tab.
Manual triggers are always displayed and added at the top of the triggers list, ensuring immediate visibility for the user. You can add up to 10 manual triggers.
Manual triggers can only be set on the reference entity itself, not on its attributes.
Rules using reference entity attributes in actions (Copy, Calculate, Concatenate) are not executed when a reference entity record is updated.
Rule execution
In this mode, rules are triggered when all of the following conditions are met:
- The product is updated, whether through the UI, API, or import.
- The product, at the time of the update, matches the rule's defined conditions.
- At least one product value (attributes, categories,…) that is either part of the rule's conditions OR is part of the manuals triggers added OR is the source of an action (for Copy, Concatenate, Calculate and Generate Dynamic Content actions) is among the product values that were updated.
For the actions Generate Attribute Value with AI and Generate Translation with AI, attributes defined in the “Data to take into account” option in the AI Configuration are also considered as trigger sources.
Example:
Consider a rule defined as: “If the 'Color' attribute is 'Green', then perform an action.”
This rule will be executed only when both of these contexts apply:
- The product has the value ‘Green’ in its ‘Color’ attribute.
- AND the ‘Color’ attribute itself has been updated or enriched during the save operation.
The rule will not be executed if the product was updated but the ‘Color’ attribute was not part of that update (e.g., if the rule was created after the ‘Color’ was already set to ‘Green’ and a different attribute was modified).

Execute on all existing products
Note that you can also execute your rule for all existing products that are part of the product selection. This is a convenient way to ensure all products are up to date at the time of rule creation.
Using reference entity attributes in conditions (using “Where” operator) is supported only when the rule runs during product save. It is not supported when you use the “execute on all existing products” button.
In the UI
To do this in the user interface, go to the rule settings:
- Open a rule.
- Click on the "..." menu.
- Click the "Execute for all existing products" button.
Via Import
For “At product save” rules, you can specify for each rule in the import file if you want to execute it at creation, with the option “Execute_at_rule_import”.
Here is an example of a YAML import :
 rules:
    set_tshirt_weight:
        priority: 0
        enabled: true
        conditions:
            -
                operator: AND
                value:
                    -
                        field: sku
                        value: '9642233'
                        operator: CONTAINS
        actions:
            -
                field: weight
                type: set
                value:
                    unit: KILOGRAM
                    amount: 600
        labels:
            de_DE: ''
            en_US: ''
            fr_FR: ''
        execution_type: near_real_time
        execute_at_rule_import: true
Compatibility
Entity types
Work for ✅ products (simple products & variants), ✅ product models (root & sub product models) and records.
Conditions
Triggered mode is compatible with most conditions except:
- ❌ PX insights
Actions
Triggered mode is compatible with most actions except:
- ❌ Clear quantified associations
Rules based on children values
If you are using product models, you can choose whether the rule conditions are evaluated on the product model itself or on its children.
When Based on children values is enabled, the rule evaluates attributes on descendant products/product models (not only direct children). This means you can, for example:
- define conditions on variant products, and
- execute actions on a higher-level product model,
even if there is one sub product model between them.

This option is available only in Triggered mode, and works for both:
- Automatic execution (when saving products, as usual in Triggered mode)
- Manual execution of triggered rules
Condition evaluation
Choose how the rule should behave when evaluating children:
- All children: the rule is executed only if all relevant children match the conditions.
- At least one child: the rule is executed if at least one relevant child matches the conditions.
Because triggered rules run upon product save (automatic execution) and can also be run manually in Triggered mode, they remain compatible with the same conditions supported by Triggered rules.
Actions
Choose how the rule should behave regarding children:
- All children: the action is executed only if all relevant children match the conditions.
- At least one child: the action is executed if at least one relevant child matches the conditions.
As these rules are executed in Triggered mode (either automatically on save, or via manual execution of triggered rules), they are compatible with the same actions available in Triggered rules.
Workflow-based mode
The Workflow-based mode lets you create powerful rules using the Rule Builder's actions. These rules make your Collaboration Workflows smarter and automate product tasks. Once enabled, rules execute automatically on workflow triggers, helping to speed up your product enrichment processes.

To learn more about how to connect Workflow-based business rules to workflows, please refer to the Set up your Collaboration Workflows.
Rules Engine Use Cases
The Akeneo Rules Engine is a powerful tool for automating repetitive tasks and ensuring data consistency, saving you valuable time and effort. Here are some practical use cases:
- Automatic Attribute Population: As shown in the screenshot, you can automatically populate complex attribute values, like a size chart table, based on product selections (e.g., Family: "Mens Clothing", Gender: "Men", Size Type: "Regular"). This eliminates manual data entry for common product attributes.
- Dynamic Categorization: Automatically assign products to categories based on their attribute values. For example, assign all products with "color" set to "red" and "in stock" to a "Red Clearance" category.
- Data Standardization: Ensure consistent data across your catalog. For instance, if a product's "material" is "leather," automatically set its "care instructions" to "wipe with a damp cloth."
- Enrichment based on Completeness: Identify products with missing essential attributes and automatically apply an action. For example, if the "description" field is empty for a product, copy content from a "short description" field to populate it.
- Calculating Values: Perform mathematical operations on numeric attributes. For example, calculate the "selling price" by adding a pre-defined margin to the "cost price."
- Cross-Attribute Enrichment: Copy values between different attribute types. For instance, copy a "brand name" from a simple text attribute to a reference entity single link attribute.
A real example
You're done with all these specifications!
We hope that you perfectly understand the rules engine operation now. But to clarify it, we thought it would be better to take a real example of a rule 😉.
Let's say that, among all the attributes of your product form, you have one price collection attribute type and a boolean attribute type. In the price collection, you define the price of your product in USD. The boolean attribute defines if your product is ready to be sent to your ecommerce platform (if it is set to "yes", it means that the product is ready).
Manually changing the status of the boolean attribute is time-consuming and a very repetitive task... But for the rules engine, it's a perfect match! The mission of the rules engine here is to automate the status change of the boolean once the price attribute has a value.
To do so, follow these steps:
- Open a text editor to write the YML code of the rule.
- Write this:
my_rule:
    priority: 90
    enabled: true
    conditions:
        -   operator: AND
            value:
                -   field: basic_price
                    operator: NOT EMPTY
                    value:
                        amount: null
                        currency: EUR
    actions:
        -   field: ecommerce_ready
            value: true
            type: set
    labels:
        en_US: 'Set ecommerce_ready'
        fr_FR: 'Définir ecommerce_ready'
And finally, import your YML file using the Akeneo rules import job.
If you want to execute the rule directly:
- Go to Settings, Rules
- Click on the "play" button on your rule line and confirm.
The rule is executed 😉
View All Rules
The Settings/Rules screen displays all rules created or imported in the PIM. You can search by rule code or label.
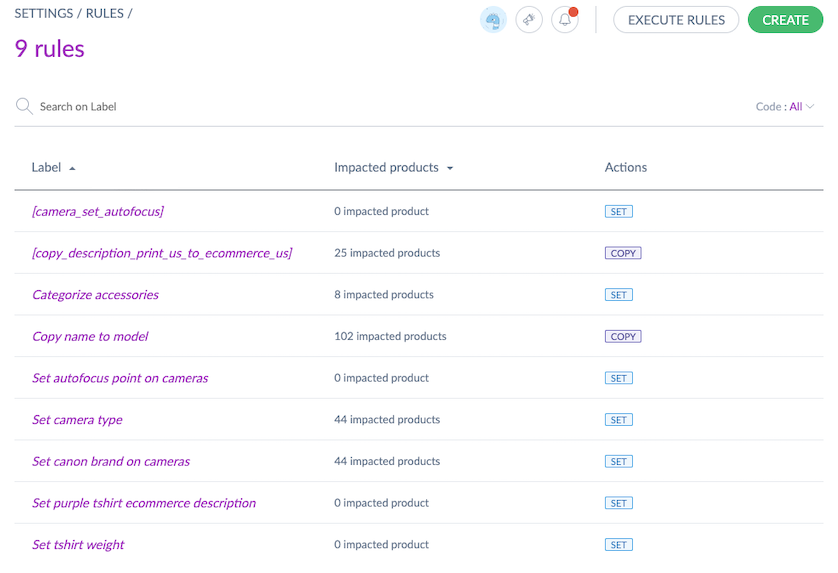
The last column shows tags indicating each rule's action type (add, copy, concatenate, set, calculate, remove, clear). You can also sort rules by priority.
Calculate the Number of Impacted Products Per Rule
To help validate rule conditions, you can calculate the number of products a rule will affect. The first execution might impact many products, but subsequent runs could affect fewer or none.
- Select one or more rules by checking the box on the left side of the screen.
- Click Calculate the impacted products.
- Confirm the action in the pop-up.
- A confirmation message will appear, and you'll be notified when the calculation is complete.
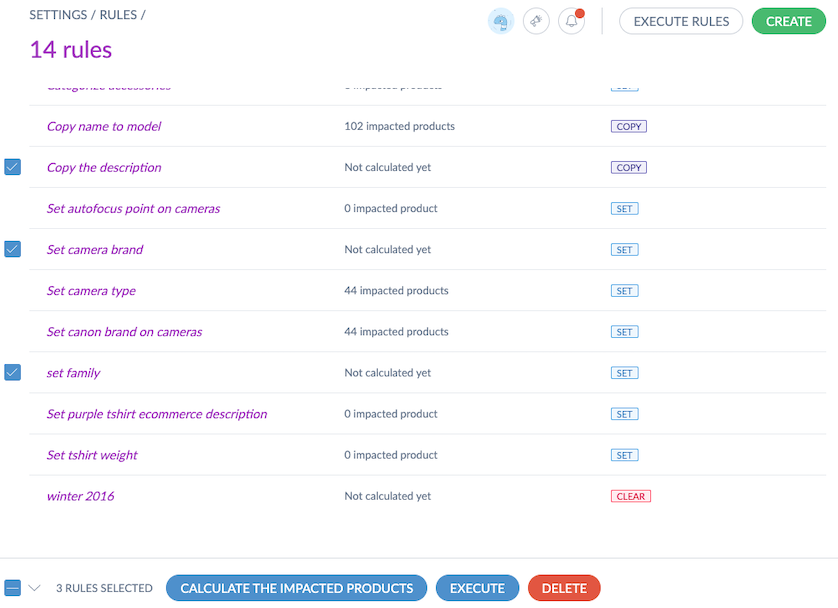
The number of impacted products will appear in the Impacted products column on the right side of your screen.
When a rule runs in Akeneo PIM, it only processes products whose Last update date has changed since the previous run, excluding unchanged products to speed up execution. This logic also applies when a rule is modified: the next execution will consider all products matching the new conditions as potential candidates.
This behavior does not apply if a rule:
- Contains a condition on a date attribute.
- Contains a condition on the Updated date.
- Includes an action with a dynamic date (e.g., Now, Date in the past, or Date in the future).
Execute Rules
Rules run automatically four times daily (5 AM, 11 AM, 5 PM, and 11 PM UTC) and after bulk actions or imports with rules enabled.
When importing with rules, products without identifiers or UUIDs are skipped during immediate rule execution.
- Rules will apply immediately after import for all products with identifiers or UUIDs.
- For products skipped due to missing identifiers or UUIDs, rules will execute four times daily, similar to a standard import.
But you can also manually execute:
- A single rule
- A selection of rules
- All rules (note: this may take a long time)
Rules support product models, allowing you to define rules based on attributes at the product model level (or sub-product model level).
The rule execution summary is available in the process tracker.
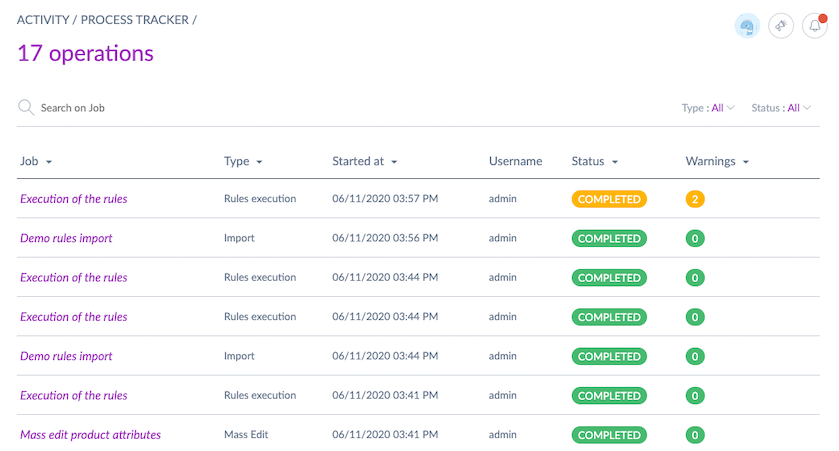
The summary provides details such as the number of rules executed, products/product models updated, and any warnings.
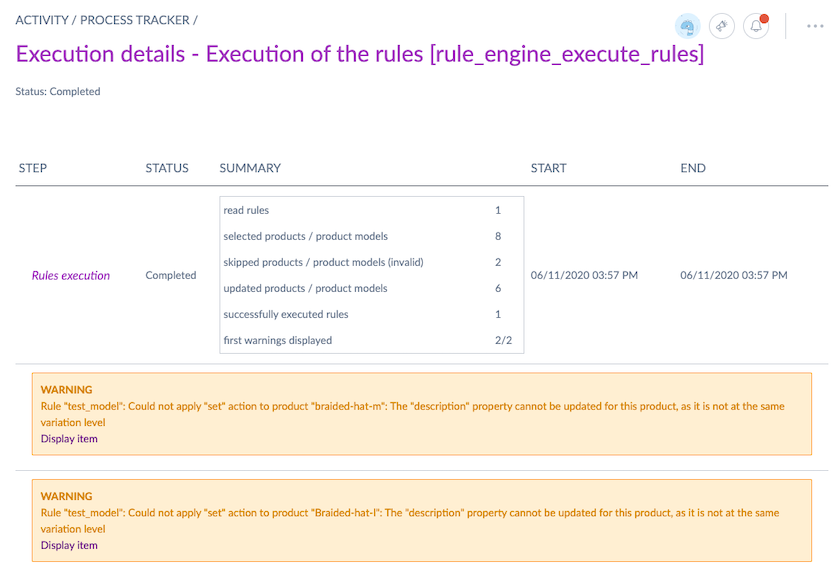
To view summaries of nightly scheduled rules in the process tracker, you must have the View all jobs in process tracker permission enabled under Roles.
Execute a Single Rule
To execute a rule, click Execute at the end of its line in the grid. A confirmation message will appear.

While editing or creating a rule, you can also execute it by clicking ..., then Save and execute.
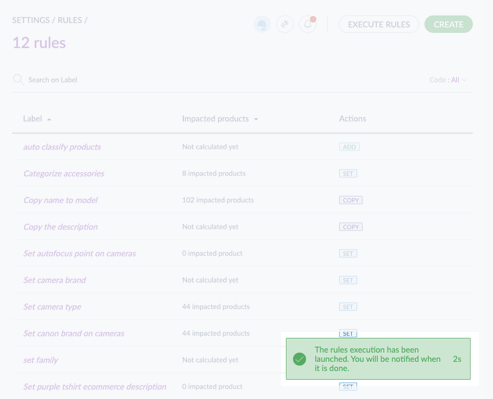
Execute a Selection of Rules
To execute multiple rules at once:
- Select the rules by checking the box on the left side of each rule's line.
- Click Execute.
- Confirm the action in the pop-up.
- A confirmation message will appear, and you'll be notified upon completion.
Duplicate a Rule
To avoid re-creating similar rules, you can duplicate an existing one. For example, if rules differ by only one condition.
To duplicate, access the rule edit form, click ..., then Save and duplicate. A creation pop-up will appear where you can enter a new code and label for your duplicated rule.
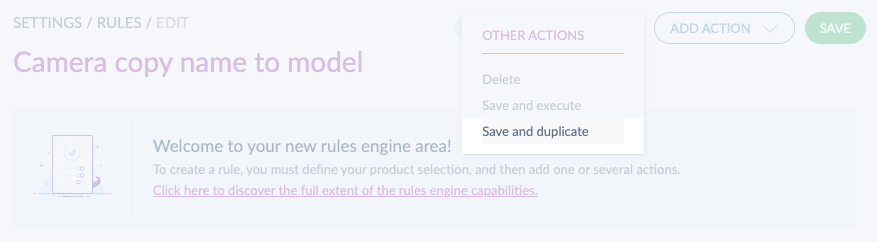
Duplicated rules are disabled by default. To execute them, change their status in the rule's Properties tab.
Delete Rules
Once a rule is deleted, the rule engine will no longer execute it, but products will retain values previously calculated by that rule.
Delete a Single Rule
To delete a rule, click Delete at the end of its line in the grid. Confirm the action in the pop-up.

If the Delete button is missing, you may lack the necessary permissions. See Manage your user roles.
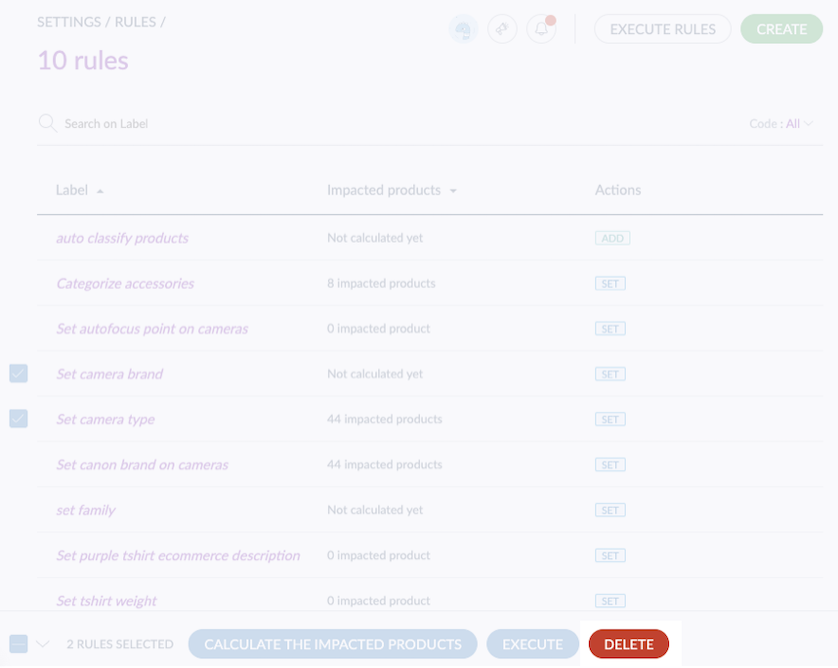
Delete a Selection of Rules
To delete multiple rules at once:
- Select the rules by checking the box on the left side of each rule's line.
- Click Delete.
- Confirm the action in the pop-in.
Limitations
The rule engine has the following limitations:
- 50 rules in the Growth package
- 300 rules in the Advanced package
- 600 rules in the Premium package
Contact your Customer Success Manager (CSM) if you need to increase this limit.
Our system is built to handle temporary errors and adjust automatically when the platform scales. This means it can pause or restart long-running tasks when needed, without losing consistency or reliability.
In practice, this allows the system to sometimes trigger rule engine executions outside the usual schedule (more than 4 times a day). When that happens:
- If another execution is already in progress, the new one will be stopped and marked as failed — but this has no impact at all on your data.
- If no other execution is running, the new one will start and complete normally.