


What's the family-by-family migration?
In this migration, you can have several asset families for your existing PAM assets.
You will need to define 2 things manually:
- For each asset, its asset family.
- For each asset collection product attribute, the linked asset family.
Other steps are automated, you just need to launch a few commands and your PAM assets will be migrated in the 4.0 new Asset Manager:
- The asset families will be automatically created in the PIM.
- All your assets will be migrated and linked to the asset family you defined.
- All your existing PAM asset collection product attributes will be linked to the asset family.
- And all the links between your assets and your products / product models will be kept.
When do we recommend you this migration?
We recommend you using this migration if:
- You have assets of different types (for example, you manage images, PDF files, videos).
- AND each asset collection contains only one single type of asset (for example, images or PDF files) because each asset collection will then be linked to a single asset family.
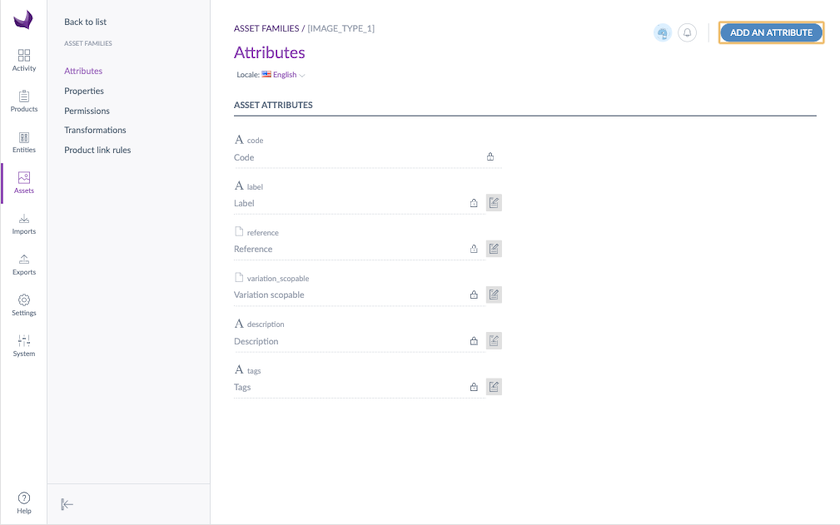
What will my asset families look like?
The asset families that will be created could contain the following attributes:
- reference (media_file attribute): containing the reference file of the PAM asset. This reference attribute is used as main media for this family.
- reference_localizable (media_file attribute): an attribute with a value per locale containing the reference file of the asset for each locale, if the asset was localizable in the PAM
- variation_scopable (media_file attribute): an attribute with a value per channel containing the asset variation file for each channel
- variation_scopable_localizable (media_file attribute): an attribute with a value per channel containing the asset variation file for each channel and locale, if the asset was localizable in the PAM
- description (text attribute): the PAM asset description
- categories (text or multiple options attribute): the PAM asset categories (only if you used categories in the PAM: refer to What about my PAM categories)
- tags (text or multiple options attribute): the PAM asset tags (refer to What about my PAM tags)
- end_of_use (text attribute): the PAM asset end of use date (only if you used the end of use date in the PAM)
During the migration, you will be able to choose the asset families codes.
If, for a given asset family, assets were not localizable in the PAM, the reference_localizable and variation_scopable_localizable attributes won't be created in this new asset family. If, for a given asset family, assets were localizable in the PAM, the reference and variation_scopable attributes won't be created in this new asset family.

What are the steps to migrate?
8 steps to migrate your PAM assets:
- Install & Setup the migration tool
- Export the PAM assets
- Choose your new asset families
- Create your API connection
- Import your PAM Assets
- Update the former PAM assets collection product attributes
- Check and test the assets migration
- Remove or set transformations (Depending whether you want to use transformations)
Step 1 | Install & Setup the migration tool
We built a dedicated tool CSVToAsset to migrate your PAM assets to the new Asset Manager.
To install and setup this tool, refer to its readme file.
Step 2 | Export the PAM assets
First, you need to export your PAM assets in CSV files.
Run php bin/console pimee:migrate-pam-assets:export-assets <temporary-folder> <path-to-ee-installation>
with:
- temporary-folder the folder to export your PAM assets CSV files.
- path-to-ee-installation is the path of your local Enterprise Edition. If you use Docker, this value will be /srv/ee.
This command will export 2 files, named <temporary-folder>/assets.csv and <temporary-folder>/variations.csv, each of them containing the assets and the assets variations.
For more details about this command and its parameters, you can refer to the CSVToAsset readme file.
Step 3 | Choose your new asset families
Then, as you want to create several asset families for your assets, you need to define its asset family for each asset.
- Open the assets.csv file with your favorite spreadsheet editor, and add a new column named family.
- For each asset, in this new family column, put the family code where you want to gather your asset. You can put a different value for each line of this file / asset, it will create as many families as there are family codes.
- Save your assets.csv in the same format as the original one (the most important is the separator, it has to be ";").
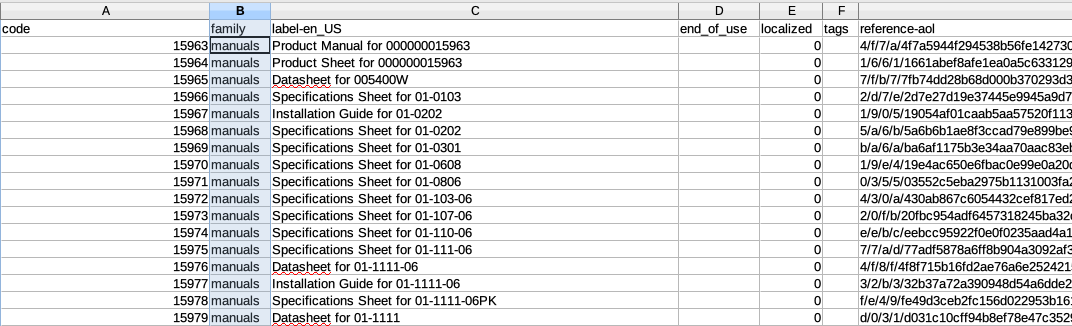
If the asset families you wanted to create were previously categories or tags in the PAM. These 2 attributes are exported in the assets.csv file, so you just have to copy them in the new family column or rename the existing column in family.
Step 4 | Create your API connection
Create your new connection to be able to use the API. Go to your Enterprise Edition path, then:
Run php bin/console akeneo:connectivity-connection:create migrations_pam
Store these credentials into a credential file named credentials containing 4 lines in the root of the CsvToAsset folder:
- clientId,
- secret,
- username
- and password.
Don't forget to remove this file when you finish to import all your assets.
Ensure the role linked to migration_pam connection has the permission to "list channels" to allow the script to work.
Step 5 | Import your PAM assets
Go to the CsvToAsset folder and run the migration process:
Run php bin/console app:migrate /path/to/assets.csv /path/to/variations.csv
This command will automatically:
- Create the asset families using the new family column
- Import the exported assets in the new Asset Manager
For more details about this command and its parameters, you can refer to the CSVToAsset readme file.
Step 6 | Update the former PAM asset collection product attributes
Finally, we need to update the PAM asset collection product attributes to match the new asset families.
Run php bin/console pimee:assets:migrate:migrate-pam-attributes
Step 7 | Check and test the migration
Yeah, well done, your assets have been successfully migrated to the new Asset Manager!
But we strongly recommend you to run some checks and tests to make sure that everything is ok. You can also take some time to deep dive into our brand new Asset Manager.
To view all your assets
- Go to the Assets menu
- Your asset family will be selected by default and all your assets will automatically appear in the grid
- You can search for an asset or display an asset by clicking on it
If you want to go further, please read this article Create and display assets.
To view your asset family structure
- Go to the Assets menu`
- Click on the button Edit family on the top right corner of the grid
- Family attributes are displayed in the Attributes tab, you can translate the attributes labels for each locale
- Family properties are displayed in the Properties tab, you can translate the family labels for each locale

If you want to go further, please read this article Manage asset families.
By default, for each asset family, a label and a media attributes are created, if you don't need them you can delete these attributes.
You don't want to have a description, categories, tags or end-of-use date attributes on your new assets, you can default, for each asset family, a label and a media attributes are created, if you don't need them you can delete these attributes.
To view the assets linked to a product
- Click on a product on the product grid
- Click on the Assets tab, all the assets linked to this product will be displayed
If you want to go further, please read this article Work with asset in an asset collection attribute.
Step 8A | Remove transformations
In the new Asset Manager, transformations are no longer mandatory.
So if you were used to having fake transformations (resize 100% or 99%) in the PAM in order to keep your reference file as it was, the only thing you need to do now is to remove the existing variation files migrated.
To do it, you just have to delete the attributevariation_scopable and variation_scopable_localizable in the family.
And to not define any transformation 😉
Step 8B | Set transformations
If you were using some real transformations in the PAM (for example, a thumbnail transformation), the variations of the assets will be migrated during the step 2. But the transformations settings won't be migrated since we totally change the format of the transformations settings.
So you need to set transformation rules in the new Asset Manager. The transformations are not defined by channels anymore. They are defined by asset family, and there can be up to 10 transformations per asset family. It means that you can have several transformations for the same channel for example.
The format is a bit different but don't worry, take a look at this article About the asset transformations.
To know more about our powerful transformations, please read this article About the asset transformations.
FAQ
The FAQ is available in the main article about the asset migration.