


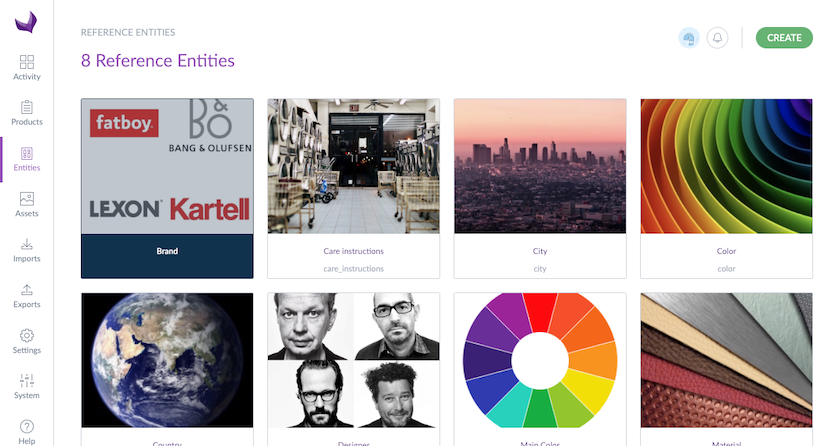
Display the reference entities
To display the existing reference entities, click on the Entities menu.
No reference entity is created by default.
From this single place, you can:
- Create your 1st reference entity
- Define its properties (Properties tab)
- Define its records attributes (Attributes tab)
- Create and enrich its records (Records tab)
- Define its permissions, which user groups can view or edit this reference entity and its records (Permissions tab)
If a reference entity has already been created, simply click on it to access its information.
If you create a PDF version of a product, it will only display the codes of the Reference Entities and not their labels
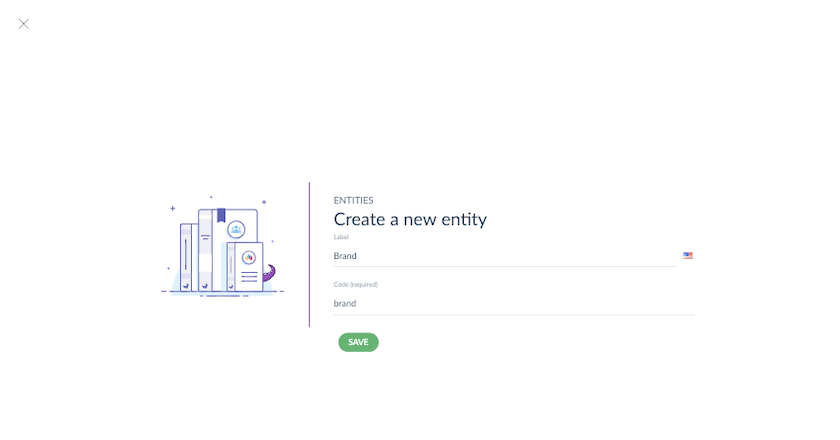
Create a reference entity
- Click on the Create button
- Input the label of the reference entity in the current catalog locale
- The code is automatically generated using the label, but it can also be updated (this code must be unique and may only contain letters, numbers and underscores)
- Click on the Save button or press Enter to create the reference entity
Then you can define its properties (Properties tab) and define its records attributes (Attributes tab).
We defined a volume limitation of 1,000 reference entities for this feature to guarantee that the PIM is functional and runs smoothly. An error message will prevent you from creating more.
Define its properties
In the Properties tab, you can manage the settings of your reference entity:
- Labels: Edit and translate the label of the reference entity to ensure it is localized for all enabled locales.
- Reference entity image: Upload a specific image used to identify the reference entity itself within the PIM interface.
-
Main Record Image: Define which attribute serves as the primary visual for individual records.
- You can select any image or asset collection attribute.
- Note: If a record contains multiple assets within the selected asset collection, the PIM will automatically use the first asset added to that record as the main picture.

Delete a reference entity
To delete a reference entity, follow these steps:
- Go to the Properties tab of the reference entity you want to delete
- In the top right corner of the header, click on ... for other actions and then Delete entity
- A confirmation pop-in opens to confirm that you want to delete the reference entity
- Click on the Delete button
You cannot delete a reference entity if:
- This reference entity has some records: first, you need to delete the records of this reference entity.
- This reference entity is linked to some product attributes: then, you need to delete the related product attributes to this reference entity.
Define its attributes
In the Attributes tab, you can define what are the attributes for these reference entity records.
For example, a Brand reference entity could be described by the following information:
- a code
- a label
- an image
- a country
- a designer
- a foundation date
- a photo
- a description
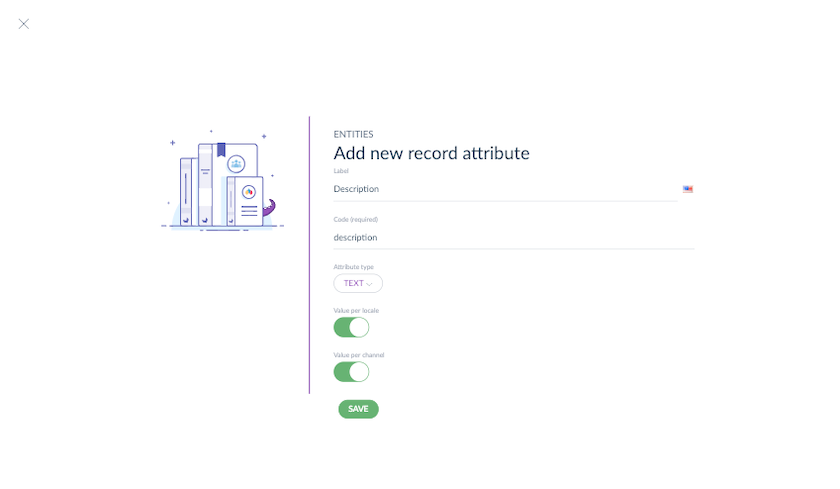
Add an attribute
To add an attribute, follow these steps:
- Go to the Attributes tab of a reference entity
- Click on the Add an attribute button
- Input the label of the attribute in the current catalog locale
- The code is automatically generated using the label but you can update it (this code must be unique and may only contain letters, numbers and underscores)
- Select the attribute type:

- Image: for images attributes
-
Text: for text or text area attributes
You can add up to 65,535 characters. Please note that HTML tags are included in the characters' count.
- Number: for number attributes
- Reference entity single link: to link a record to only one entity record
- Reference entity multiple links: to link a record to several entity records
- Single option: to define a list of options with a single choice
- Multiple options: to define a list of options with multiple choices
-
Asset collection: to link one or several assets
NEW Drag & Drop Functionality for Reference Entities Attributes
Reference Entity attributes (single & multi link) now support a new drag-and-drop functionality!
- If the attribute type is a reference entity single/multiple link or an asset collection, select the reference entity or asset family to link to this attribute in the list.
- Tick Value per locale if your record could have different values per locale for this attribute
- Tick Value per channel if your record could have different values per channel for this attribute
- Click on the Save button or press Enter to add the attribute
The attribute is now created and an edit pop-in opens with the attribute parameters depending on the attribute type.
These attributes parameters, except the label, can't be edited afterwards.
To define a text area attribute, refer to Edit an attribute.
To guarantee that the PIM is functional and runs smoothly, we defined a volume limitation of 100 attributes per reference entity for this feature. If you try to create more than 100 attributes, you will have a blocking message.
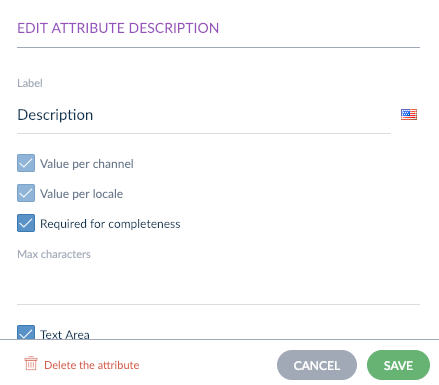
Edit an attribute
To edit an attribute, follow these steps:
- Go to the Attributes tab of a reference entity
- Click on the Edit icon
- An edit pop-in opens with the attribute parameters depending on the attribute type
- You can translate the label of the attribute by switching the current locale in the header
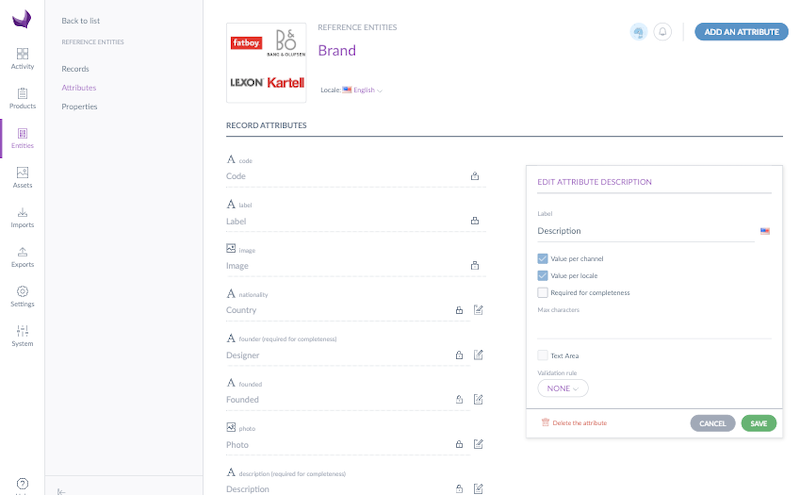
- Depending on the attribute type, set the specific parameters of the attribute (see below the specific parameters)
- Click on the Save button or press Enter to save the attribute parameters
Edit an image attribute
- Max file size (MB): maximum file size allowed in MB
- Allowed extensions: allowed files extensions (gif, jpeg, jpg, pdf, png...)
Edit a text attribute
- Maximum number of characters: maximum number of characters that an attribute value can have
- Text area: long text
If Text area:
- Rich Text Editor: activates the WYSIWYG feature to format the text
If not Text area:
- Validation rule: defines how the value should be validated (such as an URL, an email, or using a regular expression)
Edit a number attribute
- Decimal values allowed: allows decimal values for this attribute
- Min value: the smallest value allowed
- Max value: the largest value allowed
To only allow positive values, define a min value equals to 0.
To only allow negative values, define a max value equals to 0.
Edit a reference entity simple/multiple link attribute
- Related reference entity: the reference entity linked to this attribute, this information cannot be updated
Edit a single/multiple options attribute
- The Manage options button enables to manage the options of the list
Edit an asset collection attribute
- Related asset family: the asset family linked to this attribute, this information cannot be updated
Manage the options
To define the options of a single/multiple options attribute, follow these steps:
- Go to the Attributes tab of a reference entity
- Click on the Edit icon of the attribute
- An edit pop-in opens with the attribute parameters
- Click on the Manage options button
- A fullscreen opens to manage the options
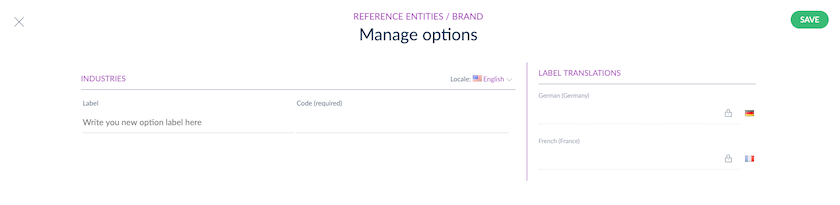
Add options
- Write your option label
- The option code is automatically generated using the label, but it can also be updated (this code must be unique and may only contain letters, numbers and underscores)
- Write your next option label
- Click on the Save button, the fullscreen is closed
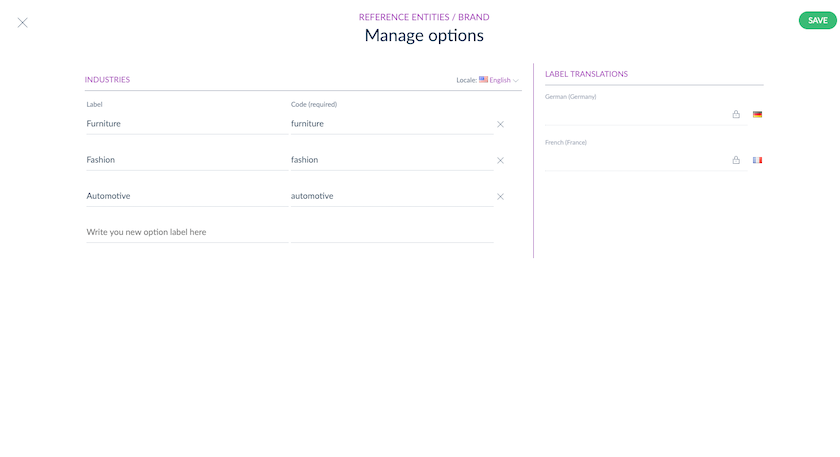
The code can't be edited afterwards, you can only edit/translate the label.
To quickly input all your options:
- You just have to input the 1st option label
- Then press Enter
- Input the 2nd option label
- Then press Enter
- And so on...
To guarantee that the PIM is functional and runs smoothly, we defined a volume limitation of 100 options per attribute for this feature. If you try to create more than 100 options, you will have a blocking message.
If you need to manage more than 100 options per attribute, we advise you to create a dedicated reference entity that can be linked to this entity.
Translate options
- Change the catalog locale using the switcher
- Translate the option label
- Translate the next option label
- Click on the Save button, the fullscreen is closed
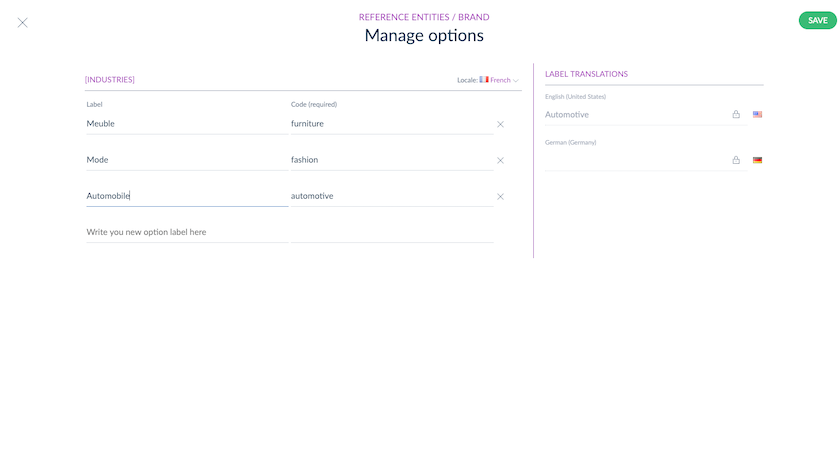
To help you for the translation, the labels of the option on other locales are displayed in the right panel.
To quickly translate all your options:
- You just have to translate the 1st option label
- Then press Enter
- Translate the 2nd option label
- Then press Enter
- And so on..
Remove options
To remove an option, click on the cross at the end of the option line.
Define the completeness
To define the attributes required for the completeness of a record:
- Go to the Attributes tab of a reference entity
- Click on the Edit icon of an attribute
- Tick Required for completeness if this attribute is required for the completeness of a record
- Click on the Save button or press Enter
If this attribute is not required for the completeness, untick Required for completeness.
Delete an attribute
To delete an attribute, follow these steps:
- Go to the Attributes tab of a reference entity
- Click on the Edit icon of the attribute you want to delete
- An edit pop-in opens with the attribute parameters
- Click on the Delete the attribute button
- A confirmation pop-in opens to confirm that you want to delete the attributes
- Click on the Delete button
The attribute and its relevant information will be deleted in the records of the reference entity. Once you have confirmed the action, it cannot be reverted.
Set permissions on a reference entity
To set permissions on a reference entity, please read this article.