


About the product link rules
What if we automate the link between assets and products?
The product link rule feature enables you to automatically link assets to products/product models, based on assets attributes. Indeed, most of you use a naming convention to name your assets, so it is quite simple to automate this link in order to gain time in your daily work.
With the Asset Manager, it is possible to define this convention in the PIM in order to automatically make the link between your assets and your products/product models.
Yes, I agree with you, it looks promising 😉 So let me introduce you the first part of this product link rule functionality: the naming convention.
Focus on the naming convention
We noticed that you, our dear customers, usually name your asset files or asset codes using precious information:
- the SKU of the product corresponding to the asset,
- the locale into which your user guides are translated,
- the asset function: Is it a frontview, backview,...?,
- …
The idea of the naming convention feature is to be able to extract those pieces of information and use them to automatically enrich your assets with new attributes values.
Just a reminder but an important one for you to better understand what is coming next: the product link rule is based on asset attributes 😉
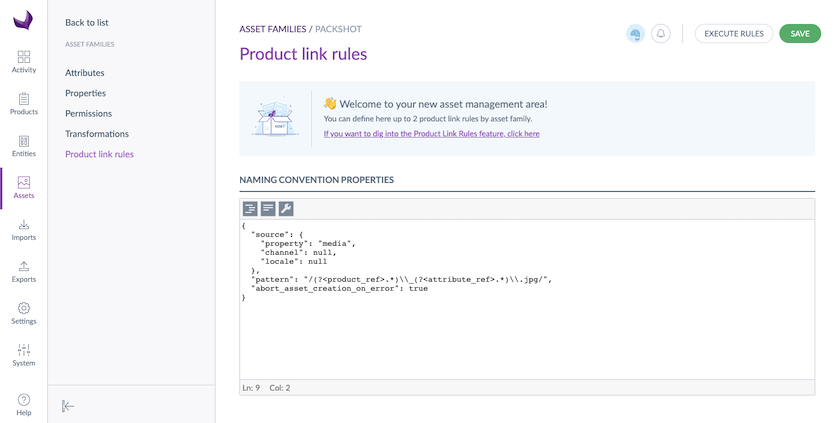
Defining a naming convention for each asset family will enable the PIM to split your asset code or your main media filename to extract the information you want and use it to populate asset attributes.
This naming convention is defined at the asset family level.
The naming convention can be defined via the API or directly in the PIM UI, in the Product Link Rules tab of each asset family.
This operation is automatically run by the PIM during each asset creation.
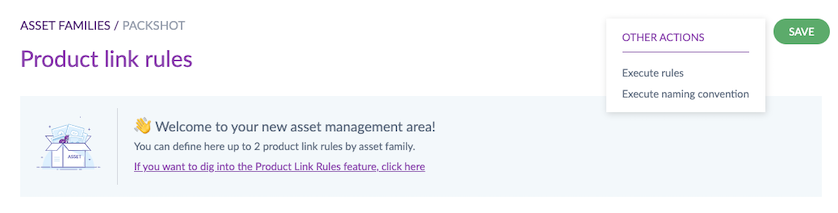
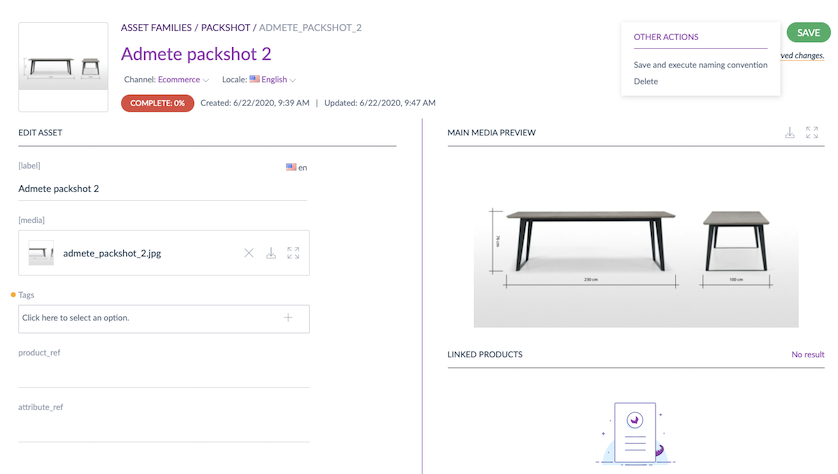
You can manually execute naming conventions as well, both in the asset edit form (you will execute the naming convention for this asset only), and in the Product link rules tab of your asset family (you will execute naming convention for all the assets of this family). These actions are available by clicking on ....
In the asset edit form
In the product link rules tab
Should I split the asset code or the filename?
As said above, you can choose to split the asset code or the main media filename. What should you do? Let's discover it.
First use case
If you mass upload your assets in the Asset Manager - meaning that your main media attribute is a media file attribute - you can choose to split either the code of the asset, or its filename.
Second use case
If you create your assets one by one in your family, or if the main media attribute of your asset family is a media link attribute (meaning that you can't use the mass upload feature), you must split the code of your assets, not the filename.
Why? Because the naming convention is executed at the asset creation step. In the second use case, we don't know the filename of the asset when the asset creation takes place since we add the file afterward. That's why the naming convention won't work if you split the filename instead of the code 😉
The format of the Naming Convention
The JSON format of the naming convention contains several parts:
- the source part,
- the pattern part,
- a boolean abort_asset_creation_on_error stating whether to abort the asset creation in case there was an error during the application of the naming convention.
- a value mappings part (optional) to map the captured value with options from simple or multi selects in the asset.
{
            "source": {...},
            "pattern": A_REGEXP,
            "abort_asset_creation_on_error": A_BOOLEAN,
            "value_mappings": {...}
        }
Examples
{
          "source": {
            "property": "main_asset_image",
            "channel": null,
            "locale": null
          },
          "pattern": "/(?<product_ref>.*)\\_(?<attribute_ref>.*)\\_(?<lang>).jpg/",
          "abort_asset_creation_on_error": true,
          "value_mappings": {
    	  	"lang": {
      	  		"target_attribute": "locales_selector",
      	  		"mapped_attribute_ref": "locales_ref",
      	  		"mappings": {
        	  		"de": [
          	  			"de_DE"
        	  		],
        	  		"en": [
          	  			"en_US",
          	  			"en_UK"
        	  		],
        	  		"fr": [
          	  			"fr_FR"
        	  		]
      	  		}
    	  	}
  	  	  }
}
Still not comfortable with the naming convention? Don't hesitate to go through the complete API article where we detail each part of the naming convention format.
The source property
- the asset code,
- the code of the main media attribute of your family.
The split pattern
The split pattern should be a string. It should be given as a regular expression.
For the PIM to know into which asset attributes the result of the split should be sent, this regular expression should contain one or several named capture groups.
Note that the names of these capture groups should be equal to the code of existing asset attributes of the family, and these asset attributes can only be text attributes, number attributes, and single/multi-option attributes.
These asset attributes cannot be localizable or scopable.
Not comfortable with regular expressions? You can try yours right here!
Let's take an example to make this clearer!
/(?.*)_(?.*)\\.jpg/The regexp above will split the source string into two parts, thanks to two named capture groups:
- (?<product_ref>.*) is the first capture group. It is named product_ref. So, the result of this capture will be sent into the product_ref asset attribute. The product_ref attribute should exist in the asset family.
- (?<attribute_ref>.*) is the second capture group. It is named attribute_ref. So, the result of this capture will be sent to the attribute_ref asset attribute. The attribute_ref attribute should exist in the asset family. Let's say our source string is equal to Victor_packshot.png. After the naming convention application, the product_ref asset attribute will contain the value "Victor" and the attribute_ref asset attribute will contain the value "packshot".
Value mappings (optional)
The value_mappings section lets you transform values captured by your naming convention regex into one or more option codes that can be written into a single select or multi select attribute on the asset. This is useful when the filename contains a short token (e.g. en, fr, de) but the asset attribute expects a different set of option codes (e.g. en_US, en_UK, fr_FR).
For each named capture group you want to map, you define:
- target_attribute: the asset attribute that will receive the mapped option(s),
- mapped_attribute_ref: in case of you want to store the captured value from the naming convention (optional)
- mappings: a dictionary that maps the captured value to an array of option codes to set on the target attribute (array size can be 1 for single select, or more for multi select).
When value_mappings is configured, the naming convention first tries to resolve the captured value using the mapping table (mappings). If no mapping entry matches, it falls back to using the captured value directly as an option code, allowing you to support both mapped tokens and direct option codes at the same time.
Example
With this pattern:
"pattern": "/(?<product_ref>.*)\\\\_(?<attribute_ref>.*)\\\\_(?<lang>).jpg/"a filename like Victor_packshot_en.jpg will capture lang = "en". The following value_mappings configuration:
"value_mappings": {
  "lang": {
    "target_attribute": "locales_selector",
    "mapped_attribute_ref": "locales_ref",
    "mappings": {
      "de": [
      	"de_DE"
      ],
      "en": [
      	"en_US",
      	"en_UK"
      ],
      "fr": [
      	"fr_FR"
      ]
    }
  }
}
will then convert the captured lang value into option code(s) for the locales_selector attribute:
- if lang is de, locales_selector will be set to de_DE,
- if lang is en, locales_selector will be set to en_US and en_UK (typical multi select use case),
- if lang is fr, locales_selector will be set to fr_FR.
This way, your naming convention can keep using short, readable tokens in filenames while still populating the exact option codes configured in your asset family.
Abortion on error
Sometimes, the application of the naming convention will fail. For example, it is the case if the regular expression did not capture any group. In this case, you can choose if you still want the corresponding asset to be created or not. To allow this behavior, set abort_asset_creation_on_error to true. As a result, the asset won't be created and you will be able to submit it again with a better filename/code for example. If you want the asset to be created even if the naming convention application failed, set the property to false.
To sum up
When all your assets filenames have the same structure (let's say: ProductReference_ProductAttribute), you can declare a naming convention in the PIM. It would allow you to automatically populate asset attributes with those values from the filename of your assets. Then, the product link rule would use these asset attributes in order to automatically link assets to products or product models! 😉
Now that you know how the naming convention feature works, we can go on discovering the product link rule.
The product link rule
As said above, the product link rule is very useful when you can automate the link between assets and products/product models.
This rule is defined at the asset family level, and the PIM automatically launches it after the asset is created.
They can also be automatically re-executed:
- When an asset is updated, if the updated attribute is used by the rule (for example: an attribute used in product selection like locale/channel assignment or sorting).
- When a product is created, if the newly created product matches the product selection used by the rule. In that case, the PIM re-executes the PLR so the new product is taken into account.
Note that if:
- you did not define a naming convention
- you created/uploaded your assets within the user interface
Then, at the asset creation, only the code and the label will be available, while at the asset upload, only the code, the label and the media file will be available. Therefore, if your product selection is based on an asset attribute value, it will select no product. You can either add a naming convention or execute the PLR manually after filling in the desired asset attribute value.
If your product link rule happened to change afterward, you could easily execute it again thanks to the Execute rules button.
You can define the product link rules via the API or directly in the PIM user interface, by editing a JSON field. The format is exactly the same in the API and in the PIM interface.
To use the product link rules on product models, you should use identifier as value for the field key of the product selections part.
You can have up to two different product link rules for one given asset family.
The product link rule format
A product link rule is divided into two parts:
- the product_selections part,
- the assign_assets_to part.
A piece of advice: when defining two different rules on an asset family, make sure you define different product selections in each rule. Why? Because you could experience performance issues. If you want to assign your assets to two different product attributes on a given selection of products, use one single rule, with two assignments in the assign_assets_to field. See the Product value assignment section for an example.
If you are not comfortable with the naming conventions yet, the following sections will help you understand the rules and how you can make the most of it. You'll see, it's super powerful! 😃
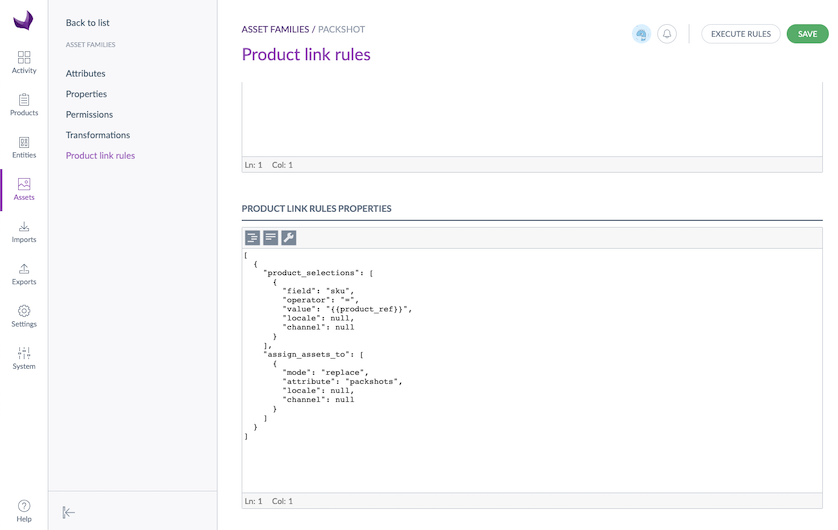
Product selections
The first part of the rule is a property called product_selections. This property will allow you to define a selection of products/product models for which you want to automatically link the assets of the asset family.
In one single product link rule, you can define one or several product selections.
The format of the product selection part is defined as follows:
{
              "product_selections": [
                {
                  "field": "enabled",
                  "operator": "=",
                  "value": true
                },
                {
                  "field": "categories",
                  "operator": "IN",
                  "value": ["men"]
                }
              ]
            }
You can use multiple conditions to make your selection. Those conditions are cumulative. For example, you can select the products that are both enabled and in the men category.
Here is the defined list of the fields you can use to select your products (other custom fields won't work):
- Among the product properties:
- The family property
- The categories property
- The enabled property
- The parent property
- Among the product attributes:
- The identifier
- Text and text area
- The simple select and multi-select attributes,
- The yes/no attribute.
Here is the complete explanation of the expected JSON format.
Product value assignment
Once you have chosen and selected the products you want to apply the rule to, it is time to think about where, in the products, you want to assign those assets.
This is done in the second part of the product link rule, in the assign_assets_to property. Thanks to this property, you will define to which product value you want to assign your assets. In other words, which product attribute, locale and channel you want to link your assets to. You can also decide whether you want to add new assets or replace the existing ones inside this product attribute.
You can target a fixed locale and/or channel using the locale and channel keys. Alternatively, you can let the PLR resolve the target locale(s) and channel(s) from the asset itself, using assign_locale_from_attribute and assign_channel_from_attribute (typically populated by a naming convention).
In that case, the PLR reads the value(s) stored in the chosen asset attribute and expects them to be valid PIM locale codes and/or channel codes (for example en_US, fr_FR, ecommerce, print).
For multi-targeting, the recommended setup is to use an asset multi select attribute (one for locales, one for channels) whose option codes are exactly the same as your PIM locale/channel codes, so the PLR can match them and create one assignment per selected locale/channel.
You can't use locale and assign_locale_from_attribute in the same Product link rule, same for channel and assign_channel_from_attribute.
The format of this part is defined as follows:
{
              "assign_assets_to": [
                {
                  "mode": "add",
                  "attribute": "user_instructions",
                  "locale": "en_US",
                  "channel": null
                }
              ]
            }
Example: assign to multiple locales and channels
The following example assigns the asset to the same product attribute for every locale and channel provided by the asset attributes:
{
              "assign_assets_to": [
                {
                  "mode": "add",
                  "attribute": "user_instructions",
                  "locale": null,
                  "channel": null,
                  "assign_locale_from_attribute" : "locales_ref",
                  "assign_channel_from" : "channels_ref"
                }
              ]
            }
Note that Product Link Rules will add optional attributes if the families of the selected products don't contain the asset collection attribute used in the assign_assets_to section.
Sort automatically assets linked to your products
It is possible to sequence product assets to automatically display in the order of your choice and gain more control over how your product stories appear across sales channels.
There are two ways to sort assets in a PLR:
- Sort by asset code : configure sorting_direction only.
- Sort by an asset attribute value : configure sorting_attribute (and optionally sorting_fallback) along with sorting_direction.
To add sorting to your PLR, you can use one of the following options:
- Ascending order: values are sorted in increasing order.
"sorting_direction": "asc"- Descending order: values are sorted in decreasing order.
"sorting_direction": "desc"- No automatic order:
"sorting_direction": nullSorting by an asset attribute (optional)
If you want to sort using a value stored on the asset (for example a “priority”, “rank”, or “order” attribute), you can set:
- "sorting_attribute": "my_sorting_attribute" (the code of an asset attribute used for sorting)
- "sorting_fallback": "code" (tie-breaker when values are equal or missing; possible values: code, updated_at, created_at)
Example:
"sorting_attribute": "sorting_order",
"sorting_direction": "asc",
"sorting_fallback": "code"
Some limitations need to be taken into account:
Some limitations need to be taken into account:
- If sorting_attribute is not specified, sorting is based on the asset code.
- If a manual sorting has been defined by users in the product asset collection, it will be overwritten when the PLRs run again.
- Once the PLR has been executed, and assets have been automatically sorted, the product edit form (PEF) UI does not provide any specific information to notify users about this automatic ordering.
Product link rule examples
With one product link rule
[
                {
                  "product_selections": [
                    {
                      "field": "sku",
                      "operator": "=",
                      "value": "{{product_ref}}",
                      "locale": null,
                      "channel": null
                    }
                  ],
                  "assign_assets_to": [
                    {
                      "mode": "replace",
                      "attribute": "user_instructions",
                      "locale": "{{locale}}",
                      "channel": null,
                      "sorting_direction": "asc"
                    }
                  ]
                }
              ]
With two product link rules
[
                {
                  "product_selections": [
                    {
                      "field": "categories",
                      "operator": "IN",
                      "value": ["men_clothes"]
                    }
                  ],
                  "assign_assets_to": [
                    {
                      "mode": "add",
                      "attribute": "ambient_image",
                      "locale": null,
                      "channel": null,
                      "sorting_direction": "asc"
                    }
                  ]
                },
                {
                  "product_selections": [
                    {
                      "field": "categories",
                      "operator": "IN",
                      "value": ["women_clothes"]
                    }
                  ],
                  "assign_assets_to": [
                    {
                      "mode": "add",
                      "attribute": "ambient_image",
                      "locale": null,
                      "channel": null,
                      "sorting_direction": "desc"
                    }
                  ]
                }
              ]