


💡 Ready to discover with a quick, interactive guided tour?
Take a guided tour of Collaboration Workflows and learn how to use this feature step-by-step.
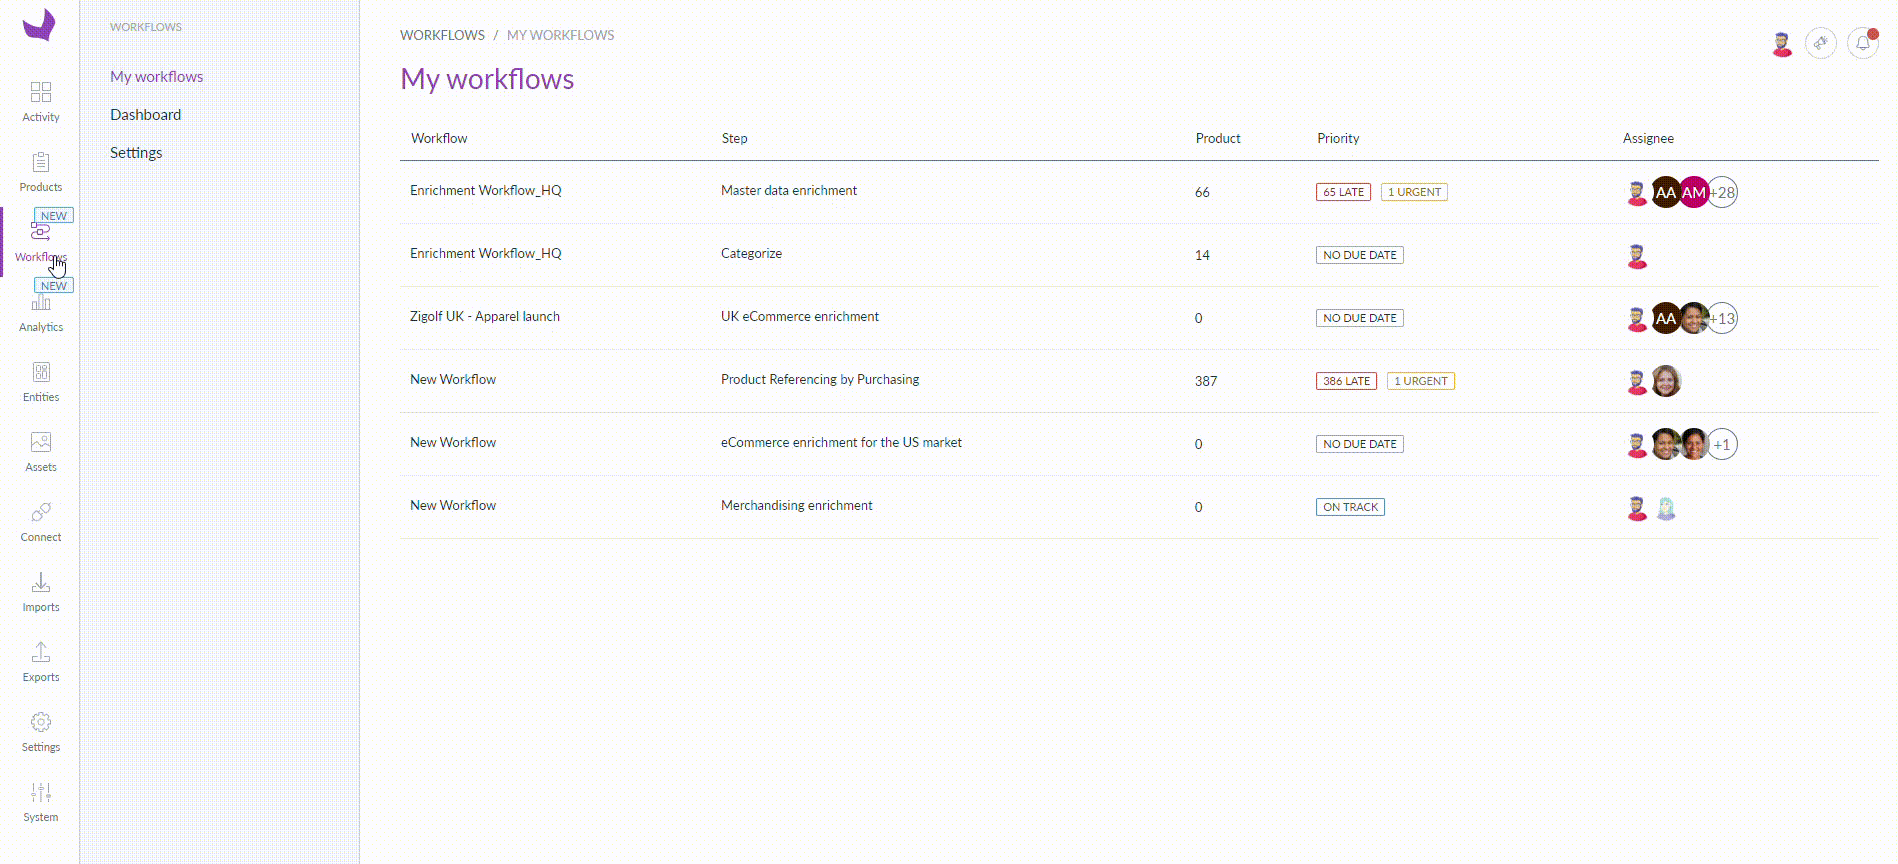
My Workflows monitoring board
The My Workflows board in Akeneo PIM enables business users to keep track of their assigned Collaboration Workflow steps and pending tasks from one place, including editing, reviewing, or validating product data. Go to Workflows > My Workflows.
To manage your assigned Collaboration Workflow steps, you need the View my workflows role permission. See Manage the interface and actions accesses > Rights on settings > Permissions on Workflows.
The board provides real-time activity indicators to organize your daily enrichment workload and prioritize the items to enrich or review. It shows the number of product tasks to complete, their priority level, and the assignment.
If the Collaboration Workflow includes enrichment steps and at least one review step, assignees can view the number of tasks rejected by the reviewer. These tasks are marked with an Action required tag, indicating they need revision.
If a task's due date is three days or less away, the step is tagged as urgent with the number of products due soon. Steps are marked as late when products have not been completed by their due date.

The My Workflows board showing assigned Collaboration Workflow steps with priority tags (Late, Urgent, On track), pending task counts per step, and assignee information.
You cannot access your task list if there are issues with your assigned Collaboration Workflow steps. Contact your PIM admin to resolve this. It may be related to a deleted or deactivated assigned user, User Group, Channel, Locale, or Attribute Group.
🎓 Want a quick and interactive walkthrough?
Learn more on Collaboration Workflows thanks to our dedicated training to better know how to use this feature.
Course time: 15 min
Master your task list
When you click on one of your assigned Collaboration Workflow steps in the My Workflows board, you are taken to the Task List in the Product Grid.

The Task List in the Product Grid showing products assigned to you in a Collaboration Workflow step, with priority tags, due dates, and Attribute progress bars.
The oldest or most urgent tasks appear at the top of the list. The Attribute progress bar shows how many Attributes are assigned to you and how many already have data. If your administrator has set an allotted time for the step, the due date shows the task's indicative deadline. An urgent tag appears if the task is due in three days or less; a late tag appears if it is past due.
The Attribute progress bar displays the total number of Attributes assigned to you compared to those already filled with data:
- "0/4" means you are assigned to enrich 4 Attributes, and none have data yet.
- "2/4" means 2 of those 4 Attributes already have data, and 2 do not.
- "4/4" means all Attributes already have values and are ready for review.
Understand your Attribute progress
The progress bar tracks your specific enrichment requirements. Use this breakdown to understand Attribute counts:
- Localizable & Scopable Attributes: The count reflects the sum of all required values across your specific assigned Locales and Channels.
- Table Attributes: Counted as a single Attribute. Marked as complete as soon as one cell is filled (unless your admin has customized column-level completeness). See Manage multidimensional data in a table.
- Price & Multi-select: A Price Attribute tracks all currencies defined for Completeness. A Multi-select Attribute is marked complete as soon as the first option is chosen.
If the Collaboration Workflow includes at least one review step, the Action Required tag at the top of the task list identifies rejected product tasks that require your attention.
Why are some tasks missing?
If you cannot see a task you expect to have, it usually comes down to Category permissions.
- Permissions: You must have "View", "Edit", or "Own" rights on the specific Category a product belongs to.
-
The "Most Permissive" rule:
- If a product belongs to multiple Categories in one or more trees, the most permissive catalog access right is applied to the product.
- If you belong to multiple User Groups, the PIM automatically grants you the highest level of access available for that product.
- If the assigned user's User Group has no permissions on the Product Category, but the default "All" User Group has Own permissions on that Category, the user automatically benefits from access to the product.
- Uncategorized products: By default, all User Groups have "Owner" rights on products that have not been assigned a Category.
See Set rights on your catalog > Rights depending on the categories > Some crucial tips to learn more.
If a task is still missing, send the product UUID to your PIM admin. They can verify whether your User Group has the correct Category access.
Another reason can be that the product has no family assigned, and therefore has no associated attributes or attribute groups. In that specific case, Akeneo PIM automatically skips creating the product task for that item because the system cannot identify the attributes to enrich. No task is generated, allowing your team to focus exclusively on products ready for data entry.
Tools available in your task list
To monitor and manage your assigned Collaboration Workflow tasks efficiently, use the following tools in the Task List:
- Sequential Edit: Select the product tasks you want to complete, then click Sequential Edit to keep your filters active and automatically move to the next task after completing each one.

The Task List with checkboxes selected on multiple products and the Sequential Edit button highlighted, enabling batch task processing.
- Filters: Use the left panel to narrow down your Task List and focus on specific tasks.

The Task List filter panel on the left side, showing filter options to narrow tasks by priority, due date, or other criteria.
- Columns: Customize your Task List view by configuring which Attributes and task details are visible.

The column selection panel for the Task List, showing available Attributes and task properties that can be added as columns.
- Bulk Actions: Select multiple products to perform collective Attribute updates or completions, change Families, or manage product Categories.

The Task List with the bulk action menu open, showing workflow-specific actions (Complete Done Tasks, Approve Tasks) alongside standard Product Grid bulk actions.
- Quick Export: Select your tasks and use the Quick Export button to export data for offline enrichment in a spreadsheet tool.

The Task List with the Quick Export button, enabling you to download selected product tasks as a spreadsheet for offline enrichment.
Process your task queue faster with Sequential Edit
To use the Done & Next task management logic in the Collaboration Workflow context:
- Select your products: Hover over the desired products and check the selection box for each. You can also select all product tasks currently in view.
- Launch the sequence: Click the Sequential Edit button.
This mode moves you seamlessly through your product list, automatically transitioning to the next item once your updates are saved and marked as complete.
Alternatively, you can handle tasks one by one. Selecting a specific product from your Task List opens its individual product page, allowing you to focus on and complete a single task by clicking Done (or Approve or Reject).
Customize your task list view
The Collaboration Workflow Task List offers the same flexible column configuration as the Product Grid.
Click the Selection icon on the right of the columns to add any Attribute or property as a column, and reorder them via drag-and-drop to prioritize key data. Use the three-dot menu on any column to pin it for horizontal scrolling or to sort tasks by specific values. You can also duplicate columns to simultaneously view and compare different scopes, such as various Channels or Locales, directly within the Task List.

The Task List with the column customization panel open, showing drag-and-drop reordering and the three-dot column menu with pin, sort, and duplicate options.
Perform bulk actions on Collaboration Workflow tasks
For more productivity, when product tasks are already completed, you can move products through the Collaboration Workflow in batches. Hover over a product, check the box next to it to select it, then choose:
- Complete Done Tasks: Move multiple products to the next step at once, once all required Attributes are filled.
- Approve Tasks: Review a sample of products and send the rest through the review step in one go. Useful for AI-generated or translated content.
- Other Bulk Actions: Edit, add, or remove Attribute values at once; assign Families or Categories; update a status or other boolean Attribute; associate products.
To use Complete Done Tasks or Approve Tasks, every assigned Attribute for the selected products must be fully populated. The system skips any products with empty assigned fields. These workflow-specific bulk actions remove the tasks from the list and send them to the next step — or complete the workflow if they are in the final step.
Processing the job can take a short moment.

The Task List bulk action confirmation dialog for Complete Done Tasks, showing the number of selected products with a confirmation prompt.
Bulk actions are governed by your user role permissions and function independently of the Collaboration Workflow settings or task assignments. Before initiating a bulk update, ensure your user profile has the necessary permissions.
Visualize Product Model tasks at a finer granularity
In Akeneo PIM, when a Collaboration Workflow task involves a Product Model, a Sub-Model, or a Variant, the Product Hierarchy View provides the granular context needed to monitor progress accurately.
To open the view, hover over the Product Model, Sub-Model, or Variant task in the Task List and click the Hierarchy icon.
This view provides:
- Global context: A complete tree showing the Parent Product Model, any Sub-Models, and all associated Variants.
- Variant Counters: The total number of Variants linked to each level.
- Variant Axes: The specific Attributes (e.g., color, size) that define each level of the hierarchy.
- Search: A search bar to find a specific entity within the view.
- Collapse/Expand: Controls to simplify your view or dive into the details.

The Product Hierarchy View in the Task List showing a Parent Product Model, its Sub-Models, and associated Variants in a tree structure with variant counters and axes.

The Product Hierarchy View in collapsed state, showing only the top-level Product Model with variant counters for each level.

The Product Hierarchy View in expanded state, showing all levels of the Product Model hierarchy including Sub-Models and their individual Variants.
The Product Hierarchy View is also available on the product page, on the right side of the Product Model navigation bar.

The product page showing the Product Hierarchy View icon in the Product Model navigation bar, providing quick access to the full hierarchy overview.
Navigate between assigned workflow steps
To navigate your Collaboration Workflow tasks, use the workflow switcher in the top left of the panel. This allows you to move between your different assigned workflow steps and manage each Task List independently. Each workflow step can have its own Task List view with saved filters and column configuration.
While you can view the full workflow sequence — including the number of pending product tasks for every step — you can only access and interact with steps specifically assigned to your user.

The workflow switcher dropdown in the top-left of the Task List panel, listing all steps in the Collaboration Workflow with pending task counts. Only steps assigned to the current user are interactive.
This number shows total assigned tasks. It may differ from the header count because it includes all product levels (products and models).
Contributor role: perform a task on the product page
When you click a product in the Task List for a Collaboration Workflow enrichment step, you open its product page with focus automatically set on the Attributes assigned to you. From there, you can complete one task and mark it as Done.
To work through multiple product tasks more efficiently, enable Sequential Edit from the Task List. This activates the Done & Next behavior: once you mark a task as done, you are automatically taken to the next product in your list, with your filters remaining active.
Use the Task details panel on the left for guidance — it shows the workflow step description, instructions, and the Attributes to verify for each Channel/Locale pair. You can change the filter from Display all my assigned attributes to any other filter if needed. Once satisfied with your content, Save the product record to see the Attribute count and progress bar update.

The product page in Collaboration Workflow contributor mode, with the Task details panel on the left showing step instructions and Attribute progress per Channel/Locale pair, and the Done button at the top.
If the assigned task involves a Product Model and/or its Variants, the Task tag identifies the level at which the task needs to be completed and makes it easier to navigate between different levels of the same Product Model.
.png)
The Task tag displayed on a product page, indicating the level (Product Model, Sub-Model, or Variant) at which the Collaboration Workflow task is assigned.
If you manage content across several Channels or Locales, the Compare & Edit feature (accessible from the three-dot menu in the product edit form) allows you to view multiple values for the same Attribute side-by-side. You can compare data, copy and paste values between contexts, and refine localized content simultaneously.
To return to your Task List, click Return to task list.
Tasks can be approved or rejected if the Collaboration Workflow includes review steps. Rejected tasks are sent back to a previous step and marked with an Action Required tag. The Attributes needing revision are flagged with an alert icon and rejection comments, helping the contributor acknowledge the requested change and revise the content before resubmitting.
If you are assigned multiple enrichment tasks at different levels of the same Product Model, the Task tags in the Variant axis navigation guide you through them. Task progress in the left workflow panel is updated by Product Model level.
Completing a task at any level of the Product Model using Done & Next individually pushes that task to the next workflow step, regardless of other pending tasks at different levels of the same product.
For a final activation step, consider assigning a specific action in the final review step on the Variants (SKUs), such as setting the product's categorization, enabling its status Attribute, or assigning a mandatory Attribute like "Go Live" or "Go to Market."
Reviewer role: approve or reject a task on the product page
When you click a product in the Task List for a Collaboration Workflow review step, you open its product page with focus automatically set on the Attributes assigned to you. From there, you can handle one task and Approve or Reject it.
To work through multiple tasks more efficiently, enable Sequential Edit from the Task List. This activates the Approve & Next or Reject & Next behavior: once you act on a task, you are automatically taken to the next product in your list.
To make a quick fix, edit the Attributes and click Approve. Ensure your User Group has the correct permissions to do so.
If you are not satisfied with the content, click Reject and add a comment explaining the reason. You must select which previous step to send the task back to. You can repeat this process as many times as needed until the product data meets your standards.
During contributor and reviewer exchanges, only the most recent comment is visible in the workflow panel. All previous Attribute value changes are saved to the product record and can be viewed in the History tab.

The product page in Collaboration Workflow review mode, showing the Reject button, comment field, and the step selection dropdown for choosing which step the task returns to.
If you are assigned multiple review tasks at different levels of the same Product Model, the Task tags in the Variant axis navigation guide you. Task progress in the left workflow panel is updated by Product Model level.
Clicking Approve on a task at any level of the Product Model moves it to the next workflow step, even if other tasks at different levels are still pending. Clicking Reject sends the task back to the chosen workflow step without affecting other ongoing tasks for the same Product Model.
For a final activation step, consider assigning a specific action in the final review step on the Variants (SKUs), such as setting the product's categorization, enabling its status Attribute, or assigning a mandatory Attribute like "Go Live" or "Go to Market."
Compare & Edit mode is unavailable while performing review tasks or revising rejected tasks marked as Action Required.
To manage your tasks efficiently:
- Use the Channel and Locale selectors in the header to review, reject, comment on, or approve tasks by context.
- Follow the guidance in the workflow left panel to navigate through each context.
Impact of permission settings on the product category
Collaboration Workflows in Akeneo PIM are designed to support collaboration and accelerate time-to-market without creating Drafts or Proposals. To ensure alignment with user permission settings on the product Category, the feature works as follows:
- Contributor roles: Contributors with Edit permissions on a product Category cannot directly input or save product values. To do so, they need Own permissions on the product Category.
- View-only restriction: Users without Own permissions can only view product data in read-only mode, similar to having View permissions on the Category. This prevents unintended modifications.
- Reviewer feedback: Reviewers without Own permissions cannot edit product data but can still add comments when rejecting a task, supporting collaboration without compromising the product record.
Workflow Log tab
On the product page, the Workflow Log tab in Akeneo PIM tracks the last 30 days of Collaboration Workflow activity for products, Product Models, and Variants. It provides a detailed timeline of events to help you monitor task progress and troubleshoot issues. Each entry shows the author or source of the event and details such as the workflow, step, and step position.
To view the Workflow Log tab, you need the Manage workflows settings or View dashboard role permission. See Manage the interface and actions accesses > Rights on settings > Permissions on Workflows or contact your PIM administrator.
The log records three categories of events:
- Workflow transitions: Products that started, completed, or re-entered a Collaboration Workflow.
- Task statuses: Tasks that were started, completed, approved, or rejected. Also records when a task is skipped because it is irrelevant — for example, when no Attribute is assigned in the step based on the step settings, typically due to Family configuration.
- Rule execution: Whether a workflow-based rule was successfully executed, generated an error, was not found, or did not apply to the current context.

The Workflow Log tab on the product page showing a chronological timeline of Collaboration Workflow events — including task status changes, workflow transitions, and rule execution results — each with author, step, and timestamp details.
For specific questions about the Collaboration Workflows feature, use the Swifty AI chat by clicking the purple rounded icon in the bottom-left corner of your screen.
You can also refer to the Collaboration Workflows: Frequently Asked Questions (FAQ).
Troubleshoot Rule errors
When a Rule cannot be applied to a product, an error message displays in the Rule execution log. Below is a summary of the possible error messages and their causes.

| Error message | Cause | What to do |
|---|---|---|
| Rule could not be applied due to a validation error. | The Rule attempted to set a value that violates a validation constraint (e.g., text exceeding the maximum allowed length, invalid format, or value out of range). | Check the detailed message for the specific validation failure. Then review the target Attribute's validation settings and adjust the Rule action or the Attribute constraints accordingly. |
| Rule could not be applied because the entity was modified in parallel. | The product was being updated by another process at the same time (e.g., multiple Rules running simultaneously on the same product, or a manual save and a Rule execution happening concurrently). | Check whether multiple Rules or imports target the same products at the same time and stagger their execution. |
| Rule could not be applied to this entity. | The Rule itself has a configuration issue (e.g., referencing an Attribute that does not exist, targeting an invalid Channel or Locale, or using an incompatible action for the Attribute type). | Review the Rule's conditions and actions. Verify that all referenced Attributes, Channels, Locales, and values are valid. Update the Rule configuration and re-run it. |
| Rule application failed unexpectedly. | An unexpected system error occurred during Rule execution. This is a catch-all for errors not covered by the other messages. | Check the detailed message for more information. If the issue persists, contact Akeneo support and include the full error message. |
The detail placeholder in error messages is replaced at runtime with specific information about the failure. Always read the full message to understand exactly what went wrong.
Workflows widget in the dashboard
The Workflows widget on the Akeneo PIM dashboard displays essential details about your assigned Collaboration Workflow steps and associated pending tasks, categorized by priority level.

The Workflows widget on the PIM dashboard showing pending task counts categorized as Late, Urgent, On track, and No due date, with a Go to workflows shortcut button.
Under Tasks to enrich, you can view the quantity of pending tasks categorized as Late, Urgent, On track, or No due date. Click Go to workflows to handle your tasks.
Under To get started, up to two workflow steps that may require immediate attention are suggested. Clicking one of these boxes takes you directly to the Task List for that step.
Receive email notifications
Weekly email notification recap
Every Monday, all Collaboration Workflow assignees receive an email summarizing their assigned pending tasks for active workflows. The weekly recap includes the total number of tasks to complete or review, along with their priority level.
.png)
The weekly Collaboration Workflows email notification showing a summary of pending tasks by priority level (Late, Urgent, On track) with a link to the My Workflows board.
Daily rejection email reminder
Each day, all Collaboration Workflow assignees with rejected tasks receive an email highlighting the actions required for ongoing workflows. The daily reminder summarizes the total number of tasks requiring revision, helping you prioritize the most critical pending items.

The daily rejection email notification for Collaboration Workflows, showing the number of tasks marked as Action Required that need revision.
To unsubscribe from email notifications:
- From the email footer, click the unsubscribe link.
- From the user interface, click your user icon in the top-right corner, go to My Account > Notifications, and set "Weekly email notification on workflow pending tasks" or "Daily e-mail notification on workflow rejected tasks" to No. If you cannot access this yourself, ask your admin to unsubscribe you.
To monitor user accounts, you need the System > Edit users role permission.
Customizing notifications with the REST API and Event Platform
For advanced, real-time notification options, teams can use the Akeneo PIM REST API and Event Platform to create fully tailored notification workflows. Contact your PIM administrator for support with this integration.
Workflows Dashboard overview
The Workflows Dashboard in Akeneo PIM enables PIM owners, team leaders, and managers to monitor all active Collaboration Workflows from one centralized location. Go to Workflows > Dashboard.
To access the Workflows Dashboard, you need the View dashboard role permission. See Manage the interface and actions accesses > Rights on settings > Permissions on Workflows.
The Dashboard provides real-time insights on all active Collaboration Workflows, including which workflows business users are engaged in, the number of pending product tasks, late or urgent alerts, and individual assignees. These indicators help quickly identify slowdowns or bottlenecks in the product data enrichment process.
Click any workflow to access additional details that help identify excessive workload, support informed decisions to accelerate time-to-market, and continuously improve the efficiency of your Collaboration Workflows.
The Workflows Dashboard showing all active Collaboration Workflows with step-by-step task counts, Late and Urgent alerts, and assignee details. Clicking a workflow opens a detailed breakdown view.
You can filter by any assigned user to focus on their specific scope and highlight their corresponding assigned steps.
For specific questions about the Collaboration Workflows feature, use the Swifty AI chat by clicking the purple rounded icon in the bottom-left corner of your screen.
You can also refer to the Collaboration Workflows: Frequently Asked Questions (FAQ).