
How to create multiple organizations and storefront sites?
Since the version v19.7.0 of the Akeneo Connector for SFCC, you can manage multiple organizations and storefront sites in SFCC.
To illustrate the configuration of a model containing several organizations and several sites, we will use the example of having:
- 2 Business Units: Electronics and Apparel
- 5 Storefront Web-sites: Instruments, Software, Gents, Women, Kids
With the following distribution:
-
Electronics
- Instruments
- Software
-
Apparel
- Gents
- Women
- Kids
On the Akeneo PIM side
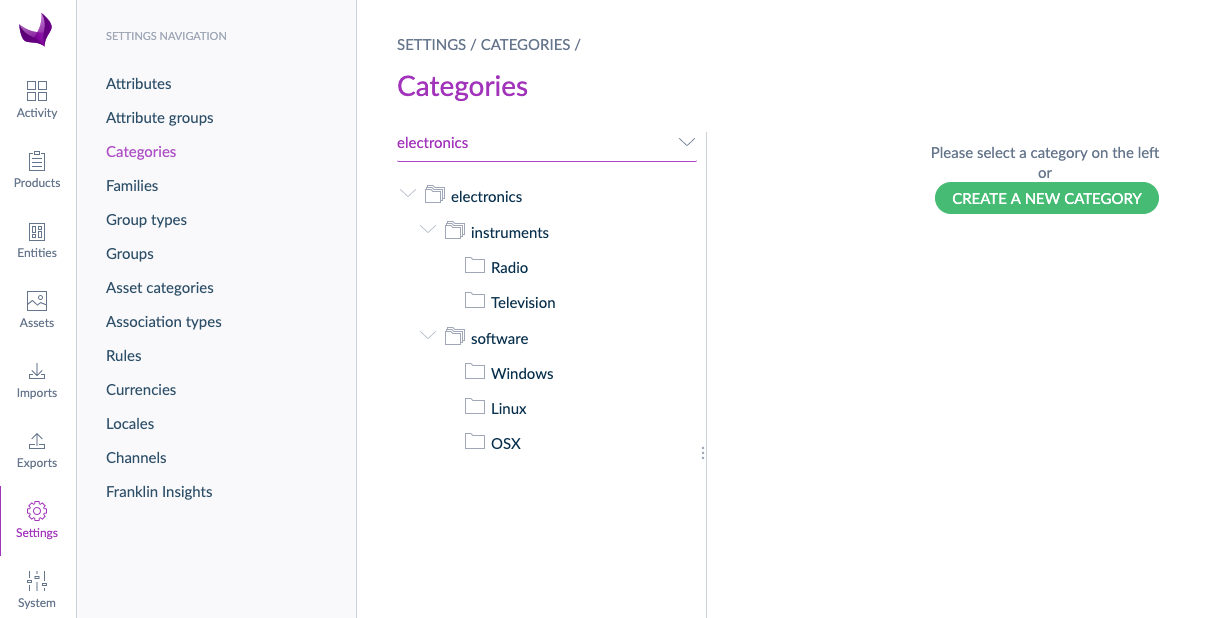
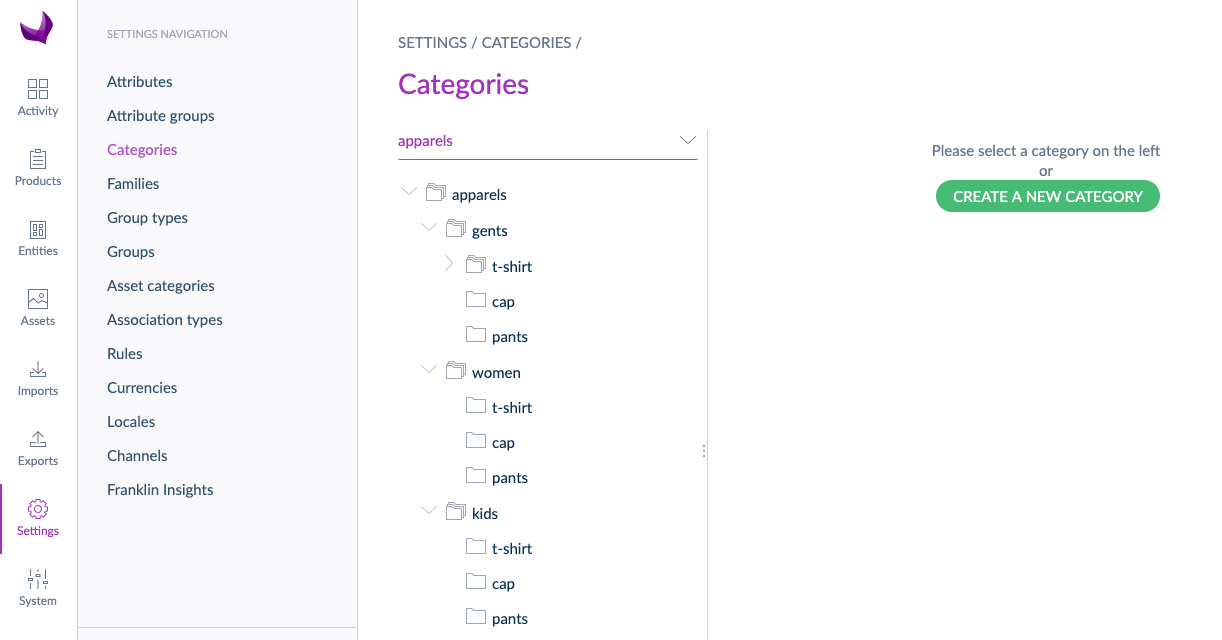
To define the notion of organizations and storefront sites in the PIM, you will implement two new category tree structures (one for each Business Unit).
Please read our documentation to create the following categories and sub-categories.
- Create two new main category trees for each Business Unit (Business Unit level):
- Electronics (ID code: electronics)
- Apparel (ID code: apparel)
- Under the Electronic category create the following sub-categories (Web site level):
- Instruments (ID code: instruments)
- Software (ID code: software)
- Under the Apparel category, create the following sub-categories (Web site level):
- Gents (ID code: gents)
- Women (ID code: women)
- Kids (ID code: kids)
- Under each sub-category create a sub-category tree for each site based on your needs. (Web site categories level)
- Then, attach your products to the sub-categories created in step 4.
At the end, you'll have something like this in your PIM:
On the SFCC side
- Create each Web-site:
Go to: Administration > Sites: Manage Sites
- Instruments
- Software
- Gents
- Women
- Kids
Note: if you use a 21.0.0 version or higher of the cartridge, use bm_akeneo as a cartridge name instead of bc_akeneo.
As explained in our integration document (In Documentation Cartridge directory), make sure you properly associate the bc_akeneo cartridge in each site (Administration > Sites > Manage Sites, then select the site and go to Settings and add bm_akeneo in the Cartridges field).
- Create all master and storefront catalogs
Go to: Merchant Tools > Products and Catalogs: Catalogs
First, create two master catalogs for each Business Unit:
- electronics-master
- apparels-master
Then create five storefront catalogs for each Web-site:
- storefront-instruments
- storefront-software
- storefront-gents
- storefront-women
- storefront-kids
Don't forget to configure the site assignment of these storefront catalogs to assign each storefront catalog to the corresponding Web site.
- Configure the cartridge for each Web site.
Select a Website then go to: Merchant Tools > Site preferences: Custom preferences
You need to build one specific cartridge configuration for each storefront site.
You can use the Edit Across Site link (on the right side of each cartridge parameter) to help you copy/paste certain settings from one site to another 😉
Pay particular attention to these three parameters for each site:
-
Akeneo Main Catalogs: you need to fill in this parameter with the PIM main category tree ID code.
(In our example: electronics for Instruments and Software Website configuration and apparels for Gents, Women and Kids Website configuration) -
SFCC Master Catalog ID: you need to fill in this parameter with the SFCC master catalog ID.
(In our example: electronics-master for Instruments and Software Website configuration and apparels-master for Gents, Women and Kids Website configuration) -
Top Level Category for Storefront Catalog: you need to fill in this parameter with the PIM category ID code of your website.
(In our example: instruments for Instruments Website configuration, software for Software Website configuration, gents for Gents Website configuration, etc...)
- Configure the cartridge jobs scope
Go to: Administration > Operations: jobs
1-Akeneo-Import-Attributes job
Click on 1-Akeneo-Import-Attributes job then go to the Job Steps tab.
Configure the Scope of job-workflow-step-attributes and job-workflow-step-prepare-attributes-import with only one of your Storefronts:
Scope:
- Gents
Keep job-workflow-step-attributes-import on Organization Scope.
No need to configure all five storefronts because the attribute information will only be used for the master catalogs.
2-Akeneo-Import-Media-Assets-Pricebook job
Click on the 2-Akeneo-Import-Media-Assets-Pricebook job then go to the Job Steps tab.
Configure the job Scope with two Storefronts, one for each business unit:
Scope:
- Instruments
- Gents
3-1.1-Akeneo-Differential-Import-Master job
Click on the 3-1.1-Akeneo-Differential-Import-Master job, then go to the Job Steps tab.
Configure the job Scope with two storefronts, one for each business unit:
Scope:
- Instruments
- Gents
3-1.2-Akeneo-Differential-Import-Storefront job
Click on 3-1.2-Akeneo-Differential-Import-Storefront job, then go to the Job Steps tab.
Configure this job Scope with all storefronts.
Scope:
- Instruments
- Software
- Gents
- Women
- Kids
3-2.1-Akeneo-Full-Import-Master job
Click on 3-2.1-Akeneo-Full-Import-Master job, then go to the Job Steps tab.
Configure the job Scope with two storefronts, one for each business unit:
Scope:
- Instruments
- Gents
3-2.2-Akeneo-Full-Import-Storefront job
Click on 3-2.2-Akeneo-Full-Import-Storefront job then go to the Job Steps tab.
Configure this job Scope with all storefronts.
Scope:
- Instruments
- Software
- Gents
- Women
- Kids
Congratulations, your connector is now configured for your multiple organizations and storefronts ! 😄